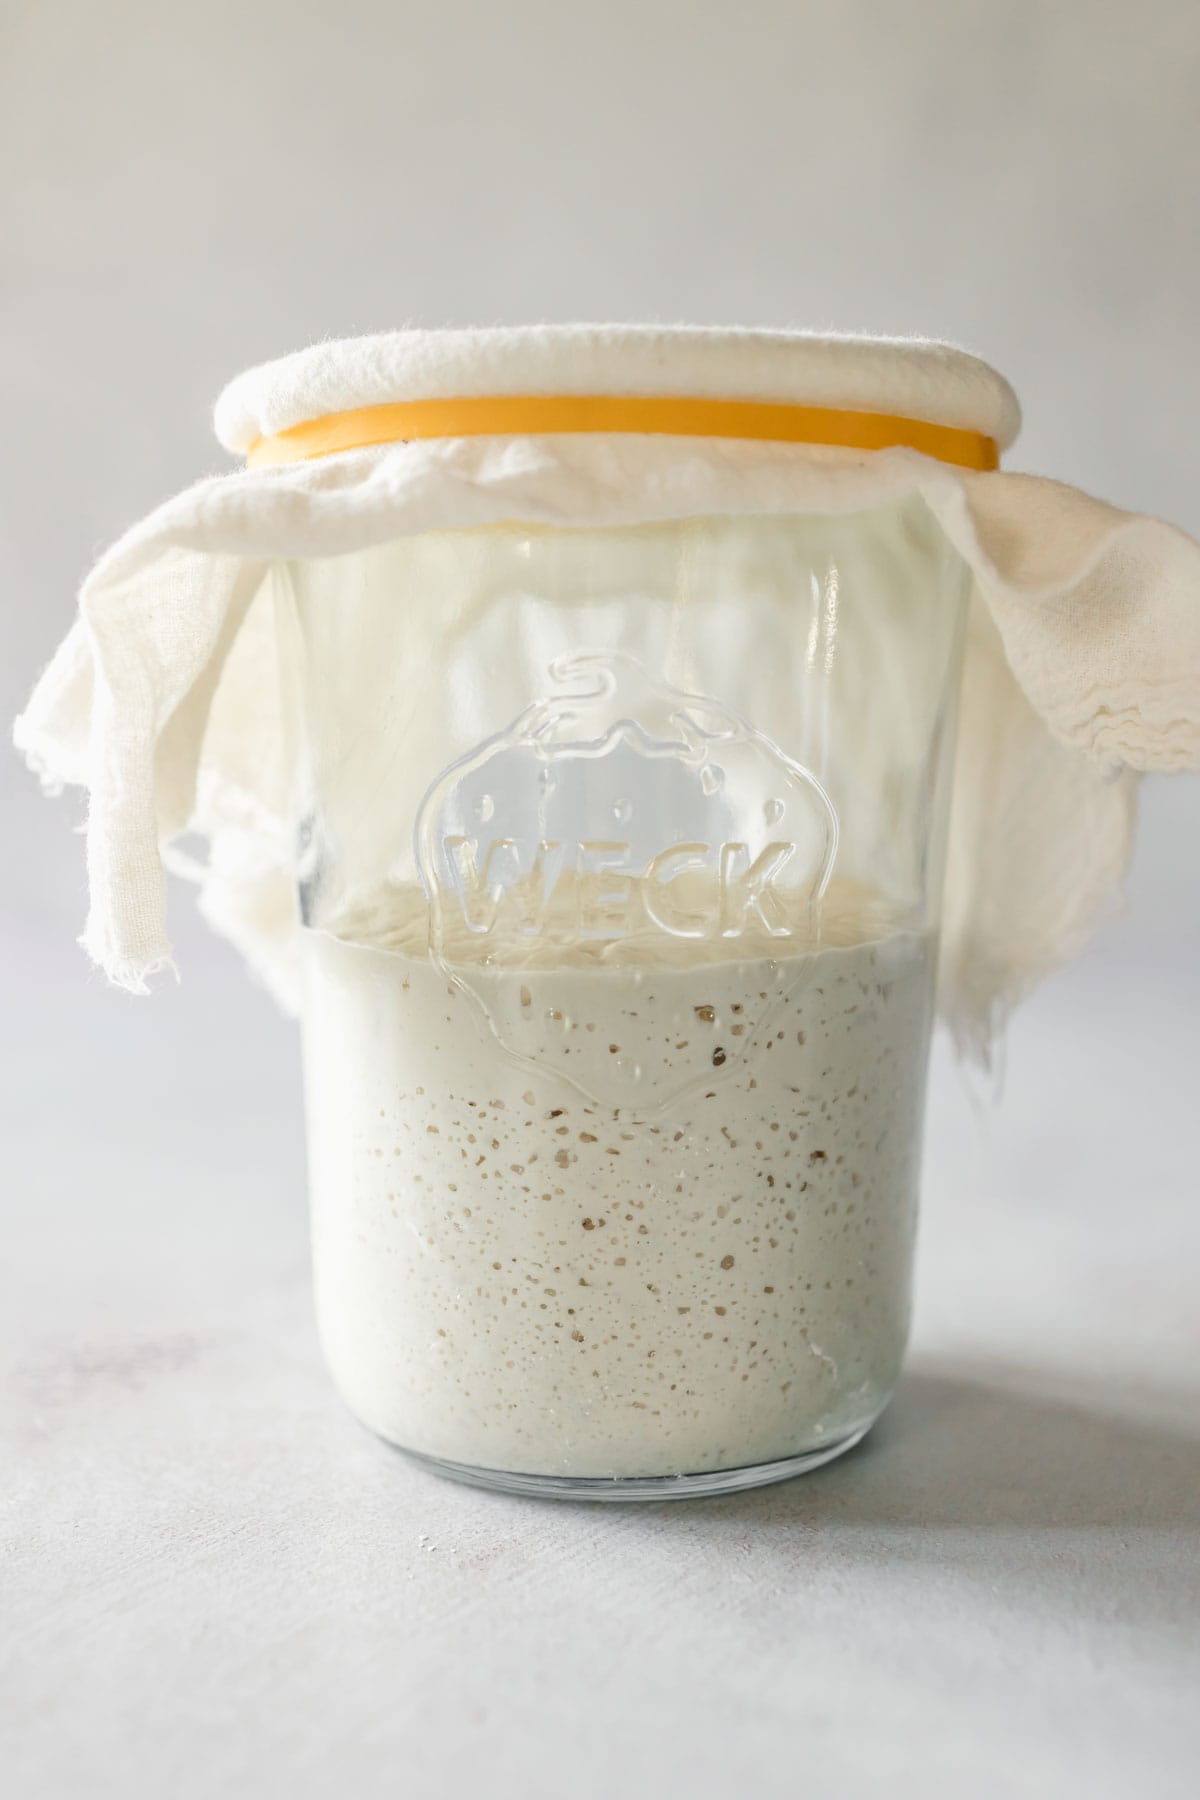
Learn how to make a gluten-free sourdough starter from scratch in just seven days! This guide has everything you need to know about creating a gluten-free sourdough starter, explained in simple, easy to understand terms.
💌 Want to Save This?
Unsubsribe at any time.
Jump to:
- Ingredients and Tools
- How to Create a Gluten-Free Starter in Seven Days
- How to Maintain Your Gluten-Free Starter
- How to Feed a Gluten-Free Sourdough Starter
- Feeding Ratios for Gluten-Free Starter
- Sourdough Discard
- Gluten-Free Sourdough Discard Recipes
- Sourdough Peak
- Sourdough Starter FAQs
- Top Sourdough Starter Tips
- More Gluten-Free Bread Recipes
- Join My Newsletter!
- Recipe
- Comments and Ratings
Creating your own gluten-free sourdough starter from scratch may seem intimidating at first, but it's actually quite simple. It's as easy as mixing together flour and water and letting it sit in a warm place to ferment.
The fermentation process works its magic, pulling wild yeast and beneficial bacteria into the mixture. Before you know it, you have an active gluten-free starter to use in gluten-free sourdough recipes, like my gluten-free sourdough bread recipe and my gluten-free sourdough sandwich bread recipe!
That said, baking bread with gluten-free sourdough is much different from traditional bread baking with commercial yeast. It involves learning a whole new approach, from creating and maintaining a gluten-free starter to understanding its intricacies in the baking process.
For that reason, I tried to cover as much as possible about gluten-free sourdough starter in this post; from how to make a starter down to the nitty gritty science behind it, basically every question I had when learning about this myself!
If you have any further questions, feel free to drop them in the comments, and I'll be happy to provide answers and support.
Ingredients and Tools
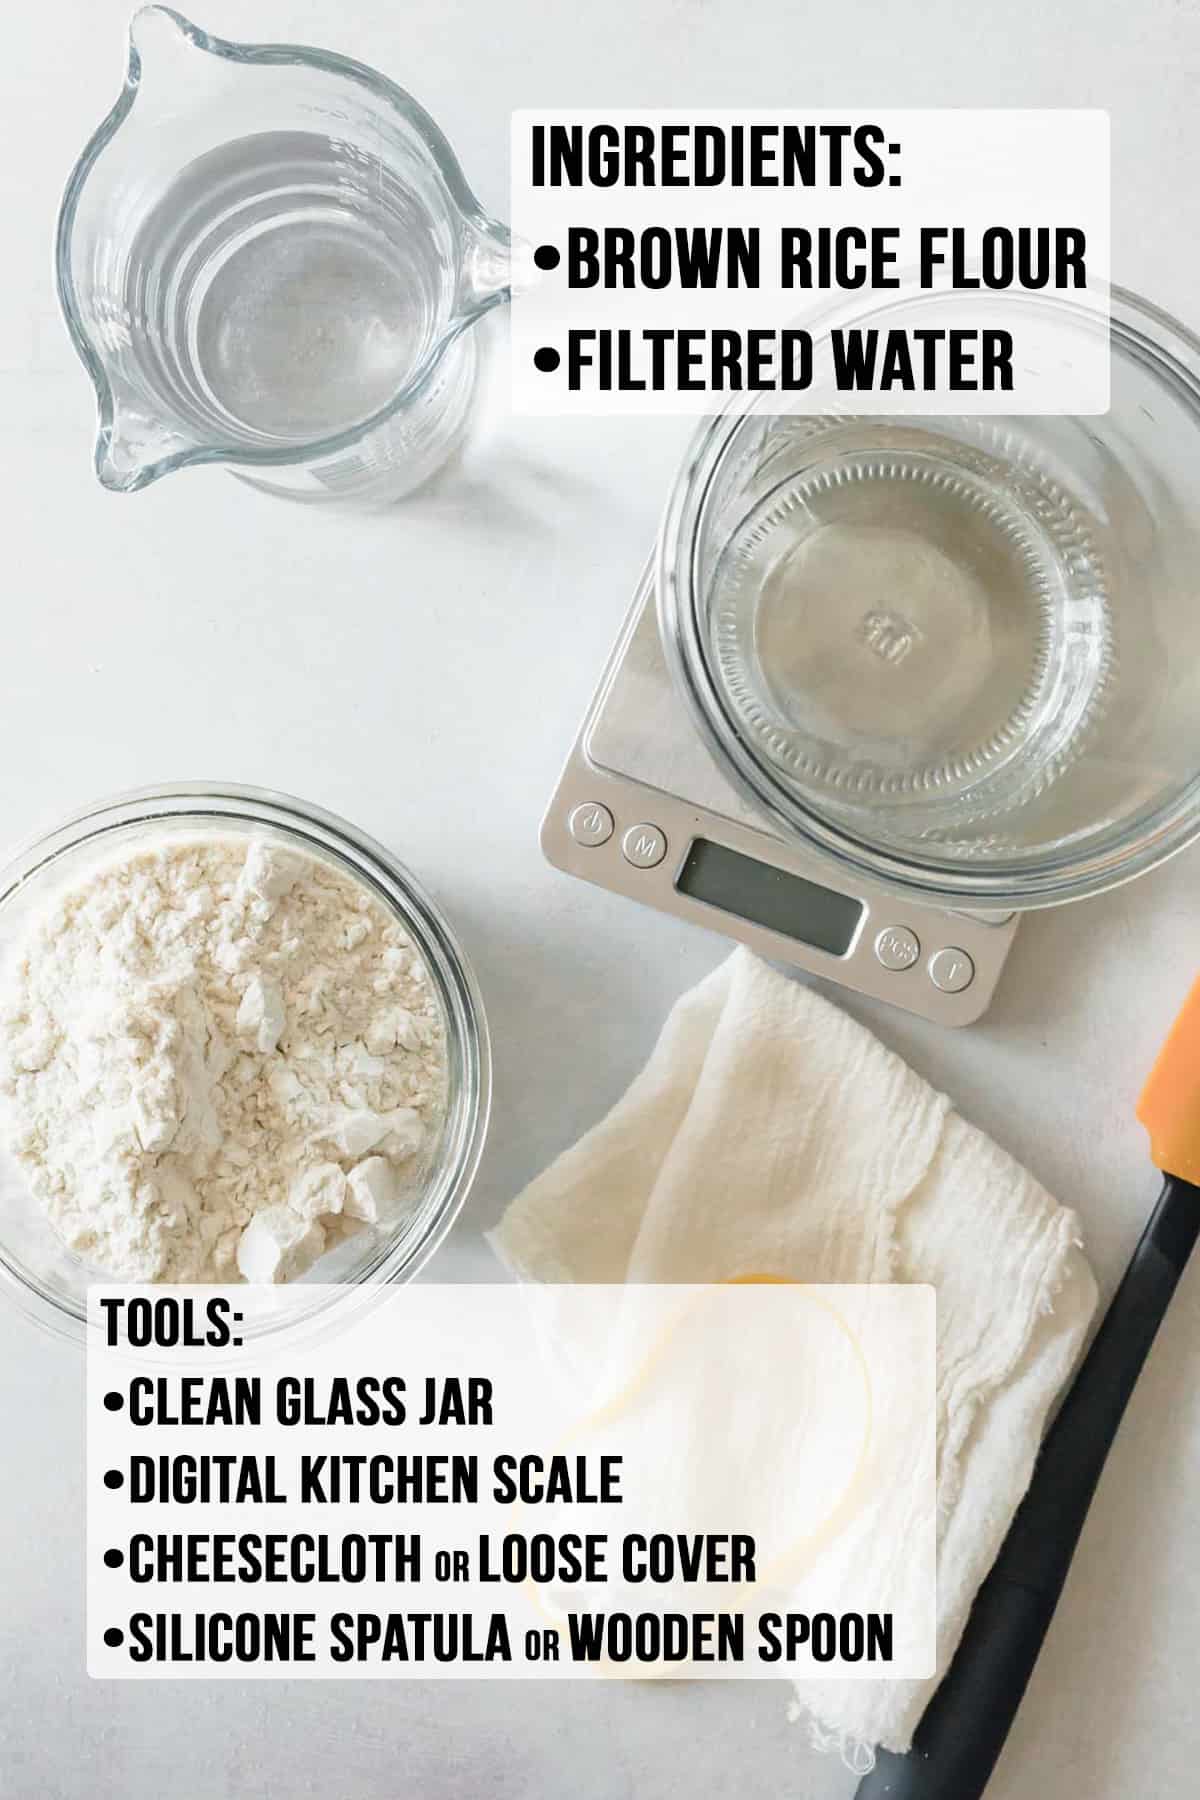
To start your gluten-free sourdough journey, you'll only need a few ingredients and some basic tools.
Ingredients
- Brown rice flour: I have had the most success with superfine brown rice flour or sorghum flour when creating my gluten-free sourdough starters. You can use another whole grain gluten-free flour as well, like buckwheat flour or teff flour. White rice flour may work, but it is not whole grain and I have not tried to create a starter with it.
Some people have reported success using a measure-for-measure flour. You can try with that if you prefer, but all the extra starches and gums simply aren't necessary for the starter to work properly. - Filtered water: It's best to use filtered water for sourdough starter. Tap water can contain chlorine, which will inhibit the growth of good bacteria. Tap water may also have other impurities that can negatively affect the success of your starter.
Tools
- Clean glass jar: like a mason jar or weck jar. A small pyrex dish would also work.
- Loose fitting lid or cheesecloth and a rubber band
- Digital kitchen scale: You can get away with using cups/tablespoons, but I personally find it easier to use a scale.
- Silicone spatula or small wooden spoon
How to Create a Gluten-Free Starter in Seven Days
Day 1:
- Weigh your empty jar and label the jar with the weight. (This comes in handy later if you want to measure your starter without fully emptying the jar.)
- Add 50 grams of brown rice flour and 50 grams of filtered water to the jar.
- Stir until well combined.
- Set aside in a warm spot for 24 hours.
Day 2:
- Add 50 grams of brown rice flour and 50 grams of filtered water to the jar.
- Stir well and set aside another 24 hours.
Day 3: At this point you may be seeing bubbles in the jar. It may also have a distinct smell of acetone or another unpleasant aroma. This is normal. Keep going.
- Remove 50 grams of the starter (about half) from the jar and throw it away.
- Do not save your discard until your starter is well established, after day 7.
- Add 50 grams of brown rice flour and 50 grams of filtered water to the jar.
- Stir well and set aside another 24 hours.
Days 4, 5, 6, and 7: At this point the starter should be getting very bubbly and starting to rise up in the jar. You should start to notice a pleasant yeasty aroma.
- If your starter is bubbly and almost doubling in size in the jar, start feeding 2 times per day.
- Feed every 12 hours with a 1:1:1 ratio:
- 50 grams starter + 50 grams brown rice flour + 50 grams filtered water.
Day 8 and on: If you have had at least 3 days of strong bubbles and the starter has a pleasant, yeasty aroma – the starter is ready to use.
- Feed daily for one more week to strengthen your starter.
- Switch to maintenance feedings and feel free to use in your baking.
- After that, you can store in the refrigerator if you don't plan to bake or feed as often.
How to Maintain Your Gluten-Free Starter
Once your starter is established, you'll need to keep feeding the starter on a regular basis to keep the yeast active and healthy.
To maintain a starter you will feed it regularly depending on how it is stored:
- Room Temperature: Feed at least 1x per day. Keep at room temperature if you plan to bake regularly, almost daily.
- Refrigerated: Feed at least 1x per week. Keep refrigerated if you plan to bake less often, about once per week or so. This will produce less waste/discard.
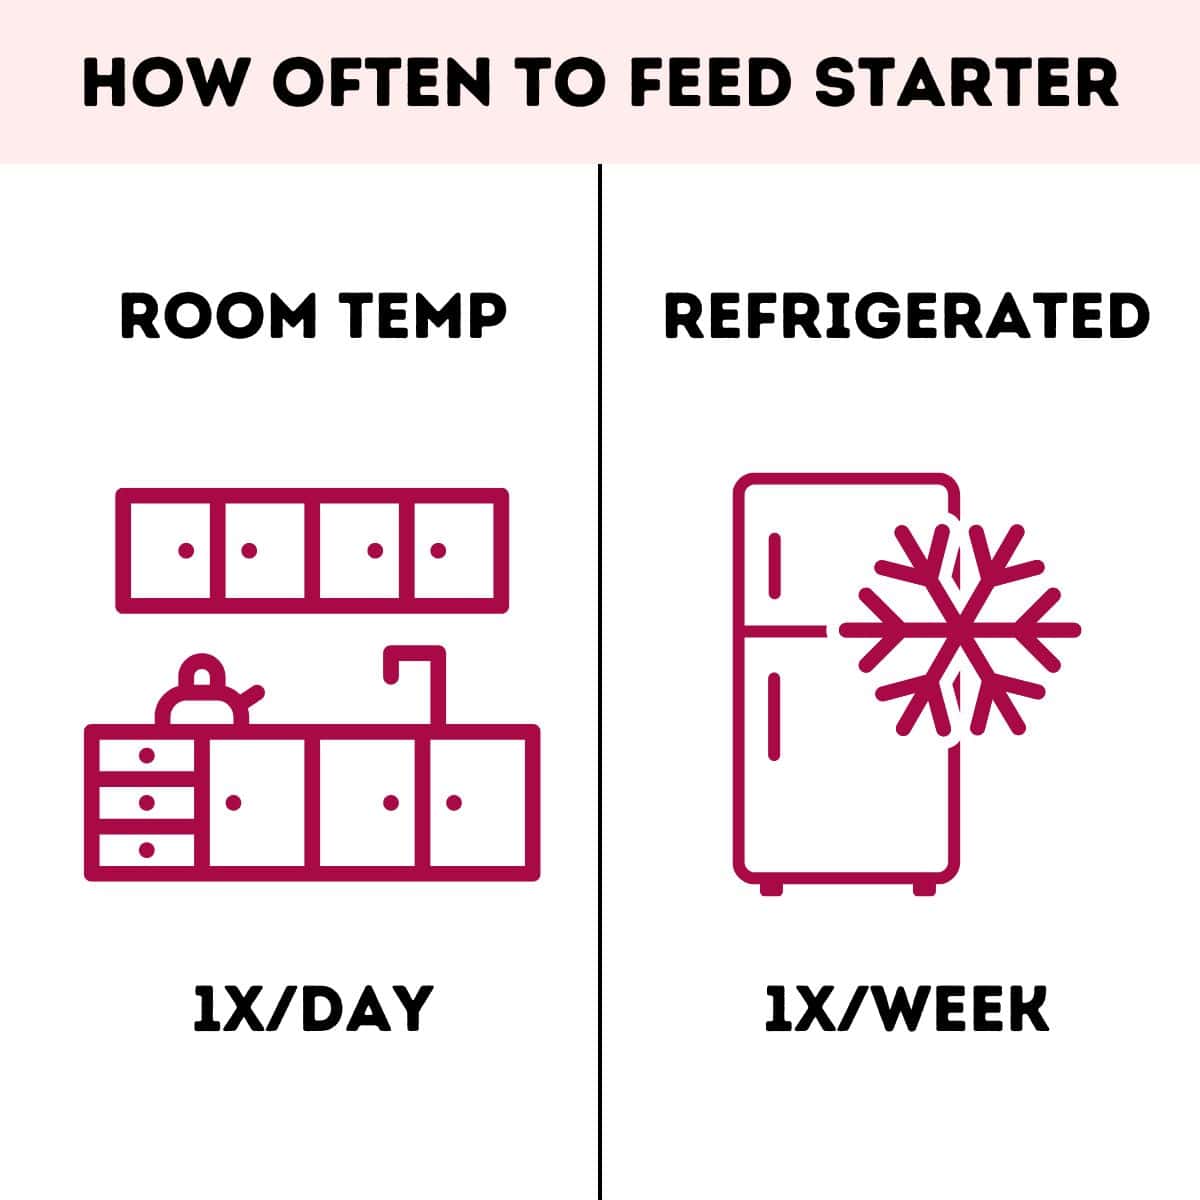
How much to feed your starter depends on your usage, learn about feeding ratios below!
How to Feed a Gluten-Free Sourdough Starter
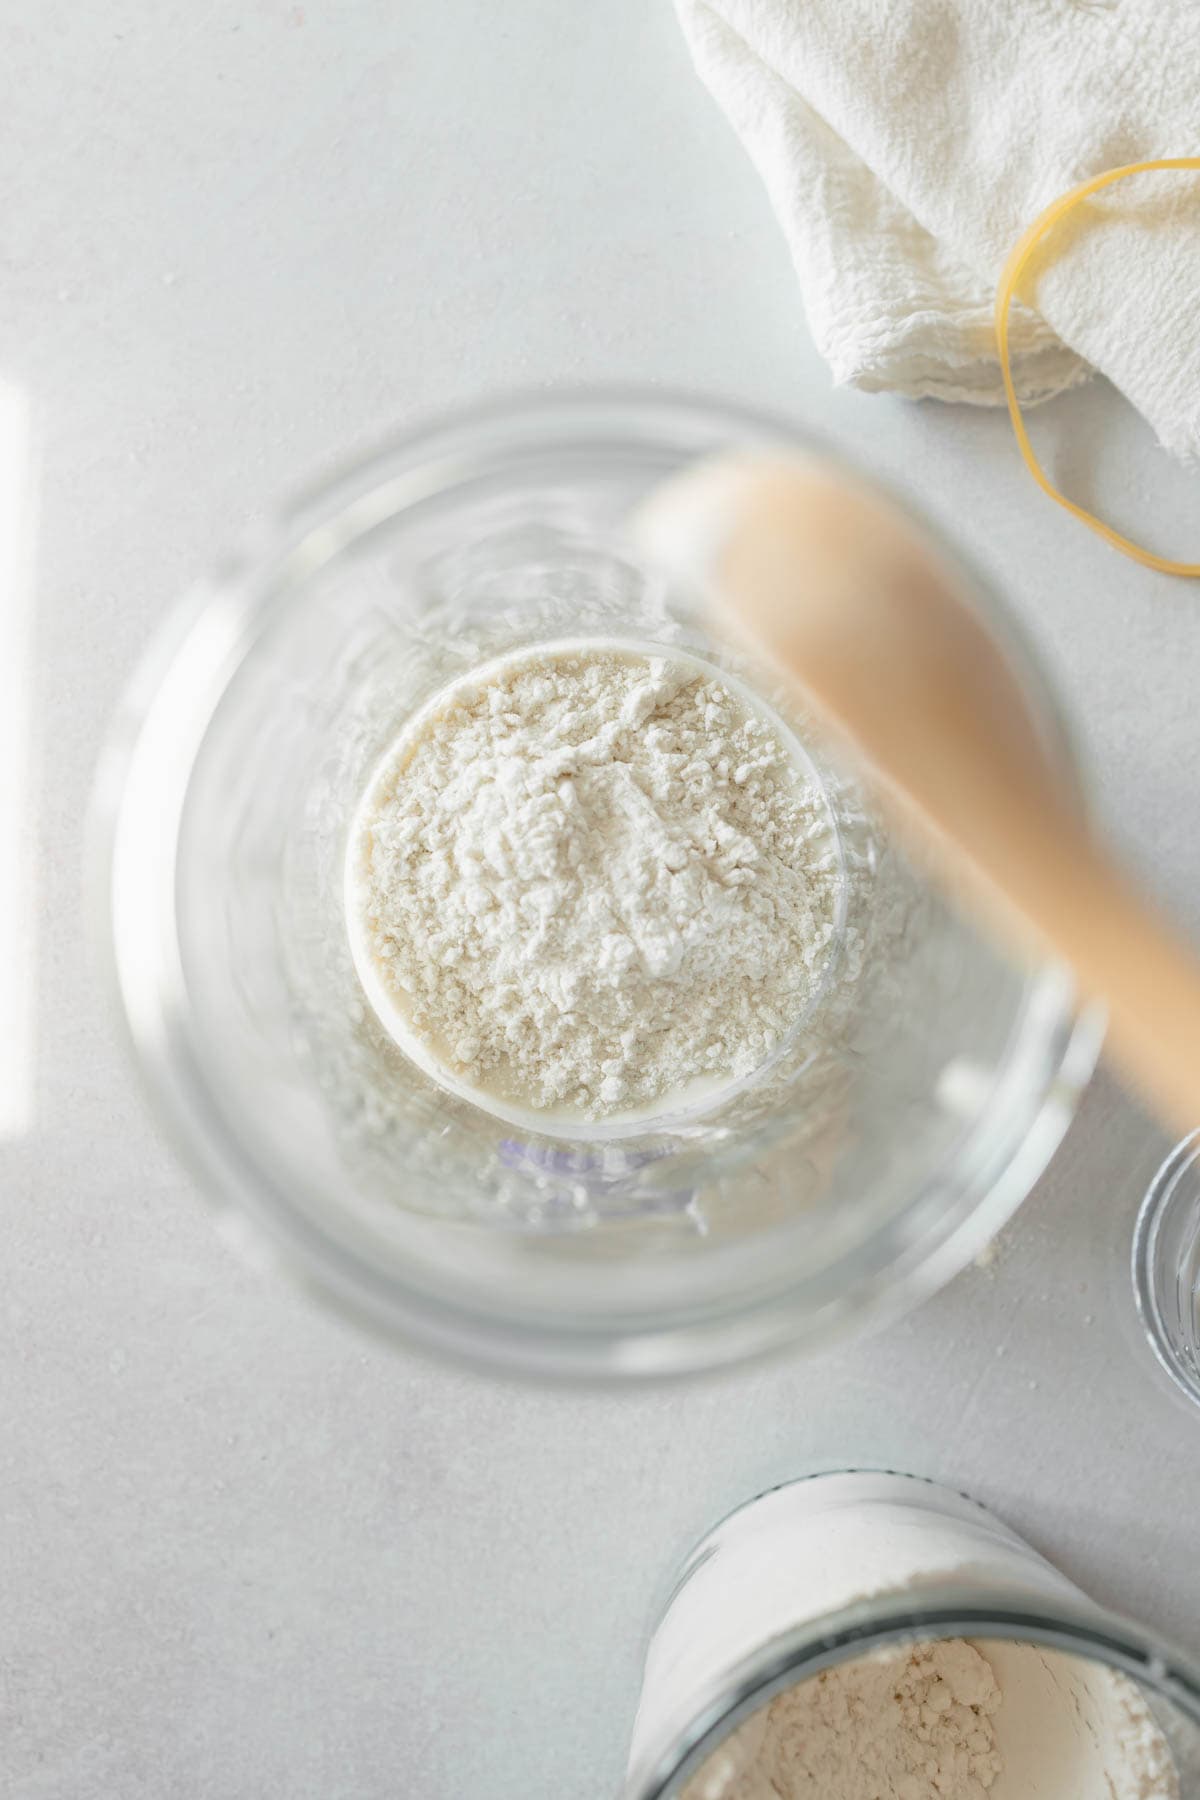
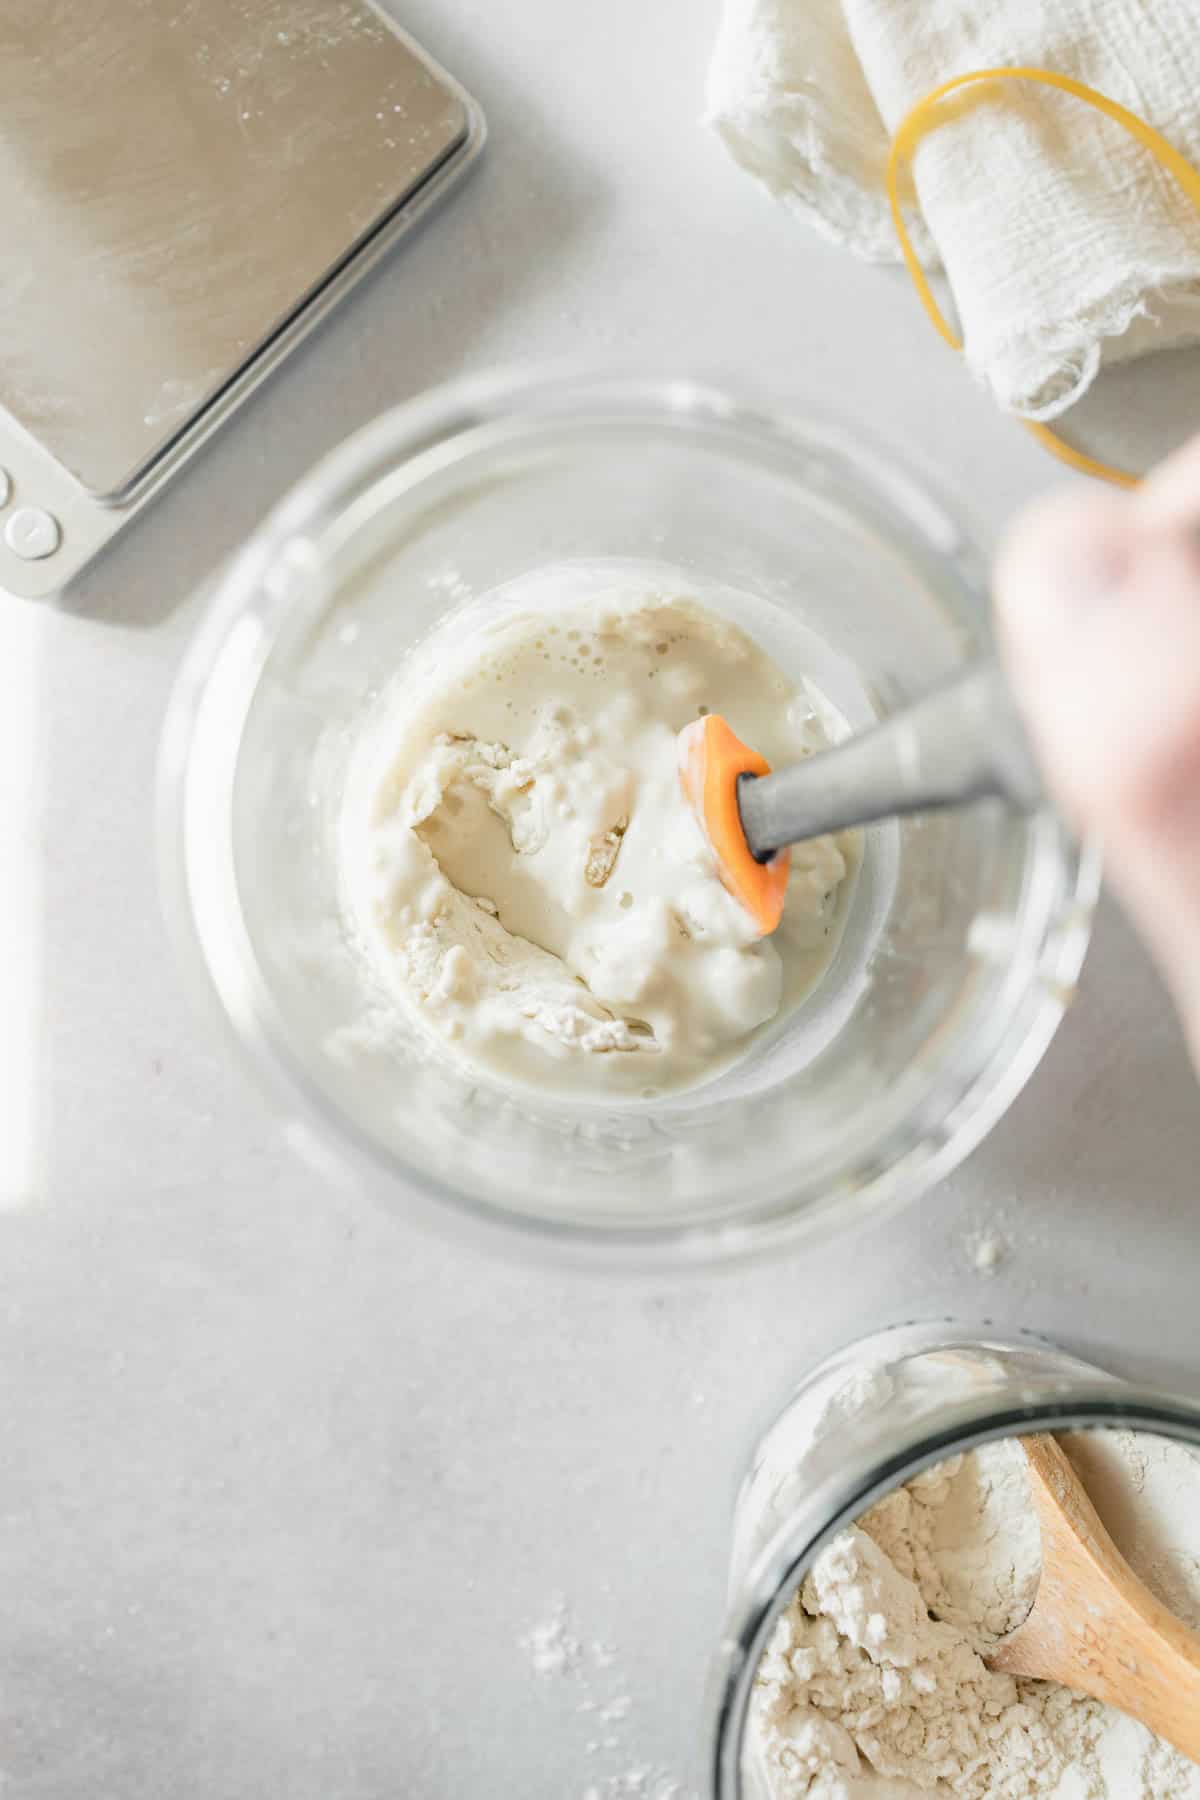
Feeding a gluten-free sourdough starter is as simple as choosing your feeding ratio, making the simple calculation to determine the amounts of starter, flour, and water needed, then mixing them together.
- Choose your feeding ratio. This can be 1:1:1, 1:3:3, or 1:10:10, etc.
- Discard the starter down to the proper amount for your desired feeding ratio.
- Add brown rice flour according to your desired ratio.
- Add water according to the ratio.
- Stir and set aside in a warm spot until the starter peaks before using in recipes or feeding again.
Feeding Ratios for Gluten-Free Starter
A ratio is simply the relationship between the ingredients in a mixture. In our case, the relationship between starter, flour, and water.
There are several standard ratios used in sourdough baking:
1:1:1 ratio: This ratio is equal parts starter, flour, and water by weight.
- Example: 50 grams starter + 50 grams flour + 50 grams water = 150 grams total.
- This ratio will peak the fastest, within 3-5 hours.
- It is the smallest amount you should be feeding your starter.
- This is the most commonly recommended ratio.
1:3:3 ratio: The amount of starter multiplied by 3.
- Example: 20 grams starter + 60 grams flour + 60 grams water = 140 grams total.
- Peaks 6-7 hours after feeding.
1:10:10 ratio: The amount of starter multiplied by 10.
- Example: 5 grams starter + 50 grams flour + 50 grams water = 105 grams total.
- This is arguably the best ratio to use for maintenance feedings.
- Peaks 10-12 hours after feeding.
- Keeps acidity low and yeast strong.
- Easy to scale up to meet larger quantity needs.
- Allows you to keep a smaller amount of starter on hand. This can mean less to discard, less to maintain, and less waste.
Which Feeding Ratio Should I Choose?
The ratio you choose can depend on several factors:
How quickly or slowly do you want the starter to peak?
The more food you give the yeast, the longer it will take for the yeast to consume it all and peak. You can use this to your advantage when it comes to timing your sourdough baking.
- If you want the starter to peak quickly, choose a 1:1:1 ratio.
- If you want it to peak slowly, choose a higher ratio such as 1:5:5 or 1:10:10.
How much starter do you need?
You can use ratios to create the exact amount of starter you need. For example, if you need 100 grams of starter you can achieve this in several ways using simple math and ratios:
- 1:1:1 ratio: Feed 50 grams starter with 50 grams flour and 50 grams water. You will have 150 grams total. Use 100 grams in your recipe, leaving 50 grams leftover to maintain and feed for next time.
- 1:10:10 ratio: Feed 5 grams starter with 50 grams flour and 50 grams water. You will have 105 grams total. Use 100 grams in your recipe, leaving 5 grams leftover to maintain and feed for next time.
How acidic is your starter?
If you're noticing your starter is weak and your yeast isn't as strong as you'd like, your mixture may be too acidic. You can use feeding ratios to alter the pH in your starter.
- A larger ratio of 1:10:10 will decrease acidity.
- Feeding right at peak can also decrease acidity, as starter gets more acidic the longer past peak that it goes. (More on how acidity affects sourdough starter below!)
A Note On Feeding Ratios
Use ratios as a guide but don't get so hung up on everything being perfectly measured. This is a very forgiving process.
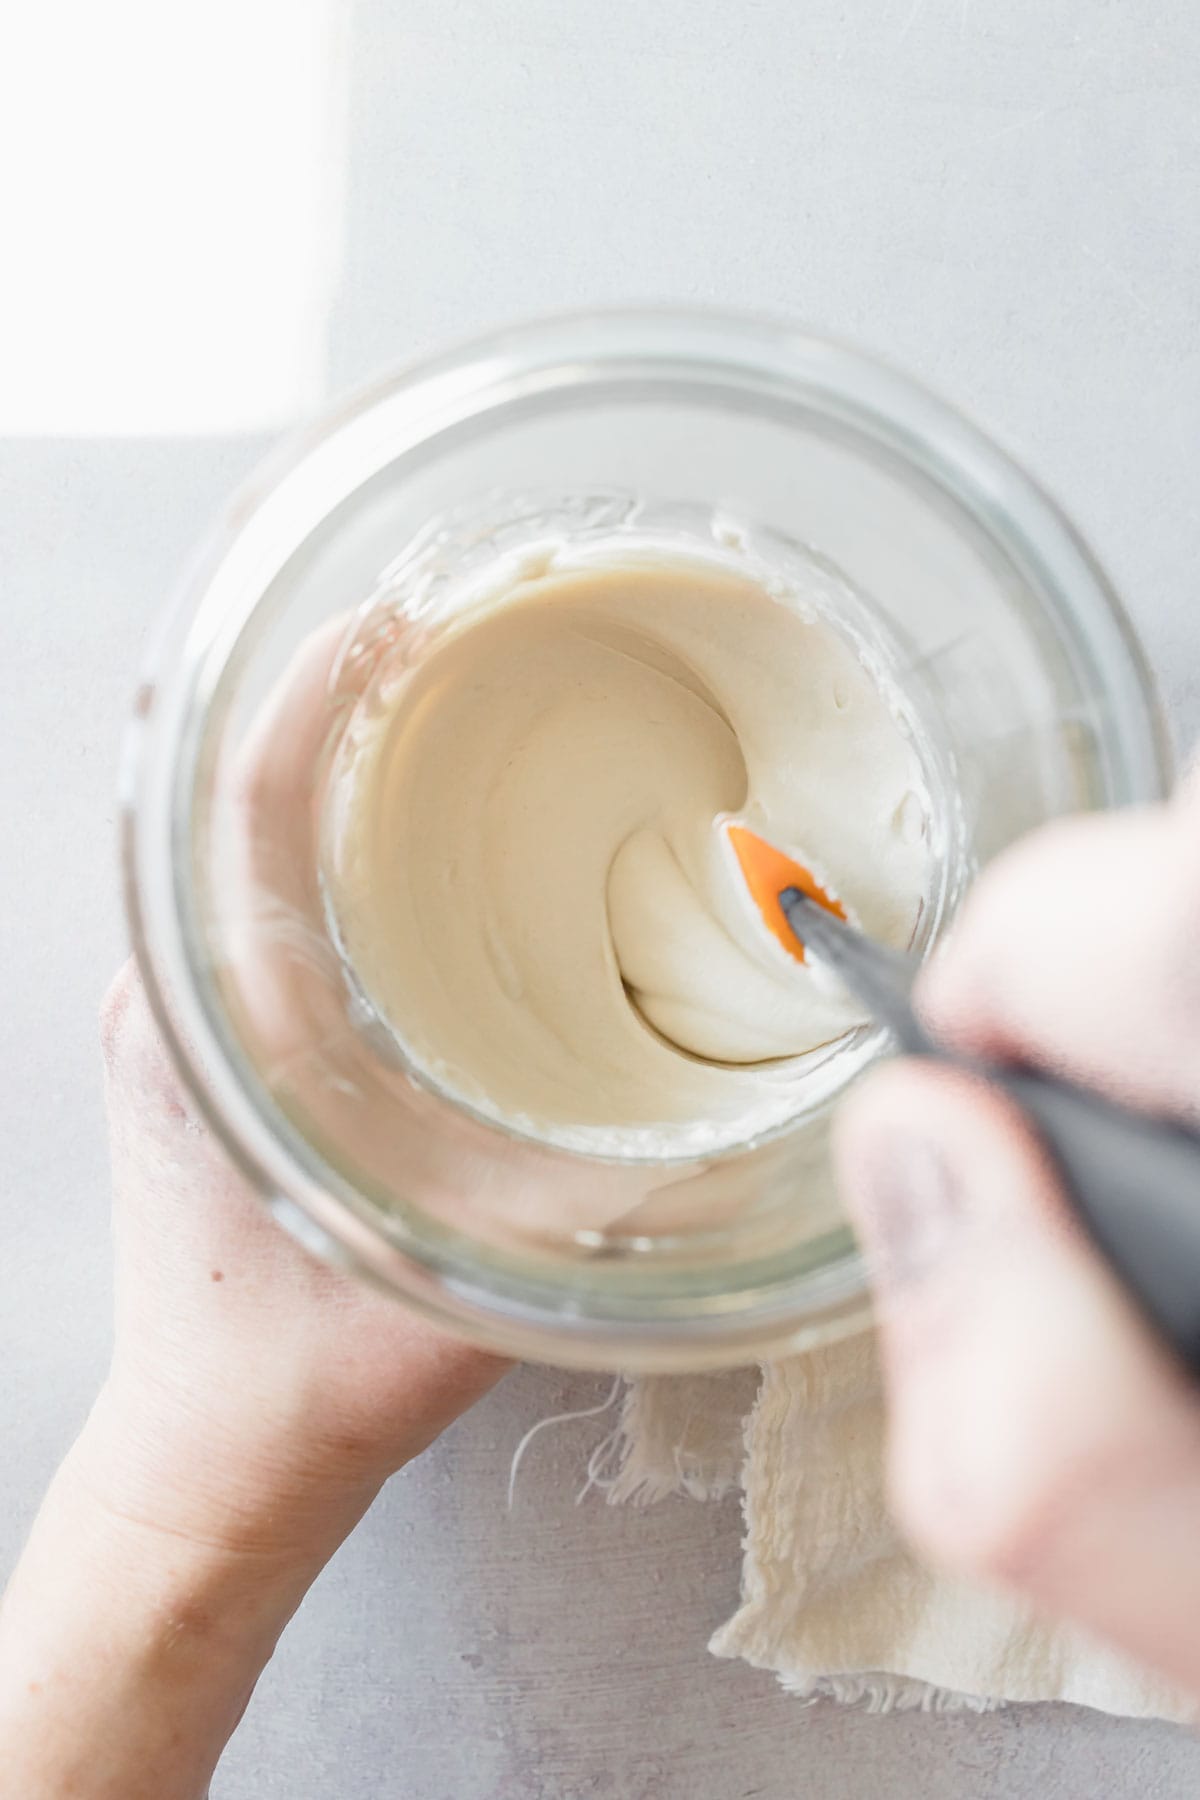
The consistency of your starter is arguably more important, especially with gluten-free starters. If your mixture is too thick or too thin, it will be hard to notice any activity happening.
Your mixture should be the consistency of pancake batter. It's ok to add a splash of water or a little more flour to achieve this consistency.
Sourdough Discard
Let's talk about sourdough discard. This is quite possibly the most confusing aspect to learning sourdough. Once you wrap your mind around the concept, it is much less confusing. Let's break it down!
What is sourdough discard?
- Sourdough discard is simply unfed, unused starter.
- It is the portion of sourdough starter that you remove from the jar before feeding.
- Discard is the same as starter, except that it has not been fed so it is not active.
Why do you discard starter?
Discarding starter helps keep the quantity you need to maintain manageable.
While it's possible to feed all of your starter daily, doing so would lead to a rapid increase in starter volume over time. See this example:
- If you start with 50 grams of starter and feed it 1:1:1, the lowest ratio possible ratio, you will feed it with 50 grams of flour and 50 grams of water. You will then have 150 grams of starter.
- The next day you will need to feed the starter a 1:1:1 ratio again. Since you now have 150 grams of starter, you will need to feed it 150 grams of flour and 150 grams of water, which results in 450 grams of starter.
- The next day you would need to feed that 450 grams of starter with 450 grams of flour and water, resulting in 1,350 grams of starter.
As you can see, feeding your entire starter everyday will become unmanageable quite quickly! So even though it feels wasteful, discarding some of your sourdough starter actually reduces waste and makes maintaining your sourdough starter much easier.
Should you save sourdough discard?
Many people save their discard and use it up in gluten-free sourdough discard recipes. They do this to avoid waste and add sourdough flavor to their recipes. You can find discard recipes for just about anything like crackers, cookies, and waffles. Check out my gluten-free sourdough discard banana cake for example!
Can discard become starter again?
If something happens to your active starter, you can revive your discard. Simply bring it to room temperature and start feeding it again as you would your sourdough starter. It may take a few feedings to become strong and active again.
Gluten-Free Sourdough Discard Recipes
Once you have an established starter, use up some of your discard with my gluten-free sourdough discard banana muffins!
Sourdough Peak
In many recipes, you'll see the instruction to use sourdough starter at its "peak." This just means the moment when the yeast is most active or concentrated in your starter. Using sourdough at its peak ensures the best results in your recipes.
How to Identify Your Starter's Peak
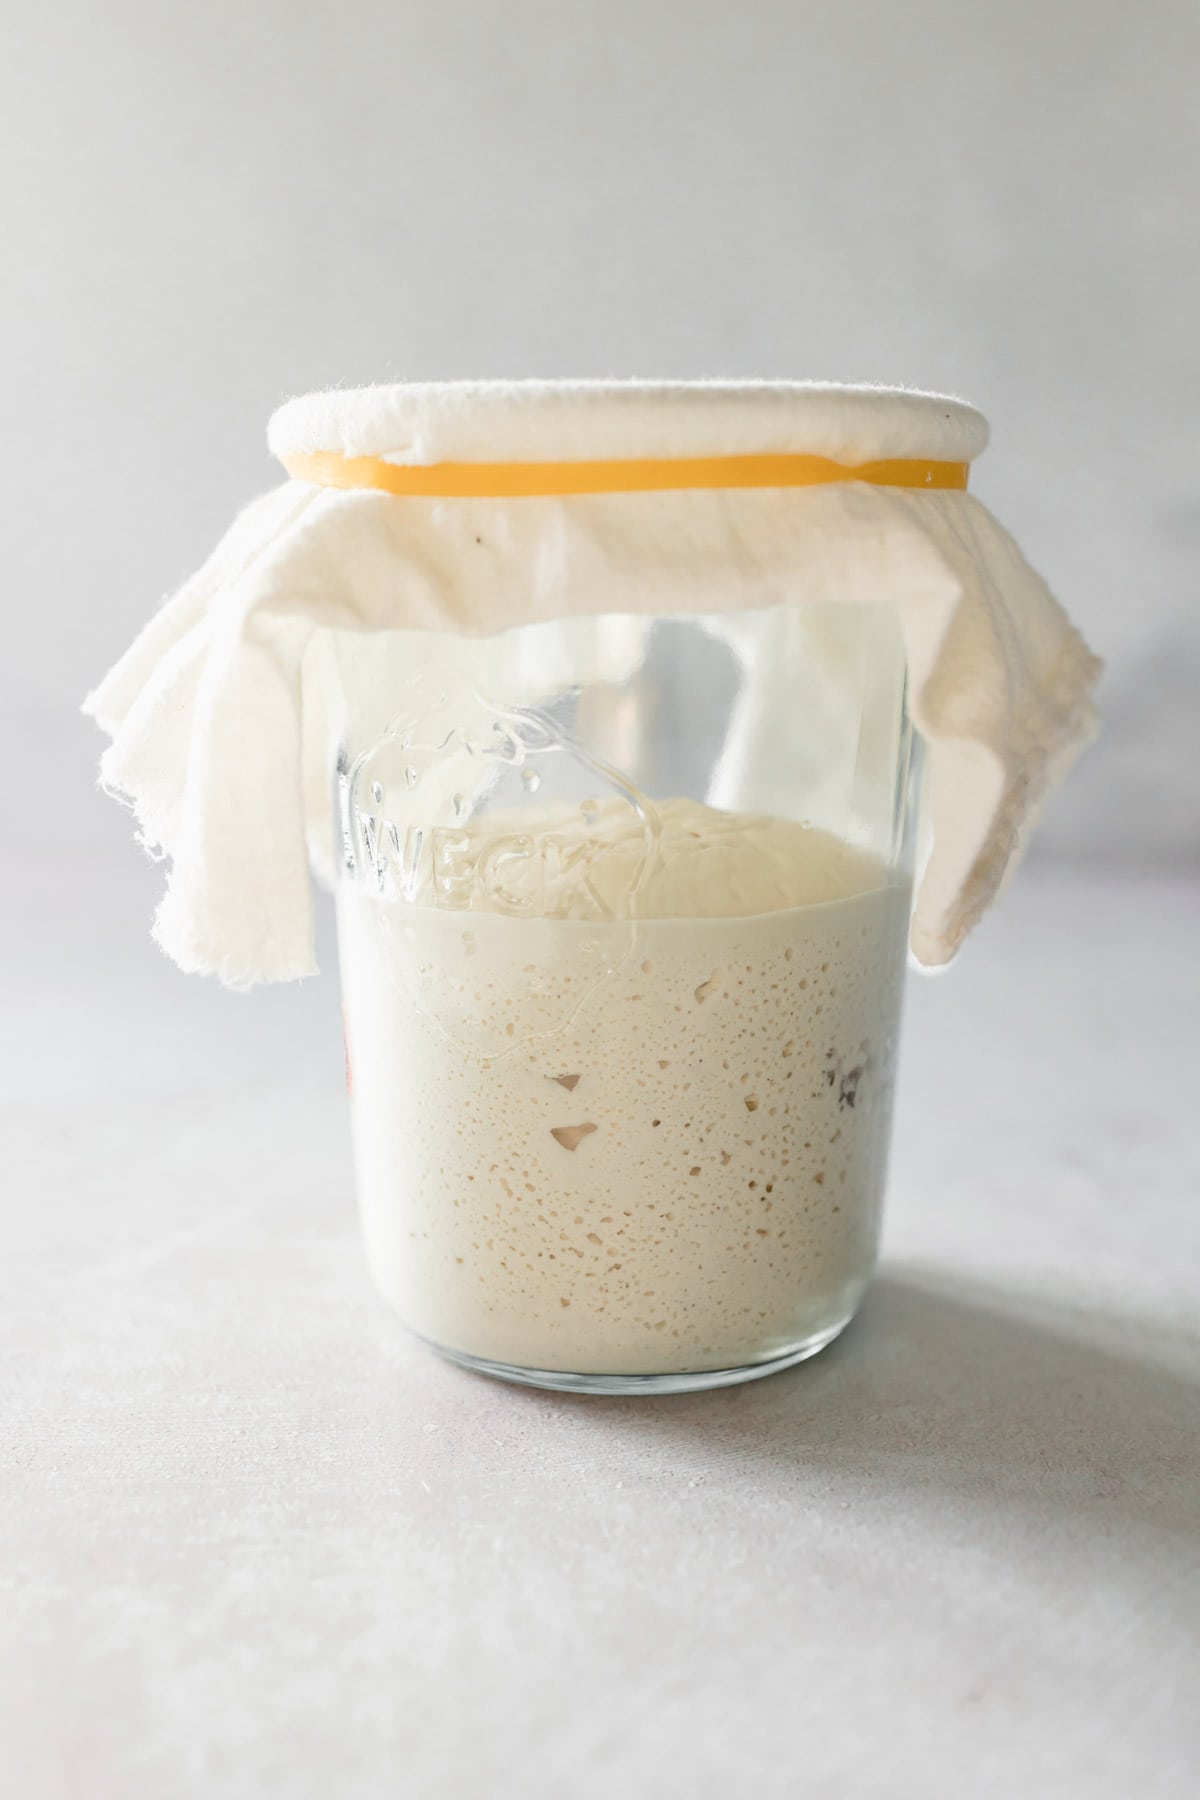
As your starter is rising in its jar, you should notice the top is domed. This is an indication that the yeast are still actively consuming nutrients.
If the top is domed, the starter has not peaked quite yet. (See below.)
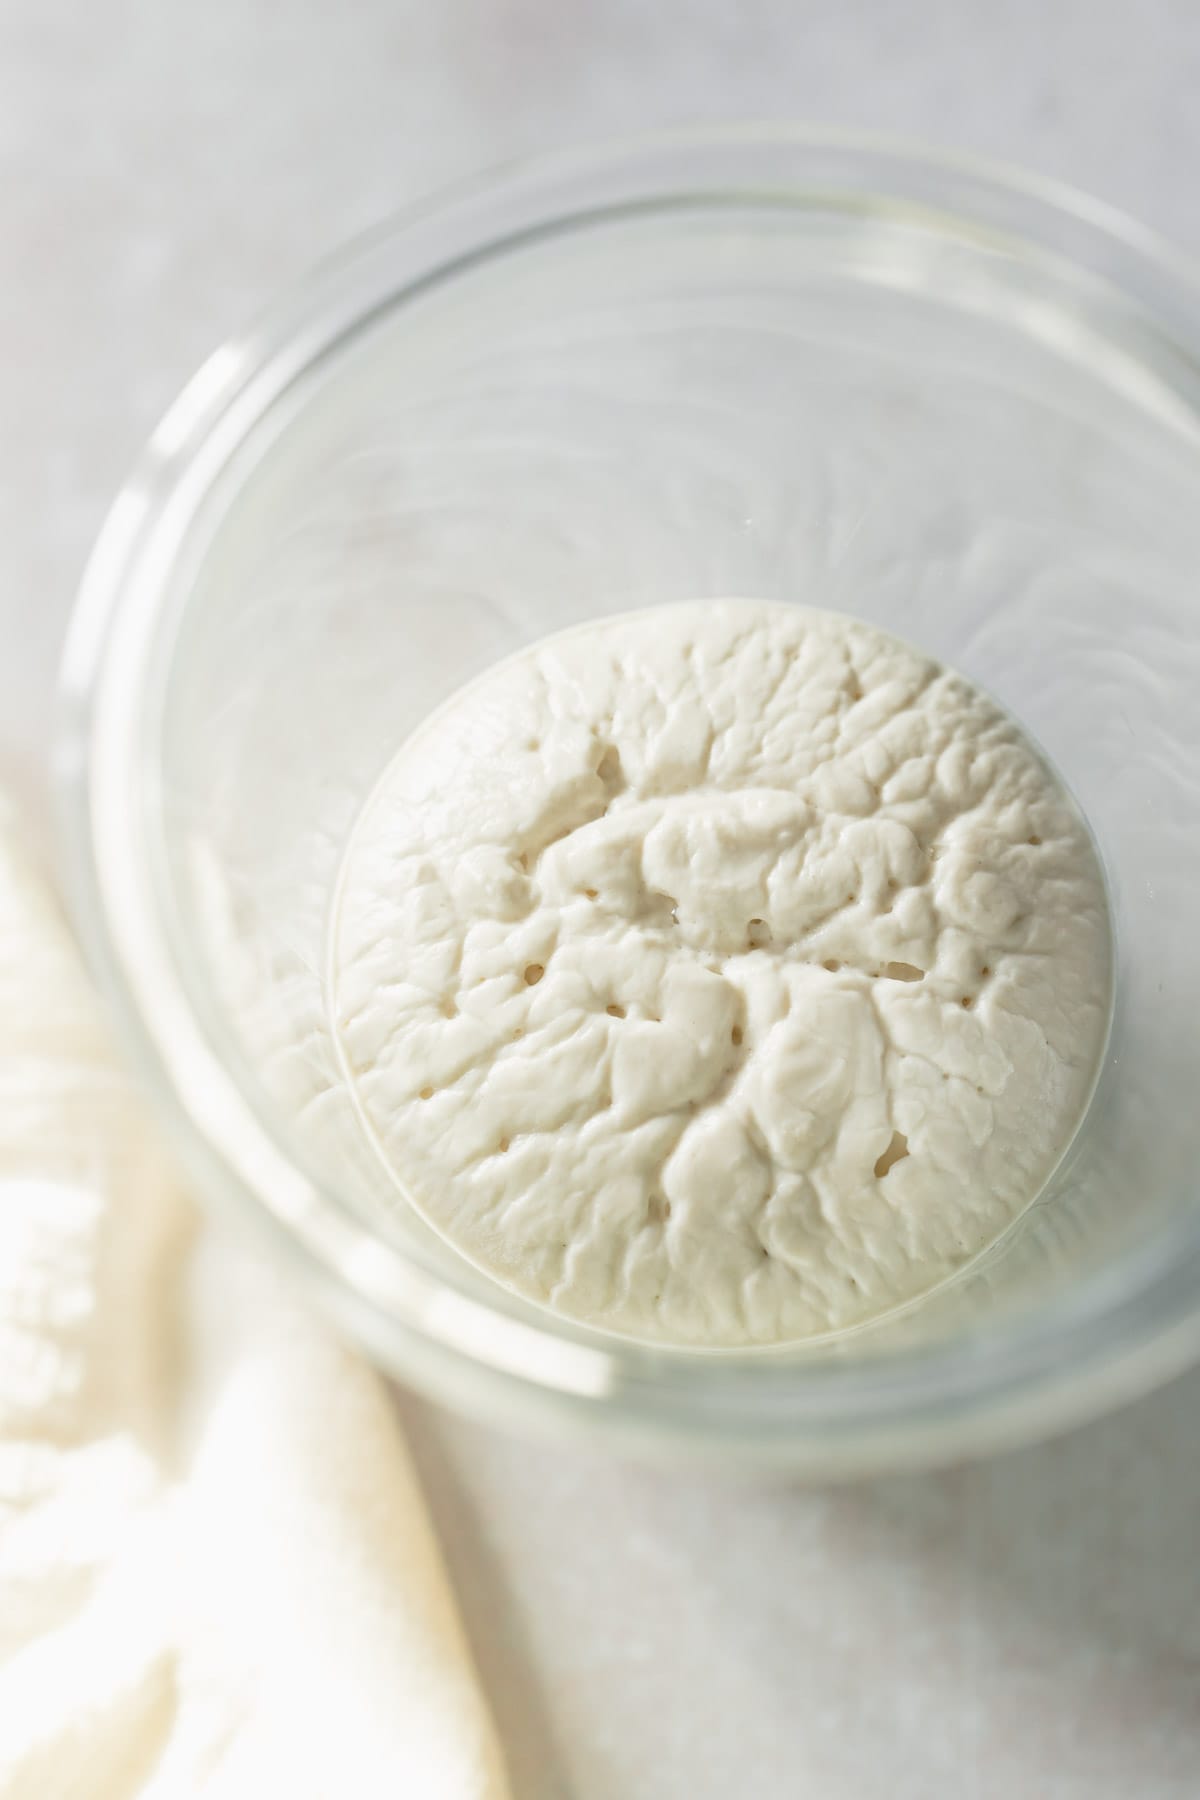
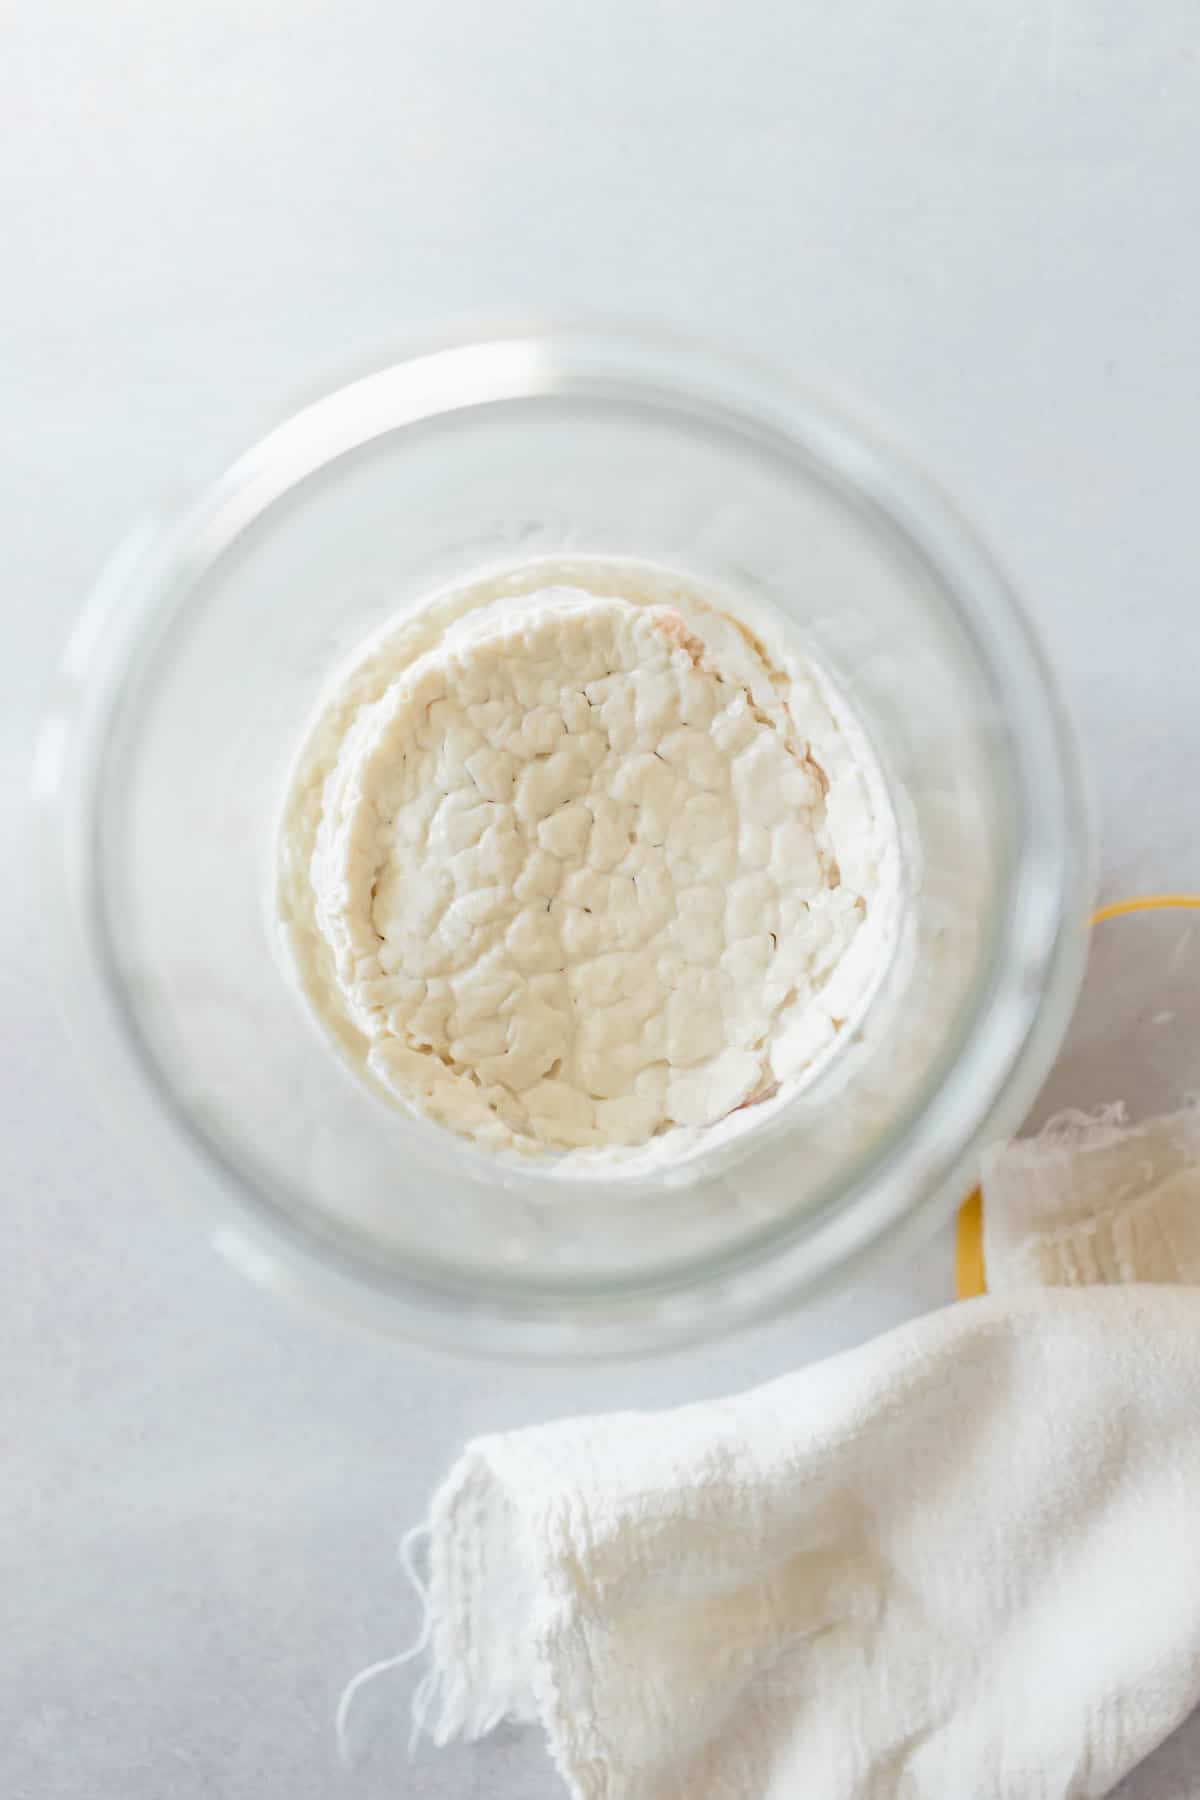
Shortly after the starter peaks, the domed top will begin to flatten out. This is the best time to use your starter! (See below.)

As the starter moves further past its peak, it will sink back into the jar leaving traces on the sides of the jar. This is an indication that the starter is much past its peak and the yeast are becoming more dormant. (See below.)
The Science Behind Sourdough Starter
Understanding the science behind sourdough starter can help you troubleshoot issues and master your sourdough baking, so let's dig a little deeper!
Sourdough starter contains two crucial organisms: yeast and lactic acid bacteria. Together, they create the magic of sourdough:
- Yeast releases CO2 gases, which is what helps breads to rise.
- Lactic acid bacteria produce lactic acid, which is what gives sourdough its distinct sour flavor.
Understanding these organisms can help us understand why sourdough starter will rise, peak, and fall:
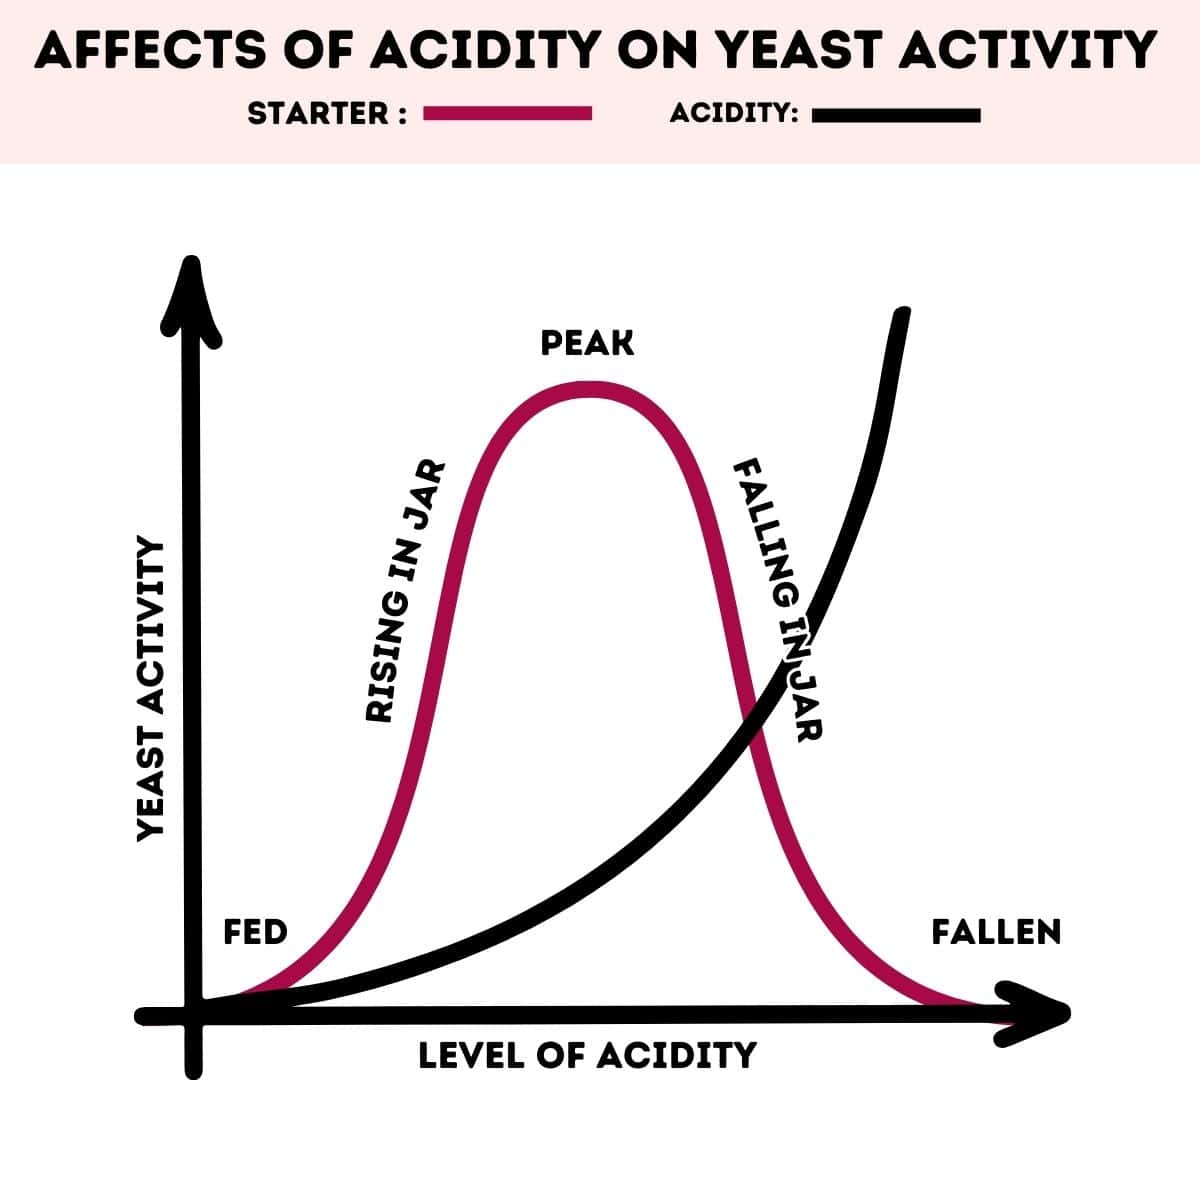
- Yeast Activity: As yeast consumes nutrients, it emits CO2, causing the starter to rise. This process creates surface tension, forming the domed top. (Represented by the purple line on the graph.)
- Lactic Acid Increases: Simultaneously, lactic acid bacteria release lactic acid. This increases the acidity of the mixture, which will eventually hinder yeast activity. (Represented by the black line on the graph.)
- Peak Concentration: At peak, the yeast population is highest, making it optimal for use.
- Dormancy: Post-peak, rising acidity causes yeast to become dormant. This halts CO2 production which causes the starter to level off and eventually fall as gases escape.
- Acidity Rise: Following peak, acidity continues to rise further and yeast activity continues to decrease until the starter is fed again.
How Acidity Affects Sourdough Starter
Understanding the impact of acidity on your sourdough starter highlights the importance of feeding ratios. Using ratios to your advantage allows you to regulate the acidity level in your starter, giving you control over its performance and flavor.
Thinking about the graph above, we know that after peak the starter will continue to build up acidity. The longer your starter sits after peak, the more acid it will accumulate.
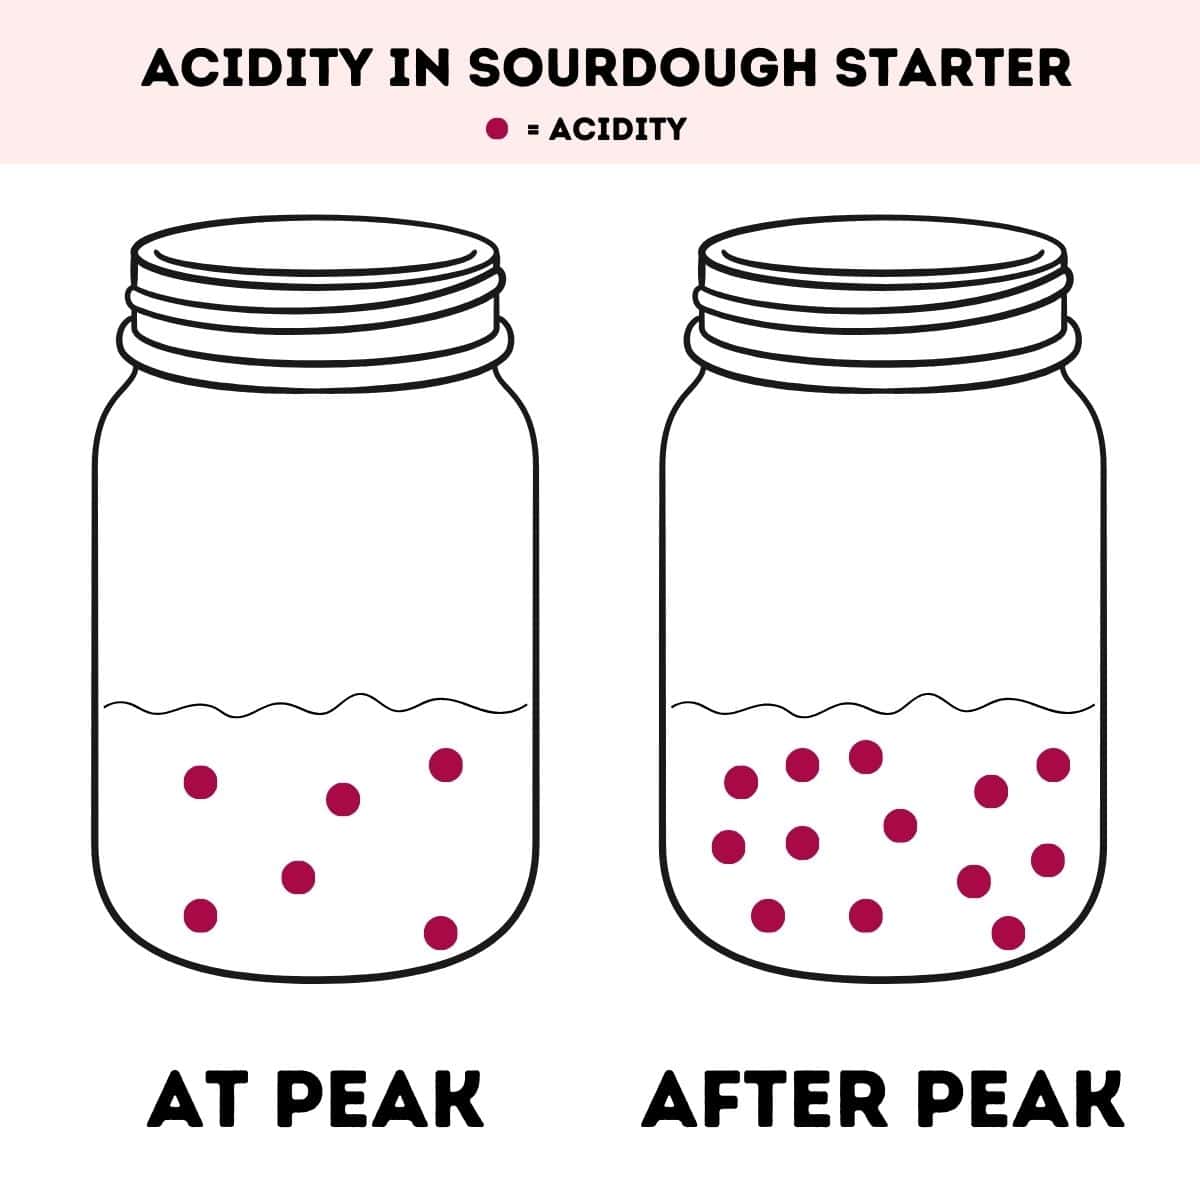
When you feed your sourdough starter, you begin with a portion of your original starter, determined by your feeding ratio. This means you also transfer some of the existing acidity into the new batch.
Using a large amount of starter for each feeding, as with a 1:1:1 ratio, can cause a faster build up of acidity over time.
That's because you are initially carrying over more starter and therefore more acidity as compared to a larger feeding ratio, where you begin with a smaller amount of starter relative to the amount of flour and water. (See the graphic below for a visual representation.)
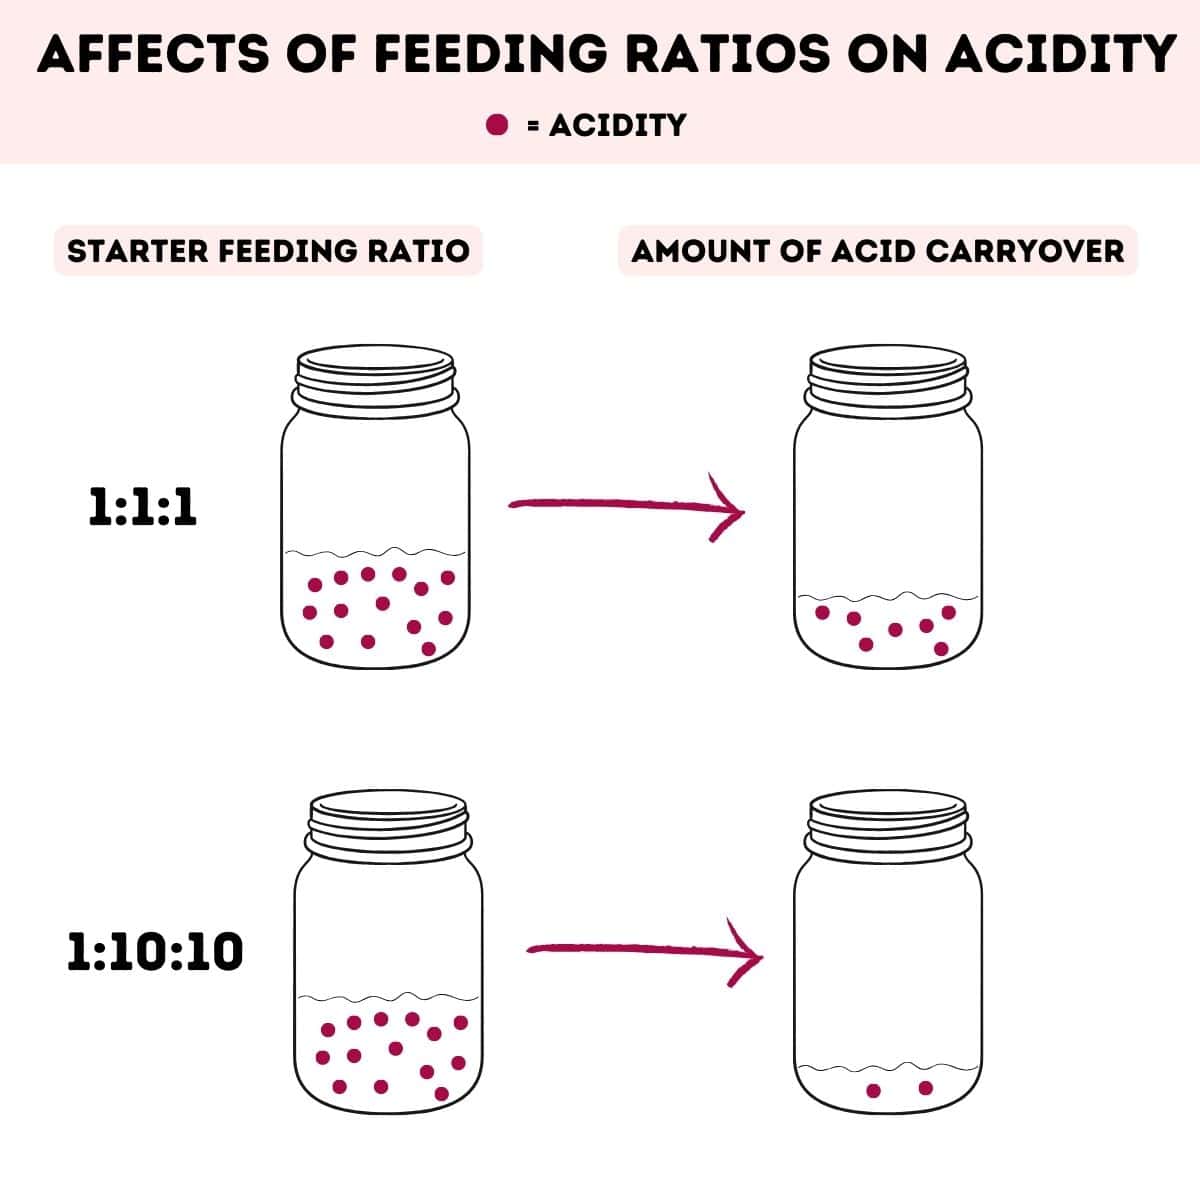
If your starter builds up too much lactic acid, the yeast will become dormant more quickly after feeding and your starter will not rise as much.
If you notice your starter is weak or is quickly rising and falling there are two methods you can try to strengthen your starter:
- Feed right at peak for a few days. Feeding at peak will catch the starter before too much acidity builds up.
- Use larger feeding ratios. Larger ratios reduce the amount of acid carryover from the starter into your new feeding.
Sourdough Starter FAQs
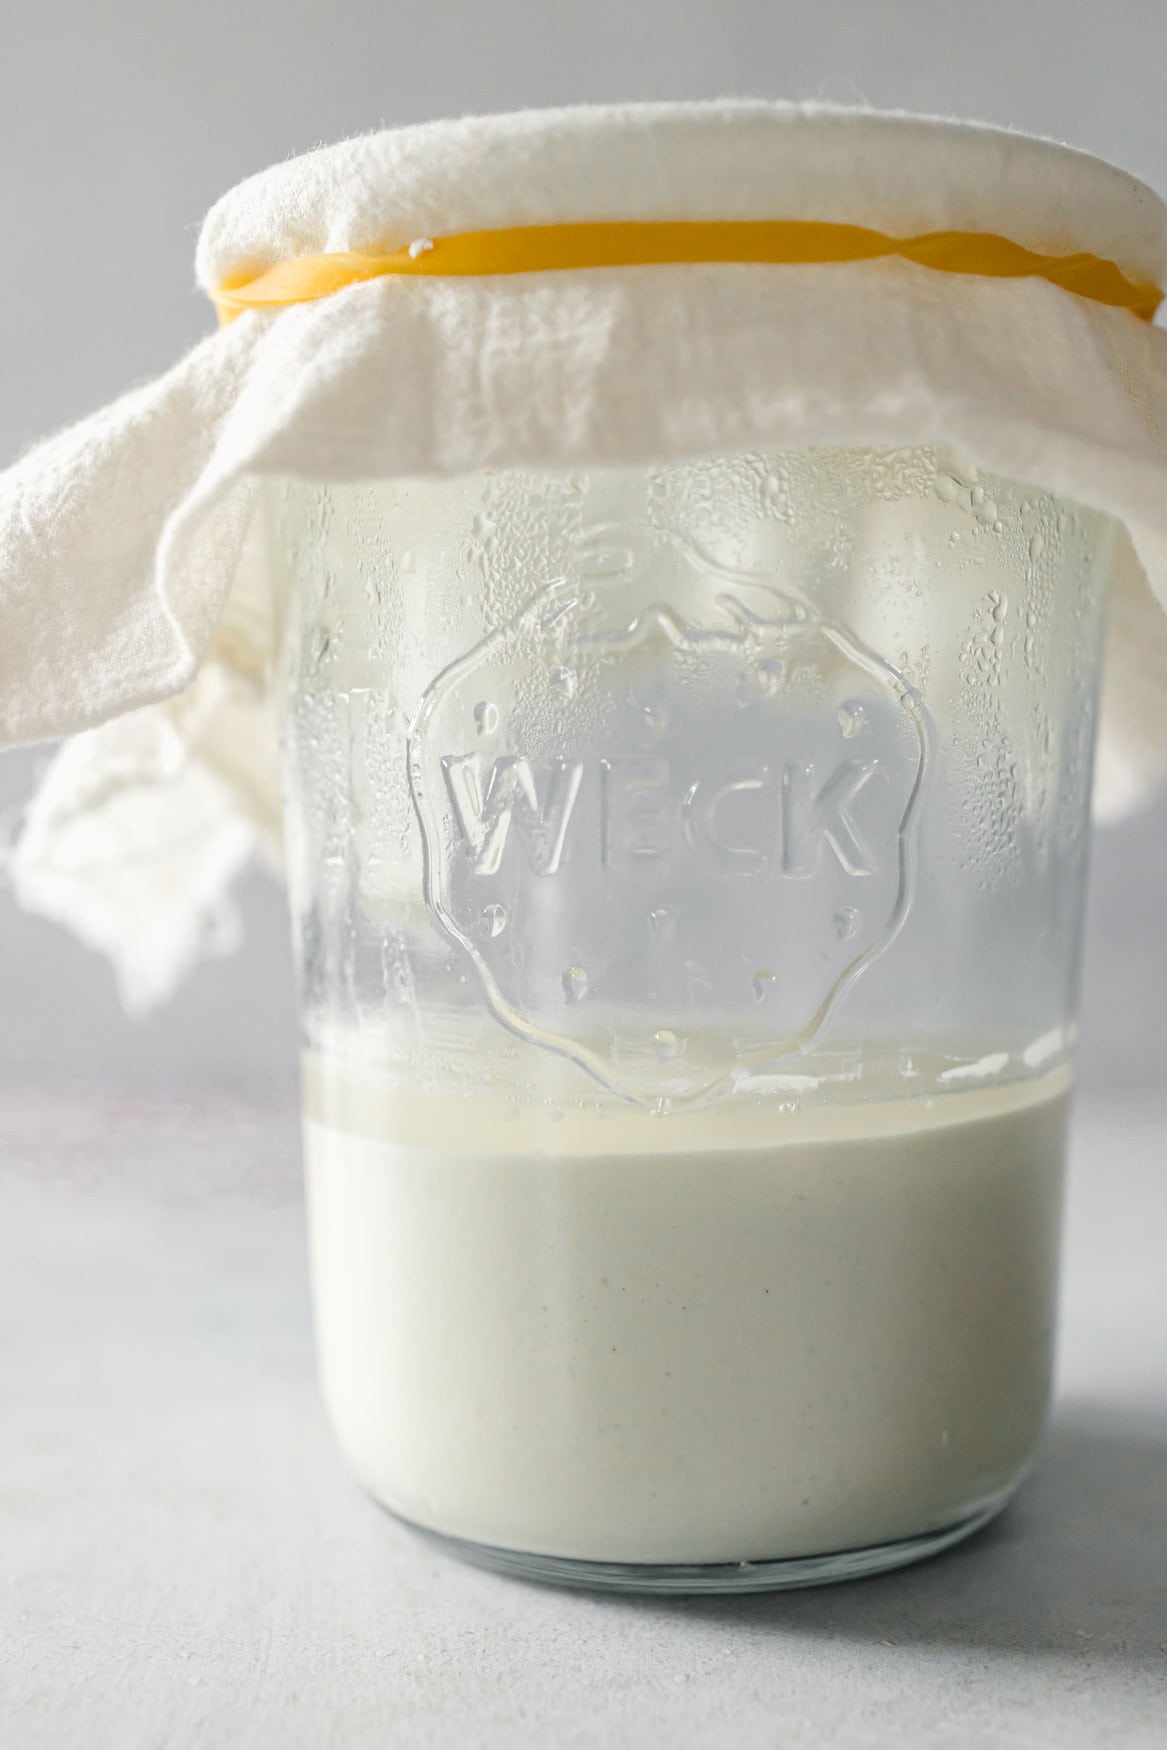
What is the liquid on top of my starter?
At some point you may notice liquid forming on top of the starter. This is normal and can be a result of two possible scenarios.
Too Much Water
If you are still in the process of creating or building up your starter, liquid formed on top is likely due to the fact that you're simply using too much water. Try reducing the amount of water at your next feeding. Look for a consistency of thick pancake batter.
Hooch
If your starter is well-established the liquid that forms on top is often hooch, a by-product of the fermentation process. It has a sour smell and taste from the alcohol it contains.
Hooch is an indication your starter is hungry. It can vary in color from clear to dark gray. Darker gray is usually due to oxidation.
You can pour it out or stir it back into your starter, but it may be beneficial to pour it out if the layer is quite thick and dark.
Can I Feed My Starter With Different Flours?
While establishing your starter, it is often recommended to try and stick with the original flour that you began with, but if you happen to run out, it's better to feed with a different flour than none at all.
Once your starter is well-established, it is fine to feed with different flours or a combination of flours. You may choose to do this if you run out of a particular flour, you want to switch up the flavor, or you want to give your starter a fresh boost.
Try to stick with whole grain flours such as brown rice flour, sorghum flour, or teff flour, which tend to work very well in gluten-free starters.
Why isn't my starter doubling in size?
Gluten-free sourdough starter may not fully double in size like traditional starters do. It should still rise some in the jar though. If your starter isn't rising or doubling, there are several factors that can affect this:
- The consistency of your starter. Is it too thick or too thin? Add more flour or water to get a thick pancake batter consistency.
- Ambient temperature. Is the temperature of your home too cold or too warm? A seed starting mat can help maintain the warmth of your starter during colder months.
- Too acidic. Have you only been feeing a 1:1:1 ratio or has your starter been very hungry for some time? If so, try feeding a larger ratio or right at peak for a few days.
Why did it seem like my starter was active and now it's not?
If you get a burst of bubbles and activity in the first couple of days but then it seems to stop on the third or fourth day, this can actually be completely normal. The initial flurry of activity is likely non-beneficial bacteria or yeast in the mixture consuming the nutrients. They will eventually exhaust their resources, paving the way for beneficial bacteria and yeast to take over. Keep discarding and feeding for a few more days and you should see some renewed activity as the beneficial bacteria and yeast take hold.
Why isn't my starter bubbling?
If it's been a week or more and your starter still isn't bubbling, check your consistency. Is the mixture too thin to notice bubbles?
If that is not the case, you may need to start again with fresh flour. Using old flour can lead to poor results. Try to use fresh, whole grain flour when making your sourdough starter.
What is the best time to refrigerate your starter?
You can refrigerate your starter at any time after it has been well-established. Some prefer to refrigerate the starter right at peak, when the yeast population is at its highest concentration. Others prefer to give the starter a large feeding (1:10:10) and then refrigerate, to give the yeast some food to eat up while it is stored.
Does sourdough starter go bad?
Starter rarely goes bad, but it can grow mold if it has been neglected for quite some time. Throw the starter away if you see pink, orange, or green streaks or discoloration, or fuzzy spots. These are indications of bad bacteria or mold.
Is sourdough starter gluten-free?
Sourdough starter is only gluten-free if it has been fed only gluten-free flour. Traditional sourdough starters are typically fed with wheat flour and are not suitable for someone with celiac disease or gluten-intolerance.
Can I convert a regular sourdough starter into gluten-free?
This depends on why you are gluten-free. Converting a regular starter to a gluten-free starter is not recommended if you have celiac disease or a severe gluten-intolerance.
If you only have mild gluten sensitivity, feeding a regular sourdough starter with gluten-free flours will diminish the amount of gluten in the starter over time. It may never be fully gluten-free as there are traces of the original starter in each subsequent feeding.
If you choose to do this, pay attention to your starter after feeding. If your starter isn't active, the types of yeast and lactic acid bacteria in your starter may not be able to digest the gluten-free flours. In this case, you'll need to create a new starter using only gluten-free flours.
Top Sourdough Starter Tips
- Feed your starter with fresh whole grain flour, such as brown rice flour, and room temperature filtered water for the best results.
- Keep the starter in a warm spot, 70-80°F, with the ideal temperature being 78°F.
- Use feeding ratios to your advantage! You don't always have to feed 1:1:1.
- Use ratios as a guide, but feel free to add a little water if the mixture is dry or more flour if the mixture is too thin. Aim for a thick pancake batter consistency.
Join My Newsletter!

Recipe

Gluten-Free Sourdough Starter
Equipment
- clean jar with loose cover
- silicone spatula
Ingredients
- approx. 350 grams Brown rice flour, sorghum, or teff flour
- approx. 350 grams Filtered water
Instructions
Day 1:
- Weigh your empty jar and label the jar with the weight. (This comes in handy later if you want to measure your starter without fully emptying the jar.)
- Add 50 grams of brown rice flour and 50 grams of filtered water to the jar.
- Stir until well combined.
- Set aside in a warm spot for 24 hours.
Day 2:
- Add 50 grams of brown rice flour and 50 grams of filtered water to the jar.
- Stir well and set aside another 24 hours.
Day 3:
- Note: At this point you may be seeing bubbles in the jar. It may also have a distinct smell of acetone or another unpleasant aroma. This is normal. Keep going.
- Remove 50 grams of the starter (about half) from the jar and throw it away. (Do not save your discard until your starter is well established, after day 7.)
- Add 50 grams of brown rice flour and 50 grams of filtered water to the jar.
- Stir well and set aside another 24 hours.
Days 4, 5, 6, and 7:
- Note: Over the next few days, the starter should be getting very bubbly and starting to rise up in the jar. You should start to notice a pleasant yeasty aroma.
- If your starter is bubbly and almost doubling in size in the jar, start feeding 2 times per day.
- Feed every 12 hours with a 1:1:1 ratio: 50 grams starter + 50 grams brown rice flour + 50 grams filtered water.
Day 8 and on:
- If you have had at least 3 days of strong bubbles and the starter has a pleasant, yeasty aroma – the starter is ready to use. Keep feeding daily for one more week to strengthen your starter. After that, you can store in the refrigerator if you don't plan to bake or feed as often.
Notes
- Feed your starter with fresh whole grain flour and room temperature filtered water for the best results.
- Keep the starter in a warm spot, 70-80°F, with the ideal temperature being 78°F.
- Read associated blog post for more tips and helpful information.
Nutrition
* Nutritional information is provided as a courtesy and should be used as an estimate only. See the nutrition policy for more information.





Alice King says
Thank you Katie. I have a question. On Day 3, and at Step 2, do you stir the contents before you pour off the starter?
I am excited to try this. Thank you for sharing!
Katie Olesen says
Yes, I always give it a good stir first!
Kathy says
Wow. Great information and easy to understand!! Thanks! My starter is doing great.
laura l sampson says
I didn't know it was this easy to make a gluten-free starter!
Kristin says
This was perfect! Thanks for such great instructions!
Wendie says
This worked exactly as written, thanks!
Gwen says
This was super easy to follow!
Sharon says
My daughter-in-law is gluten-free, and I have been looking for a gluten-free starter recipe. Thanks so much, this is perfect!
Wendy Brouillette says
Has anyone tried with buckwheat? I have a yeast allergy and need to avoid grains.
Thanks!
Wendy
Katie Olesen says
I haven't personally made one with buckwheat but I do know people use buckwheat for starters. I've read they sometimes take longer to develop, so keep that in mind.