


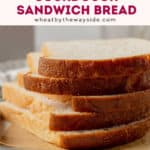
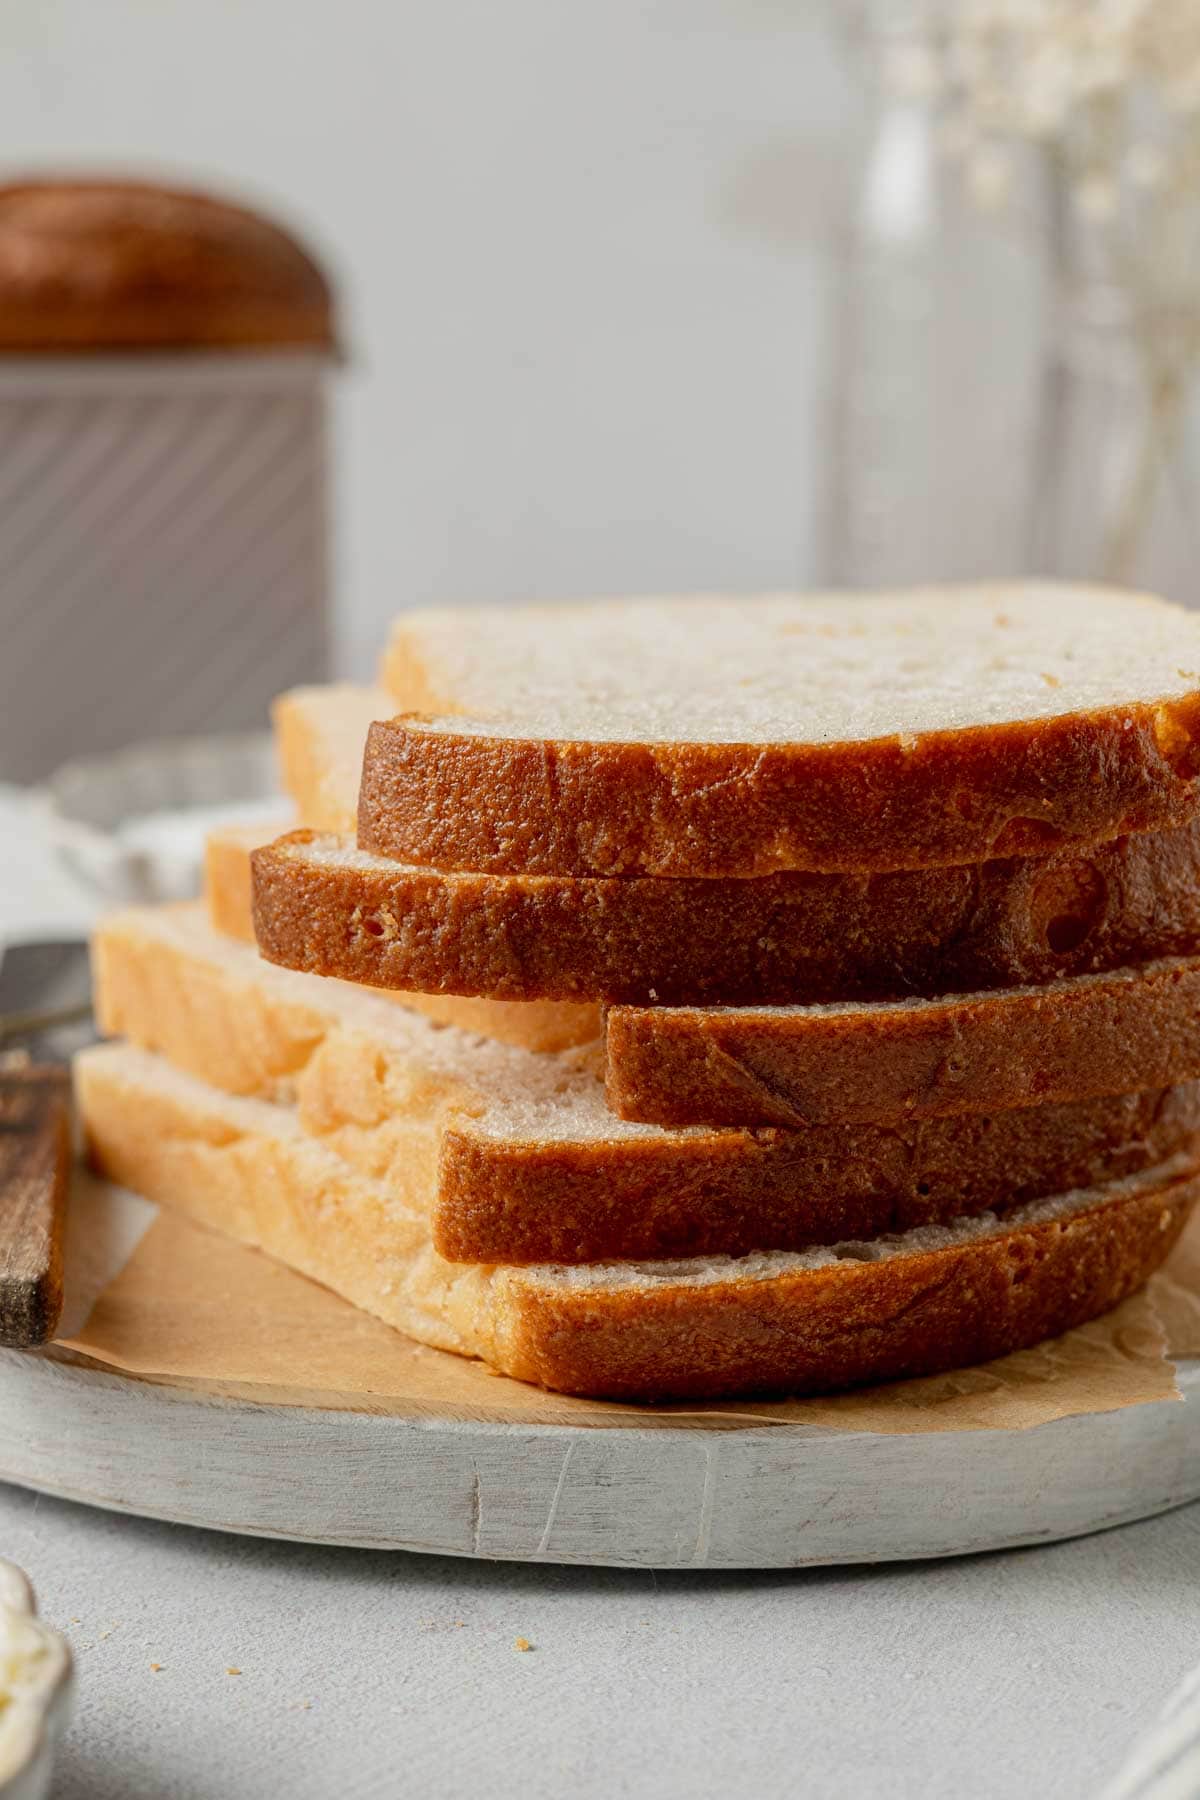
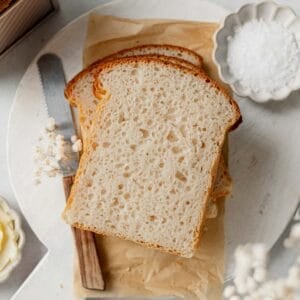
This gluten-free sourdough sandwich bread made with Caputo Fioreglut has unbelievable taste and texture! This simple recipe is perfectly sized for a mini loaf pan, yielding a half-loaf with generously sized slices. Perfect for sandwiches, French toast, or enjoying with a touch of butter.
Jump to:
- Why You'll Love This Recipe
- Recipe Testing Notes:
- Ingredients You'll Need
- Caputo Fioreglut
- Helpful Equipment
- Mini Pullman Loaf Pan
- Active Bubbly Starter
- How to Feed Your Starter for This Recipe
- How to Make the Bread
- How To Slice Bread From a Mini Pullman Loaf Pan
- Storage
- Top Recipe Tips
- Recipe FAQs
- More Gluten-Free Recipes with Caputo Fioreglut
- Need a Gluten-Free Sourdough Starter?
- Join My Newsletter!
- Recipe
- Comments and Ratings
Why You'll Love This Recipe
- So easy to make!
- Only uses sourdough (wild yeast) - no commercial yeast needed!
- Just 7 simple ingredients!
- Soft and light, much better than store-bought bread!
With this bread you'll finally have a great tasting slice to enjoy a BLT, gluten-free chicken salad sandwich, or even to make a delicious grilled cheese!
Recipe Testing Notes:
The first sourdough recipe I created was a crusty gluten-free sourdough boule, that artisan loaf took many attempts to master! You can read my recipe testing notes in that post if you want to know more about the process. Using what I learned from that recipe, I crafted a sandwich loaf with the same flour, adding milk powder and swapping oil for butter to create a softer bread with a tender crust. Here are a few more notes on the process of formulating this recipe:
Eliminated stretch and fold: This is typically done in regular sourdough baking to strengthen the gluten and develop the structure of the bread. There is no gluten here, so a stretch and fold doesn't have any benefit beyond the nostalgic feeling of working with bread dough. It's an unnecessary step.
Eliminated second rise: Traditionally a second rise is done after the stretch and fold stage. Since we are eliminating that, we can eliminate the second rise as well. You can put the gluten-free dough directly into the loaf pan, let it rise until it crowns the pan, then bake it without a second rise.
Embrace the benefits: Eliminating unnecessary steps saves time, which means we can make a loaf of sourdough bread quicker than traditional methods.
Higher hydration: I've experimented with higher hydration to improve the bread's texture. Gluten-free flours absorb more moisture, which can make loaves dense if not taken into account. By increasing hydration, the bread turns out lighter and airier.
Half-size loaf: In an effort to reduce waste during my recipe testing process, I scaled down the recipe I was working with to create a half loaf. I found that I loved the size! This smaller loaf is perfect if you're baking for 1-2 people. I find I can consume the loaf before it goes stale and I don't have to freeze it if I don't want to. If you want a full-size loaf, simply double the recipe!
Ingredients You'll Need
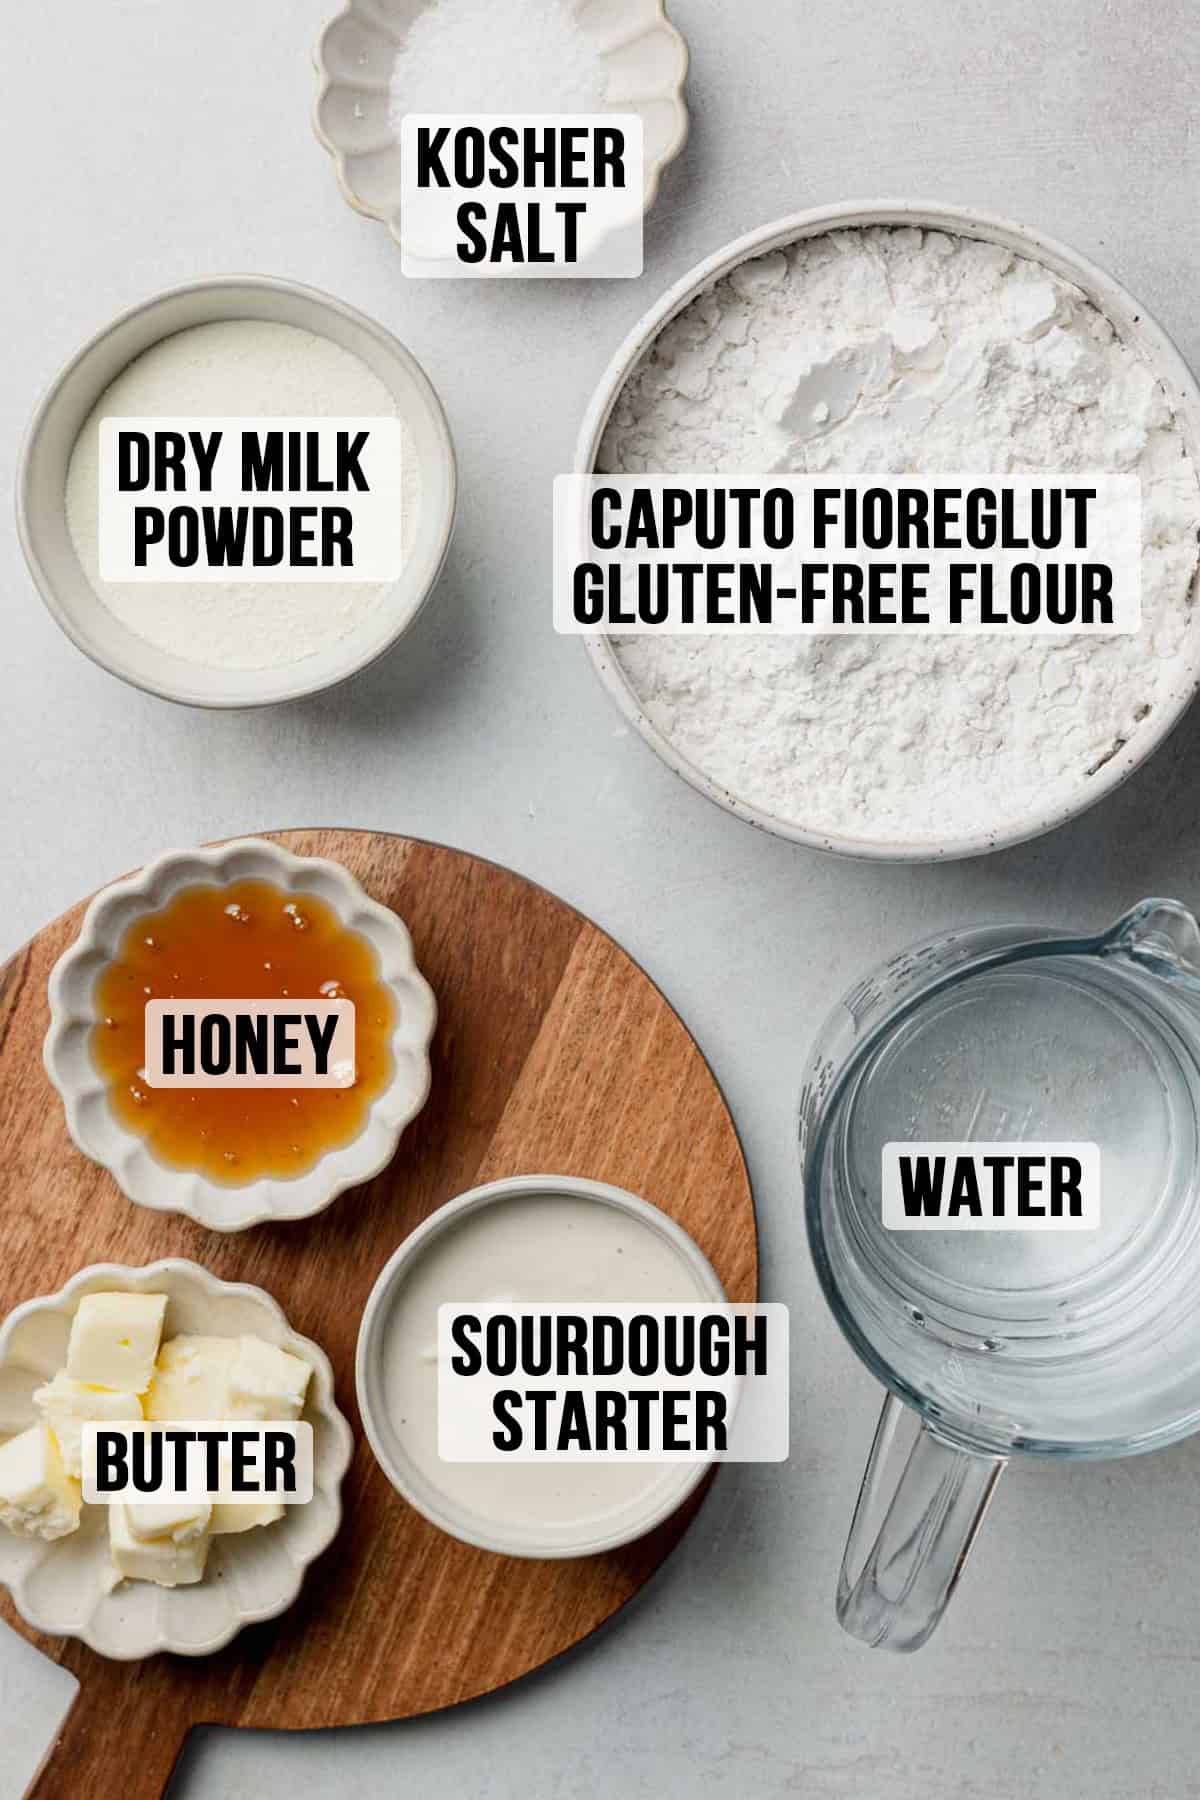
- Caputo Fioreglut Gluten-Free Flour Blend: This recipe was specifically crafted using this gluten-free flour blend. It is the only gluten-free flour blend I recommend for this recipe. It is an Italian gluten-free flour blend that does contain gluten-free wheat starch. Read my article about gluten-free wheat starch if you're new to this product.
**Please note: this flour is gluten-free and tests to less than 5ppm; I have contacted the company many times about it. It is not wheat free. This means it will be safe for someone with celiac disease or gluten sensitivity but not for someone with a wheat allergy.
I am aware the new King Arthur bread flour blend also contains wheat starch. Other than that, it has quite a different makeup than that of the Fiorelgut. I have not tested the King Arthur blend in this recipe. - Gluten-Free Sourdough Starter: If you don't have a gluten-free starter, be sure to check out my guide to making a gluten-free starter in about seven days! All you need is brown rice flour, water, and patience.
- Dry Milk Powder: This adds softness to the bread.
- Butter: You could use oil if you prefer.
- Honey: Adds a touch of sweetness and aids in browning.
*Refer to the recipe card for full ingredient information.

Get the Goods!
Caputo Fioreglut
I recommend you buy Caputo Fioreglut from Brick Oven Baker. They have great prices and you can use code: KATIE for 10% off your first order!
Helpful Equipment
- Stand Mixer: I find a stand mixer to be indispensable for my gluten-free yeast bread recipes. Since the dough is more of a batter, the stand mixer makes it easy to blend the thick and sticky mixture.
- Digital Kitchen Scale: All of my yeast breads are created around weighted measurements. This provides the most accuracy and ensures you get the same results I do!
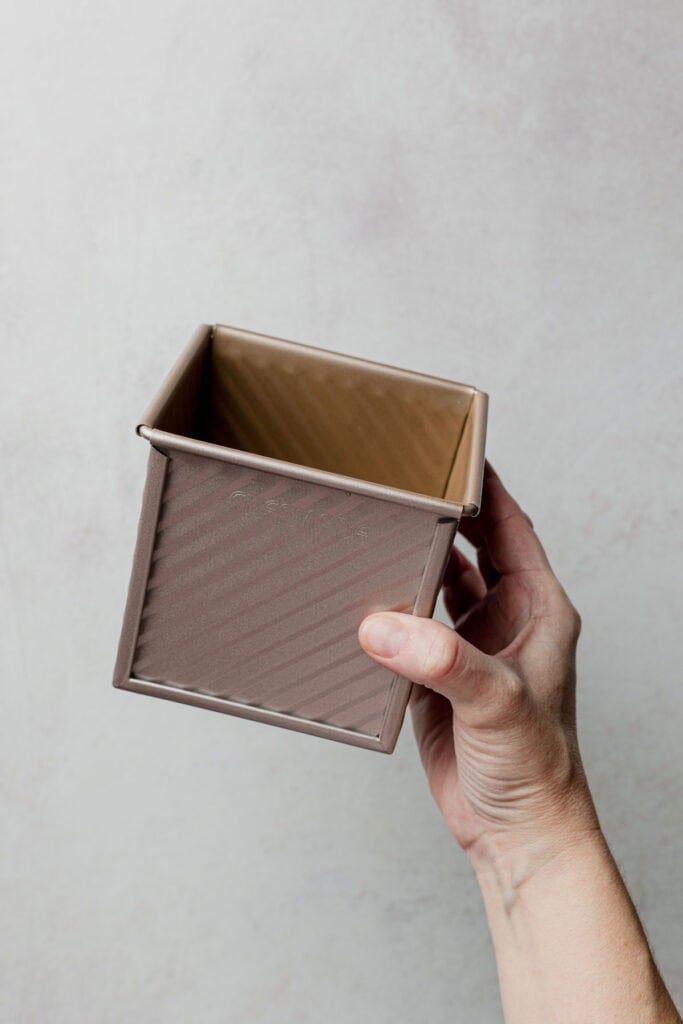
- Half Pullman Loaf Pan: This pan is about half the size of a full loaf pan. It makes a mini loaf that is the perfect size for 1-2 people. I will probably start making all of my loaves this size because it is just the best!
Get the Goods!
Mini Pullman Loaf Pan
This pan makes a small loaf, perfectly sized loaf for 1-2 people!
Active Bubbly Starter
For the best results, make sure to use an active and bubbly gluten-free sourdough starter. Your starter should be at its peak of activity, which usually means feeding it 4-6 hours before you plan to bake. This ensures that your bread rises well and has that classic sourdough flavor. If your starter isn't bubbly and active, give it a few more feedings over a couple of days to boost its activity before baking with it.
How to Feed Your Starter for This Recipe
There are many ways you can go about feeding your starter to ensure it's ready for use in baking. Choose the method that works best for your schedule.
You will need 60 grams of active starter for this recipe. The examples below will yield enough active starter to use in the recipe with enough leftover to feed and keep your starter going.
Late night feeding: I often find it easiest to feed my starter late at night with a 1:10:10 ratio. This higher feeding ratio takes longer to peak, allowing it to reach its peak activity while you sleep. In the morning, you can mix up the bread dough, let it rise throughout the day, and bake the bread in the evening.
Feed 5 grams starter with 50 grams brown rice flour and 50 grams water.
Morning feeding: For a morning feeding, I recommend using a 1:1:1 ratio for your starter. This ratio will peak the fastest, usually in about 2-4 hours, allowing you to mix the bread dough and let it rise promptly afterward. This ensures your bread-making process fits smoothly into your day.
Feed 25 grams starter with 25 grams brown rice flour and 25 grams water.
Save This Recipe!
How to Make the Bread
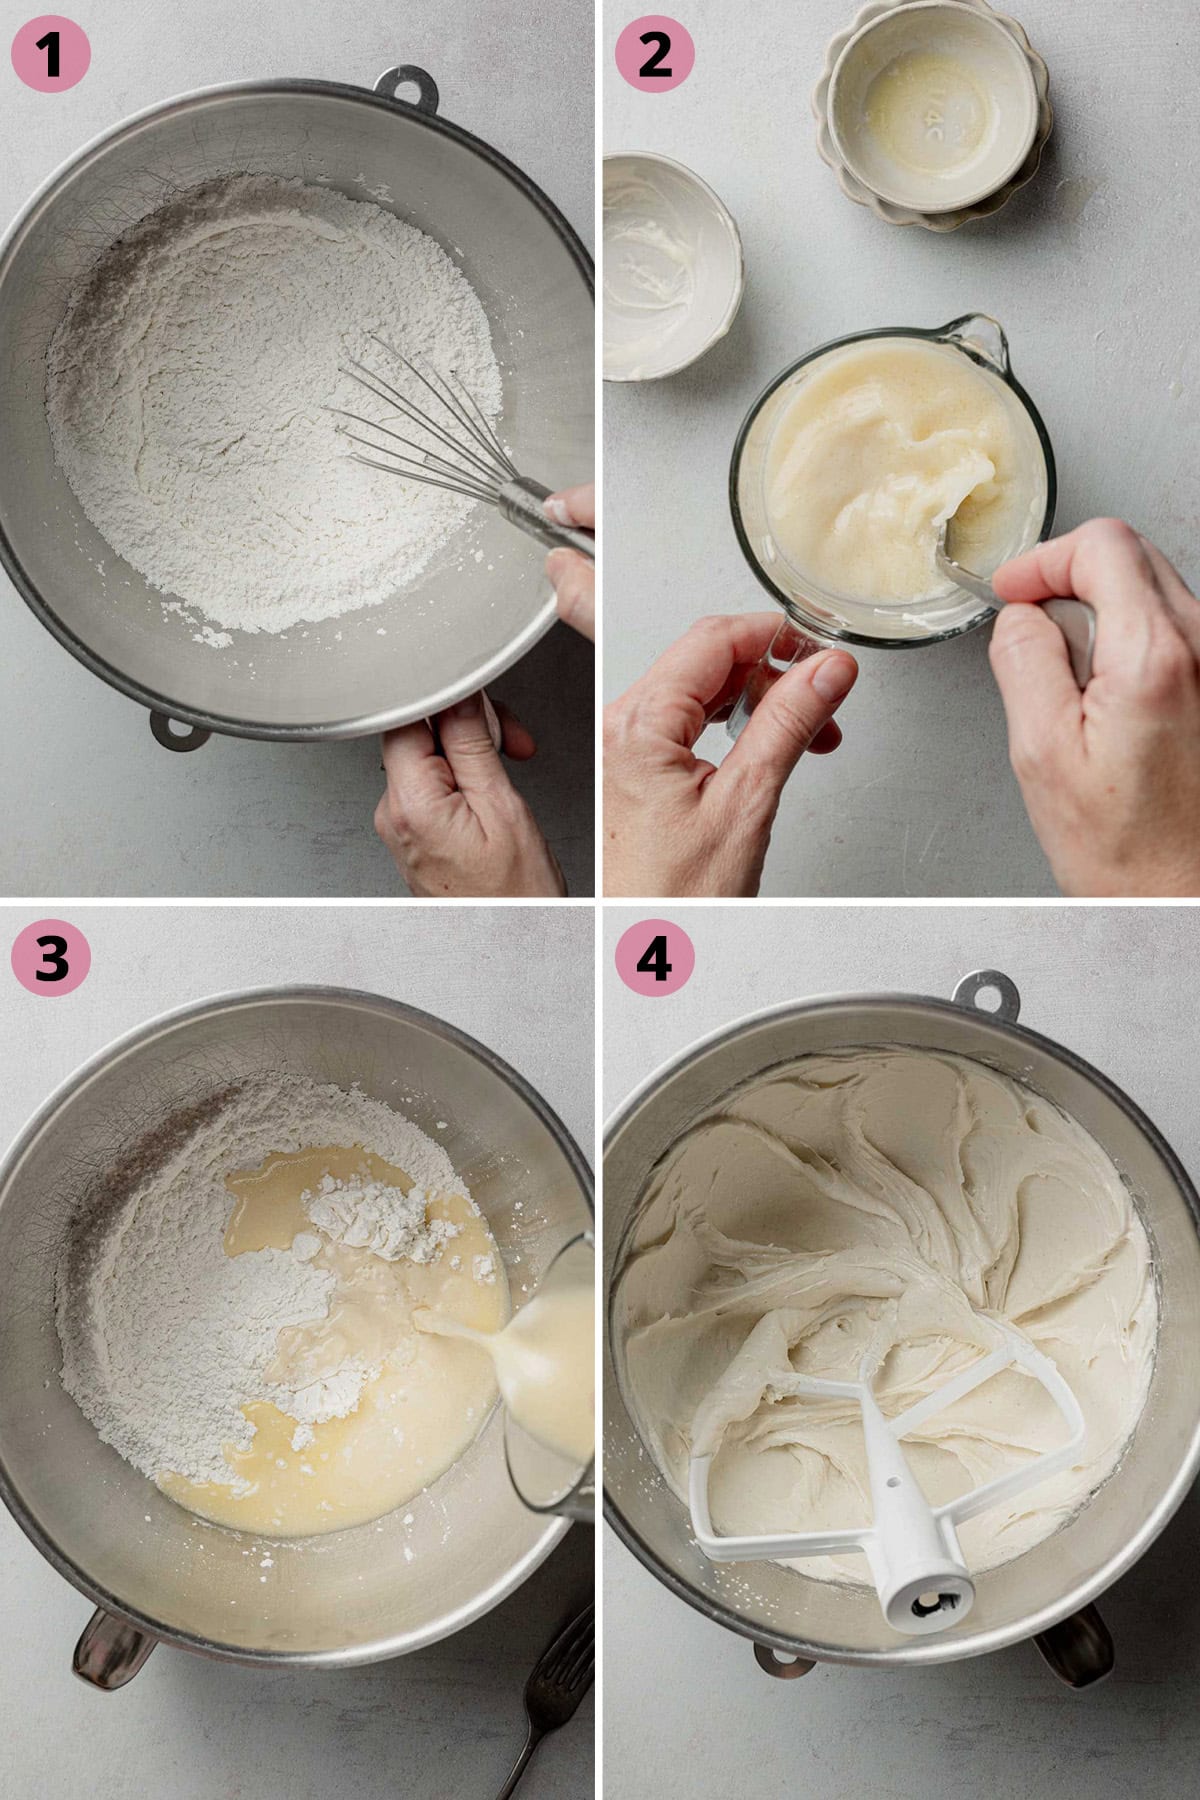
- In your stand mixer bowl, whisk together the dry ingredients; gluten-free flour blend, milk powder, and salt.
- In another measuring cup, combine the warm water, sourdough starter, honey, and melted butter.
- Add the wet ingredients into the dry mixture. Blend on medium speed with the paddle attachment for 2-3 minutes. Scrape down the bowl occasionally to ensure the mixture is well combined.
- Once mixed, the mixture should be smooth, thick, and sticky.
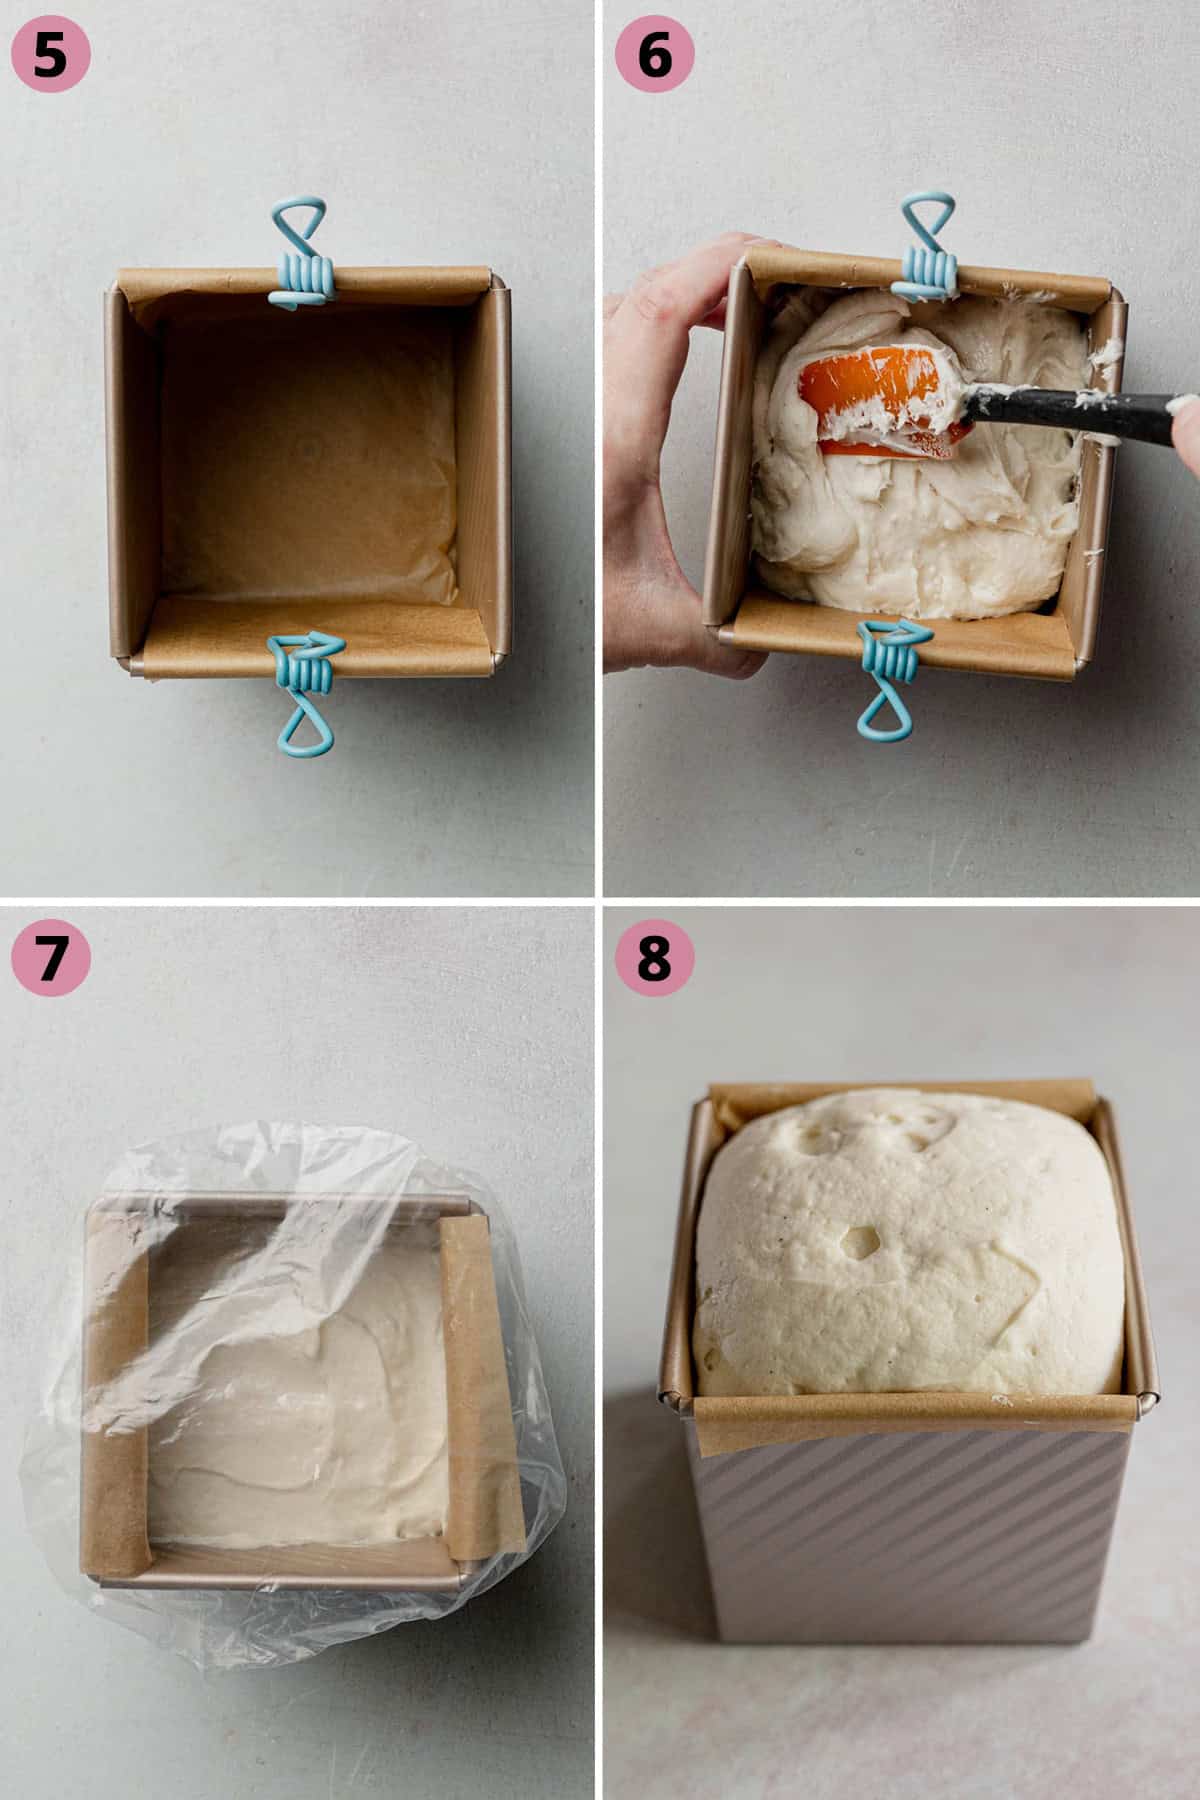
- Prepare your mini loaf pan by lining it with a piece of parchment paper. Spray the pan lightly with cooking spray.
- Add the batter to the pan and smooth out the top.
- Cover with plastic wrap or a bowl cover and set in a warm place to rise and ferment until doubled in size. This will take several hours.
- Once risen, you can bake the bread or refrigerate up to overnight before baking. *Follow baking instructions in recipe card below!
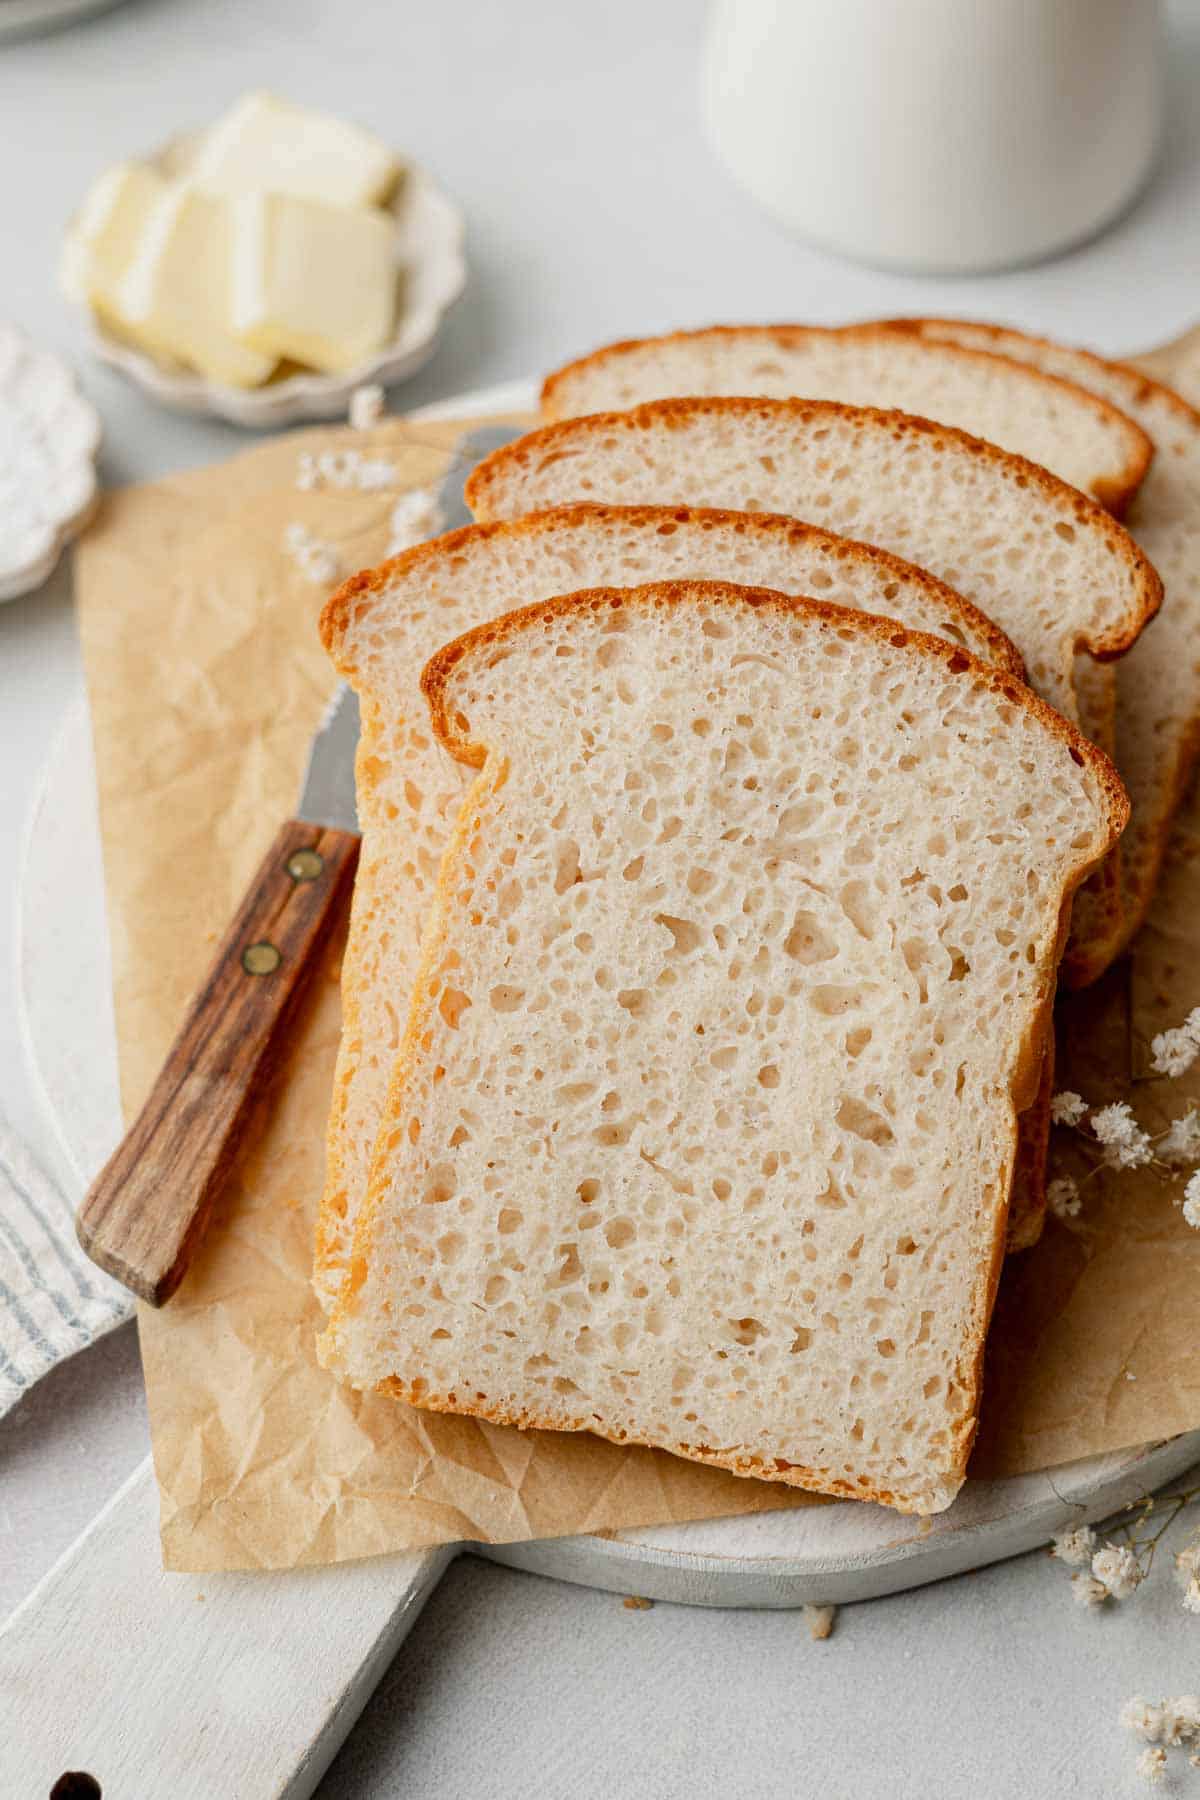
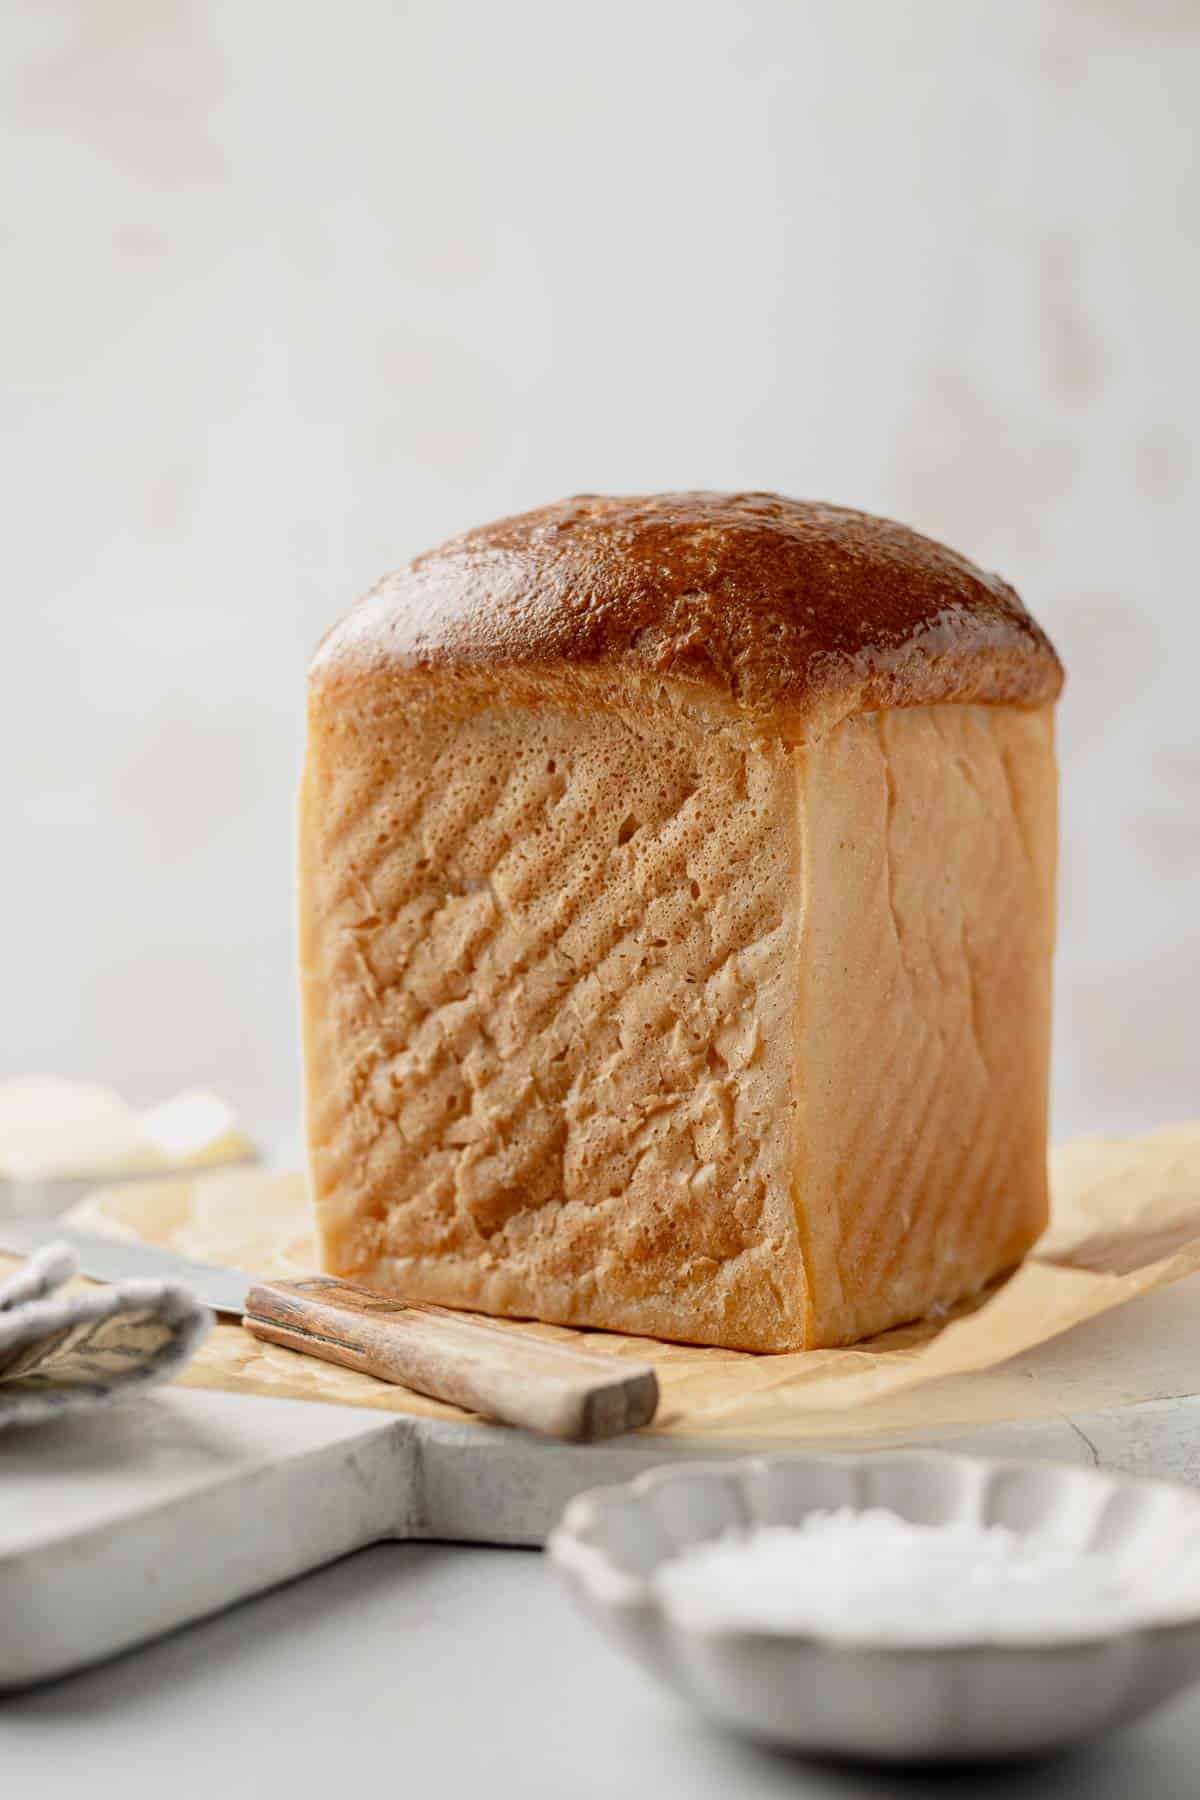
How To Slice Bread From a Mini Pullman Loaf Pan
When you pop the bread out of the pan you may wonder what the best way to slice this bread is because it is rather square and tall. You have a couple options.
- If you slice the bread from the top down, you'll get slices that look like a normal slice of bread. This will give you generously sliced slices for sandwiches and such!
- You can lay the loaf on its side and slice crosswise. This will give you perfectly square slices, similar to Texas toast!
Storage
- This loaf will keep fresh at room temperature for 2-3 days, if kept in an airtight container.
- You can freeze individual slices to enjoy at a later date.
- Refrigeration is not necessary or recommended.
Top Recipe Tips
- Double check the size of your pan. This recipe is for a mini-pullman loaf pan. My pan measures 4 inches (width) x 4 inches (height) x 4 inches (depth).
- Be patient. Sourdough loaves take a very long time to rise. For several hours it may appear as if nothing is happening. If your starter was active, you should eventually see some activity though. My loaves typically take about 5-7 hours to fully double in size.
- Double the recipe for a full-size loaf of bread. Keep an eye on the baking times, color, and internal temperature of the bread as a full loaf may take a bit longer to bake.
- Make sure your kitchen is warm enough. If your house is cold, the bread may take much longer to rise. A seed starting mat or bread proofing box may be helpful if your house is chilly, especially during the winter months.
Recipe FAQs
A mini-pullman loaf pan yields a half loaf of bread, which is about 6-7 slices.
You can refrigerate the dough up to overnight before baking. I prefer to let the dough fully rise before refrigerating it.
In my experience, using a higher hydration recipe (more water relative to flour) makes for a softer, fluffier bread. The caveat is that the dough tends to be more batter-like. This consistency can be harder to work with, especially if you're trying to knead or shape the dough, which many people find nostalgic. However, these techniques aren't necessary for gluten-free dough. If you can embrace this different process, you'll achieve much better results.
More Gluten-Free Recipes with Caputo Fioreglut
If you love this flour blend as much as I do, be sure to check out more of the great gluten-free recipes you can make with Caputo Fioreglut!

Need a Gluten-Free Sourdough Starter?
Be sure to read the associated gluten-free sourdough starter blog post as well! Once you have an established starter, use up some of your discard with my gluten-free sourdough discard banana muffins!
Join My Newsletter!

Recipe
Gluten-Free Sourdough Sandwich Bread
Equipment
Ingredients
- 250 grams Caputo Fioreglut gluten-free flour blend
- 30 grams dry milk powder
- 6 grams kosher salt
- 60 grams gluten-free starter (recently fed and active)
- 208 grams warm filtered water (80-85°F)
- 30 grams butter (melted)
- 25 grams honey
Instructions
- Line a mini pullman loaf pan (half loaf size - linked under equipment) with parchment paper and lightly grease it.
- In the bowl of a stand mixer, whisk to combine the Caputo Fioreglut gluten-free flour blend, dry milk powder, and kosher salt.
- In a separate bowl, whisk together the gluten-free sourdough starter, warm water, melted butter, and honey until well combined.
- Pour the wet mixture into the dry ingredients in the stand mixer bowl.
- Using the paddle attachment, blend the mixture on medium speed for 2-3 minutes until a smooth batter forms. The dough will be thick and sticky.
- Spread the batter into the prepared loaf pan, smoothing the top with a spatula.
- Cover the pan with a plastic wrap or a bowl cover and set aside in a warm spot. Let the dough ferment for 5-7 hours or until the dough has about doubled in size.
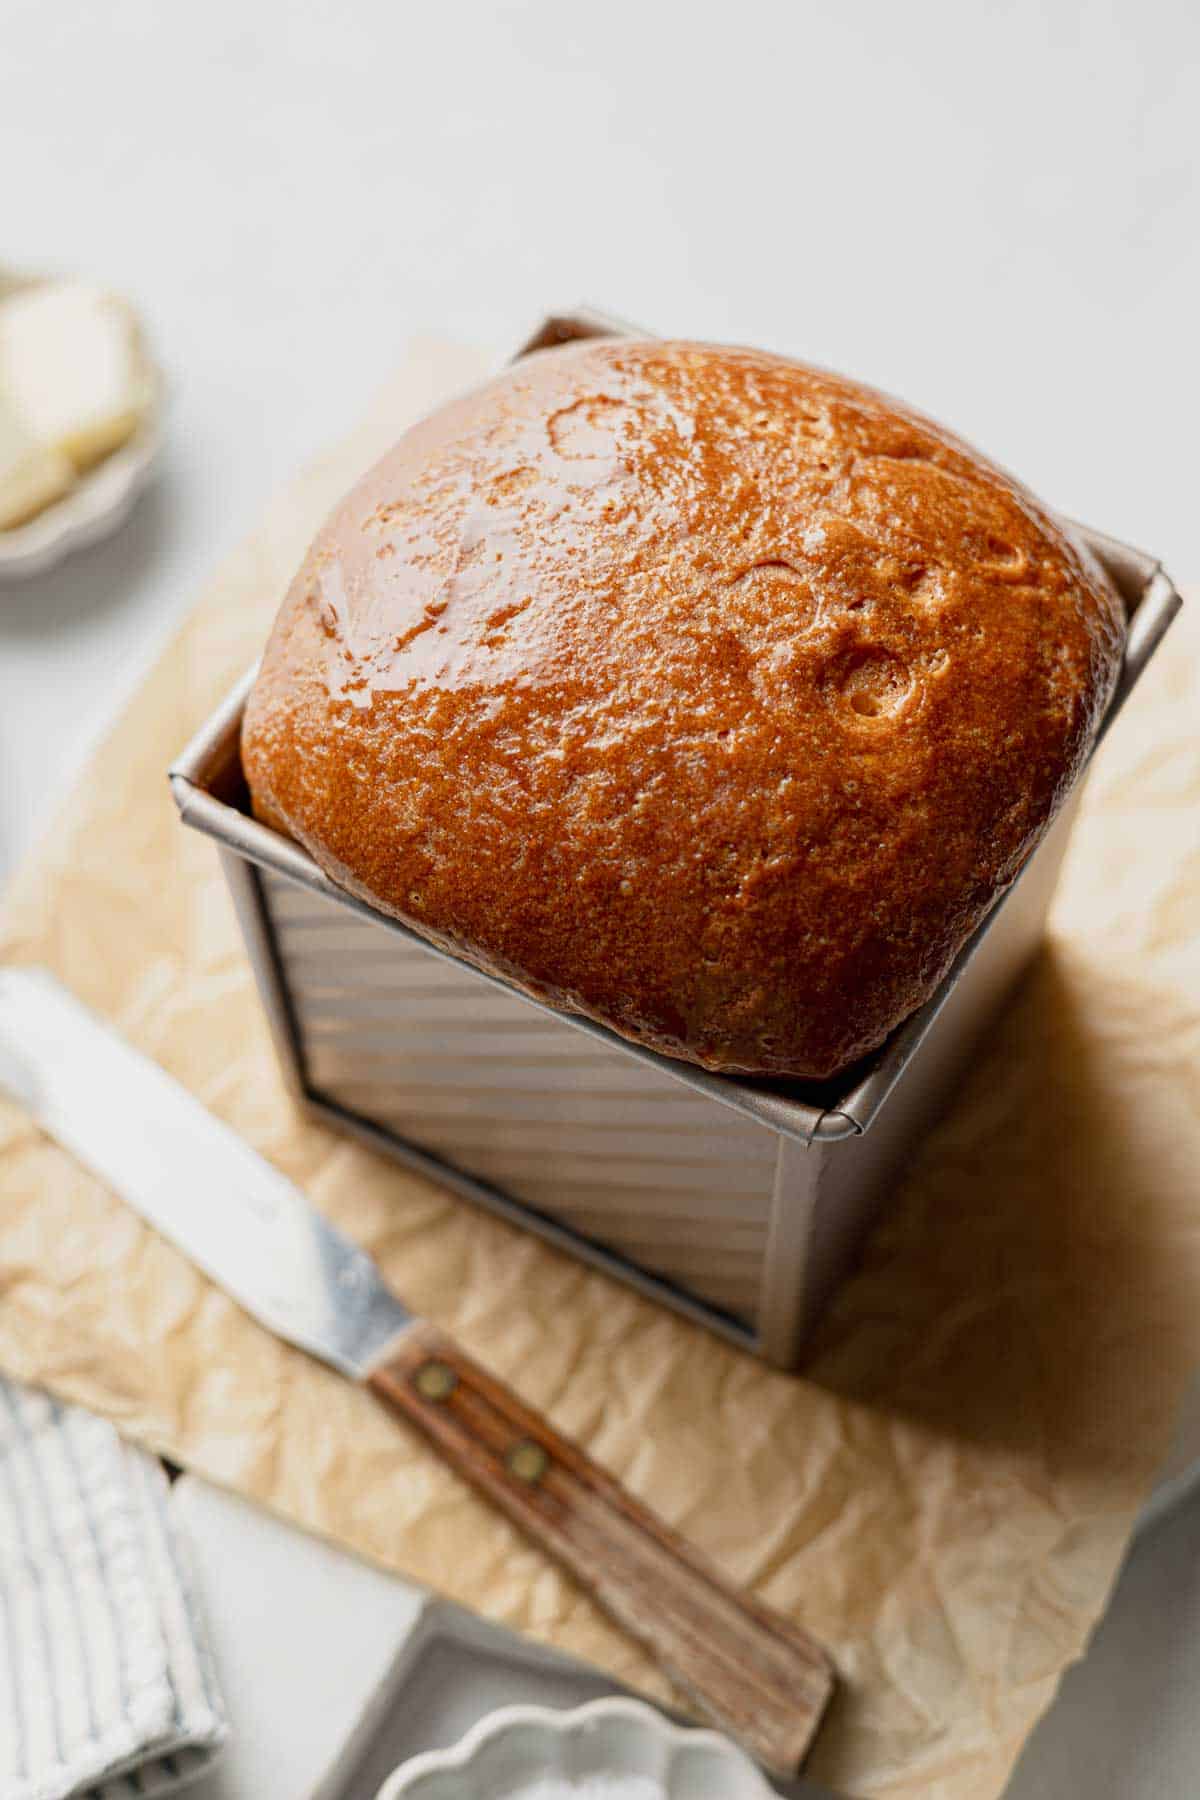
- When ready to bake, preheat the oven to 350°F. Place the bread in the preheated oven and bake for 50 minutes, or until the top is deep golden brown and the center of the loaf reaches at least 205°F.
- Remove the bread from the oven and let it cool in the pan for about 10 minutes before transferring it to a wire cooling rack to finish cooling. Let rest for at least 2 hours before slicing.
Notes
- Double check the size of your pan. This recipe is for a mini-pullman loaf pan. My pan measures 4 inches (width) x 4 inches (height) x 4 inches (depth).
- Be patient. Sourdough loaves take a very long time to rise. For several hours it may appear as if nothing is happening. My loaves typically take about 5-7 hours to fully double in size.
- Double the recipe for a full-size loaf of bread. Keep an eye on the bread as a full loaf may take a bit longer to bake.
- Make sure your kitchen is warm enough. If your house is cold, the bread may take much longer to rise. A seed starting mat or bread proofing box may be helpful if your house is chilly, especially during the winter months.
Save This Recipe!
Estimated Nutrition
* Nutritional information is provided as a courtesy and should be used as an estimate only. See the nutrition policy for more information.

April says
What if I don't have power milk could I use whole milk? Wanting to make this today. Thank you.
Katie Olesen says
You can't really substitute milk unless you also reduce the water. You can likely leave it out. It helps with softness and browning.
Lee says
I've baked this bread many times now. My husband is dairy free so I used coconut milk powder but found it expensive and maybe a bit heavy. Recently I found oat milk powder and it works great. I experimented and added an egg to the wet ingredients and love how the bread is a bit moister. Melted butter brushed on top works well to give it a little color. Have a loaf in the oven right now...
Rose Schovanec says
Do you have a recipe alternative if I don’t have a GF starter? Can I increase the flour and water by 30 grams each?
TIA
Katie Olesen says
I'm going to work on some sandwich bread recipes in the coming months. If you want to stay in the loop, I would encourage you to sign up for my emails. As far as the starter, theoretically yes, you can do that but I have not tested this recipe with active dry yeast or instant yeast yet, so I don't have any further recommendations.
Arlena says
I have already discovered the Caputo flour and it is great! I am wondering if there is a substitution for the dry milk as my daughter is also dairy-free. I searched it and Grok suggested substituting a nondairy milk for the water, which what I plan to try first. Additionally, since I found the Caputo flour, I have been using it to feed my starter but I noticed you recommend other flours for feeding. I was wondering about your rationale for that?
Katie Olesen says
I think you could substitute non-dairy milk powder for the recipe. This year, I will try and include more dairy-free yeast bread recipes. I usually feed with whole grain flours because gives the yeast more to feed on vs the starch heavy blends. Also, Fioreglut is very expensive so I'd rather use brown rice flour to feed, especially when factoring in discard.
Ash says
I have made this twice now and it is the best gluten free bread, seriously! I cannot seem to get a golden brown top though. Any tips?
Katie Olesen says
I’m so glad you’re enjoying the recipe! You could brush the top with a little melted butter or an egg wash before baking to encourage browning. You could also try baking the bread on a higher rack in your oven where it may be a little hotter.
Ellen Wolfshorndl says
Once my starter has been active, the next time I go to feed it, can I feed it with the Caputo GF flour or can I only feed it with the rice flour?
Katie Olesen says
I only feed mine with brown rice flour. My understanding is that since it is a whole grain flour, it gives more for the yeast to feed off of, but I know people use flour blends and have had success. I think it's something you could experiment with and just know that if it doesn't react well, to switch back to rice flour.
GritsRFun says
Allergic to wheat and can't use Caputo. What other blends do you recommend?
Katie Olesen says
I don't have another recommendation. This recipe was crafted specifically for this flour blend.
elizabeth a fraccaro says
I have a question about the pan. In the recipe you say your pan is 4"x4" but the link goes to a pan that's 5.8" x 5.8". Which is correct? I'm going to buy a pan but don't want to get a size that doesn't work. Thanks!
Katie Olesen says
It should be 4x4x4 (possibly listed as 3.9x 3.9x 3.9). I will double check and fix the link! Thank you for asking!
Katie Olesen says
Links are updated.