


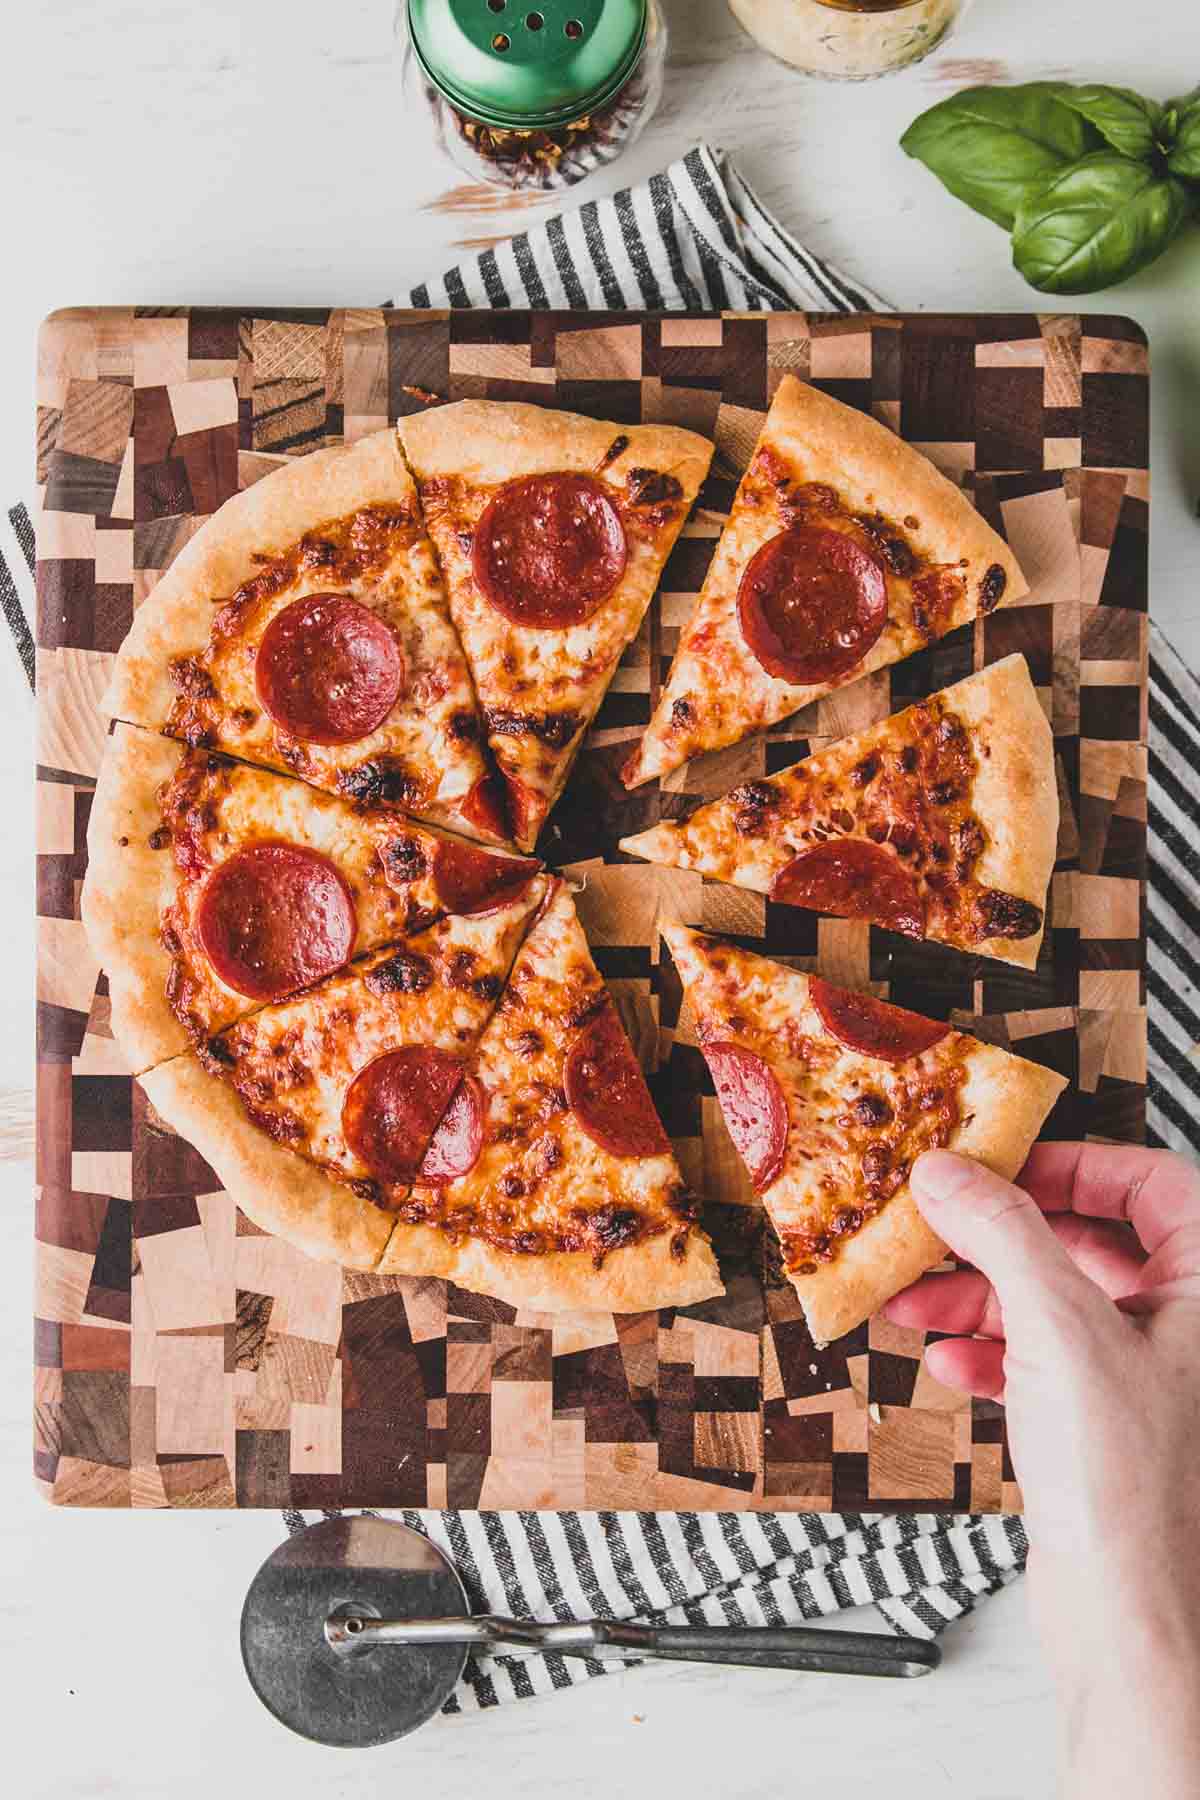
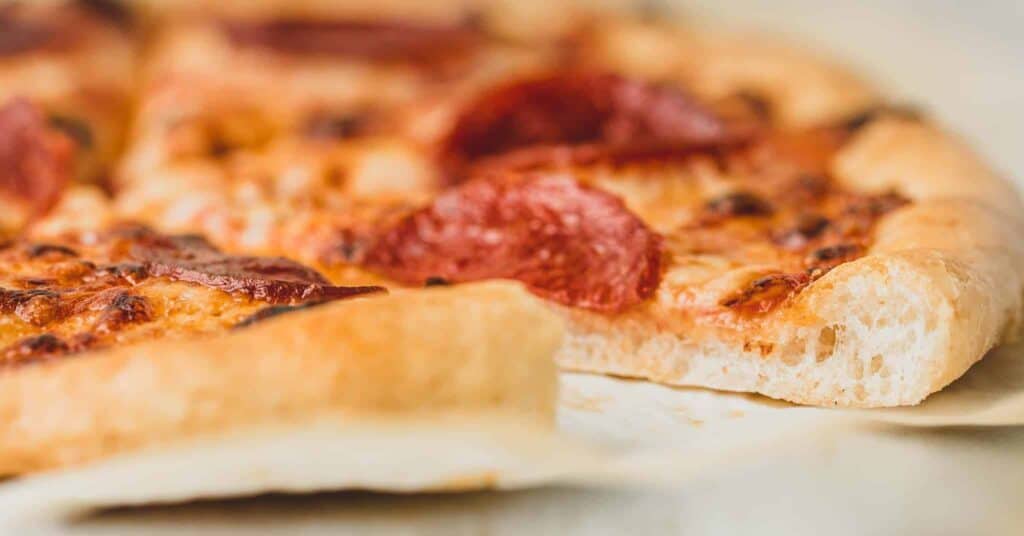
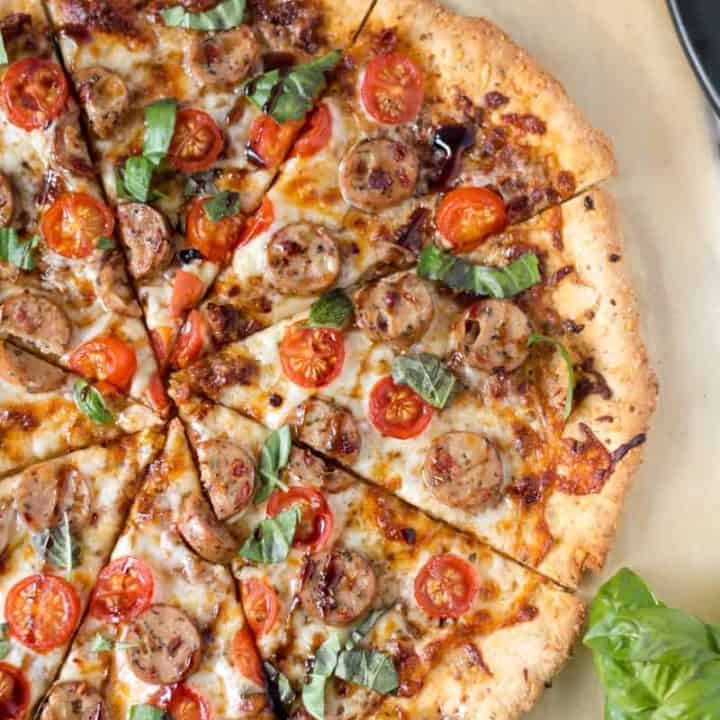
Do you miss pizza that tastes like pizza? I did too, but not anymore! Make this gluten-free pizza dough for the most delicious homemade pizza that actually tastes like pizza!
Jump to:
If you're gluten-free, there's probably one thing you're searching for... good pizza. Oh man, is it hard to find! Over the years, I have tried basically every pizza mix I could find on the market.
While there have been one or two that I have found to be good, the pizza was still not quite right. Whether in flavor, texture, or both, there was always something a bit off.
That is until I took a visit to a restaurant in a Chicago suburb that specializes in wood-fired pizzas. They are well-known in the area for making delicious gluten-free pizzas. I can attest, they are very good!
So what was the secret? How were they doing it? Well, oddly enough they give away the secret right on their menu! They share that they use a special gluten-free flour, direct from Italy, to make these amazing gluten-free pizzas! Thanks to Amazon, you can ship some of it right to your front door!
Needless to say, I've been using this flour ever since to make my own gluten-free pizzas right at home! My family agrees it is the best gluten-free pizza we have had because it actually tastes like normal pizza!
This versatile dough can be used to make a pizza in your oven or even outdoors in a wood-fired pizza oven! If you're making this pizza for the wood-fired oven, check out my post dedicated to gluten-free pizza in the Ooni for all the tips and tricks! Although for today, I will be sharing how to make this pizza in your home oven.

Get the Goods!
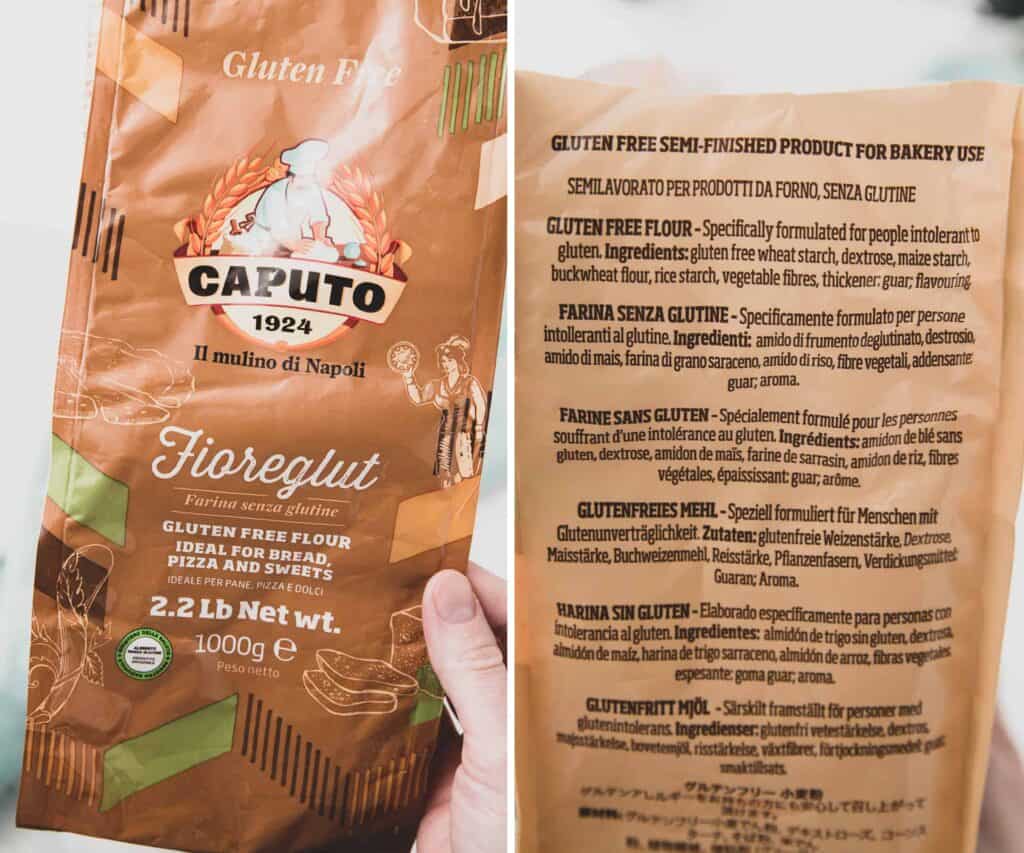
Caputo Fioreglut
I recommend you buy Caputo Fioreglut from Brick Oven Baker. They have great prices and you can use code: KATIE for 10% off your first order!
The Flour: Caputo Fioreglut
Let's talk about that special flour for a second. Using this specific flour, Caputo Fioreglut, is the secret to making the best gluten-free pizza at home. You can surely make this recipe with another flour but I doubt it will be quite as good.
To find it, just search Caputo Fioreglut either on google or Amazon. It's should be about $15 or less for a 2.2lb bag. You will be able to make at least four pizzas out of one bag, which comes out to roughly $3.75/pizza crust. That is not bad compared to other gluten-free pizza options, especially since this one actually tastes good!
Gluten-free Wheat Starch
A quick look at the ingredients and you might notice something... gluten-free wheat starch. Wait! What? I know. Don't quit reading and run for the hills quite yet!
Gluten-free wheat starch is an ingredient that is not only gluten-free but it's also safe for people with Celiac Disease. I personally was shocked the first time I ever saw it in a list of ingredients, which was long before this flour!
I actually saw it first on a package of Schar Gluten-free Crescent Rolls. Instead of immediately ruling it out, I did a little research to learn more about it. Here's what I found:
Schar, a well-respected gluten-free brand, uses gluten-free wheat starch in some of their products and has been for years! It's used to enhance the texture of certain products. They wrote a really great article about gluten-free wheat starch, what it is, and what it's used for. Make sure to read it! It's very informative.
When I was researching this particular flour, I noticed that little green symbol on the front of the bag. The words are in Italian so I popped it into Google Translate, it reads: "Ministry of Health National Register, Gluten-free food dispensable product."
Turns out, that is Italy's symbol indicating that this gluten-free food is produced and safe for those with Celiac Disease. In order to display that symbol, documentation must be supplied to the Ministry of Health that the level of gluten in the product is <20ppm of gluten.
During this research, I also found out, other than I want to move to Italy, that they provide those with Celiac Disease a monthly stipend of 140 euros to spend on gluten-free foods, including this flour! Talk about amazing seeing as the financial cost of this disease can definitely put a strain on the budget!
Alright then, let's get on with pizza making!
The Other Ingredients
Aside from our special flour, here are remaining ingredients you'll need for this pizza dough:
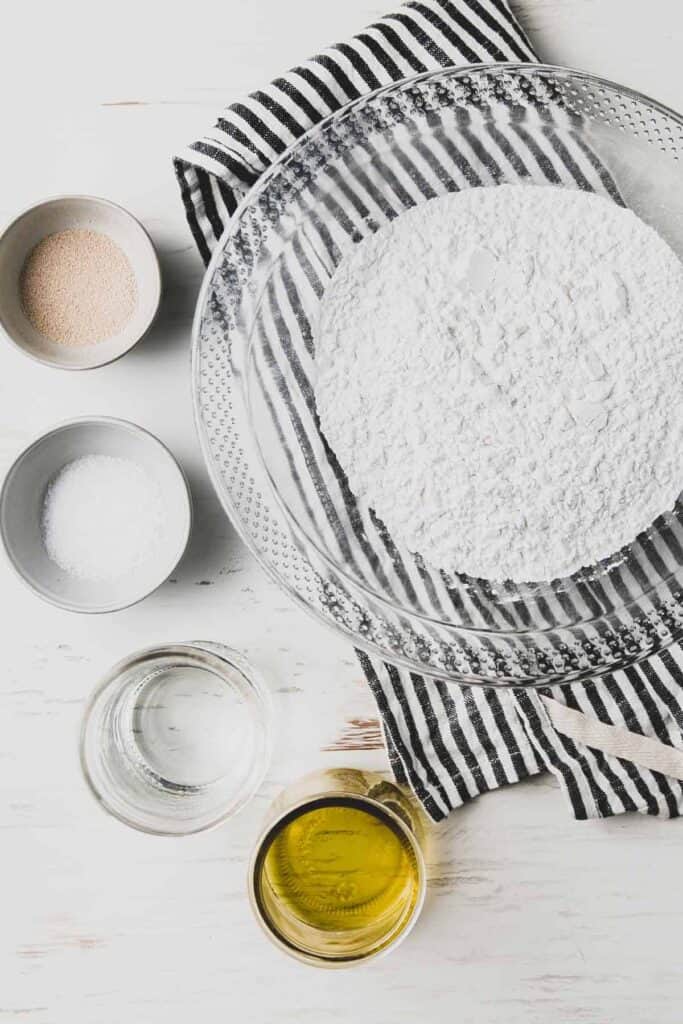
- Instant Yeast: Always get Instant Rise, Rapid Rise, or Bread Machine yeast. Those different names for yeast are actually all the same type of highly active, fast-rising yeast. Instant yeast is the easiest to use, especially for gluten-free baking! You can mix the yeast right in with the dry ingredients without dissolving in water first.
- Kosher Salt
- Olive oil
- Water
There you have it. Only 5 ingredients are needed to make the best gluten-free pizza dough!
Equipment Needed
There are some tools that come in handy for making pizza at home. You don't need any or all of them but if you're into making pizza, these are the tools that help:
- A digital kitchen scale: I especially like to measure the flour and water by weight. I will include cup measurements as well but weighing the ingredients is the most accurate.
- A stand mixer: I usually make this dough in my stand mixer but in case you don't have one, I will show you that you can also mix it by hand. It takes a little more elbow grease but the results are the same. (Please note: I would not use a hand mixer for this recipe. The dough is pretty thick and will likely break the motor.)
- Parchment paper: The dough is sticky and parchment paper helps immensely in rolling out and forming the crust.
- A pizza stone, steel, or cast-iron pan. Something that can rest in the oven and get very hot! This helps the crust get a crispy bottom. Please note, cheap pizza stones can break at high temperatures. My preferred option is a cast-iron pizza pan. They are affordable and will never break! If you don't have or want to buy one, you can make the pizza on a standard pizza pan or cookie sheet although your pizza may not get quite as crisp on the bottom.
- A pizza peel often comes in handy for getting the pizzas into and out of the oven. A flat rimmed cookie sheet or flat pizza pan could also work.
Making the Dough
A lot of people get intimidated by the word yeast. It brings to mind complicated recipes and techniques. When it comes to gluten-free baking and especially this pizza dough, you really don't have to fear. If you can measure and stir, you can make this recipe!
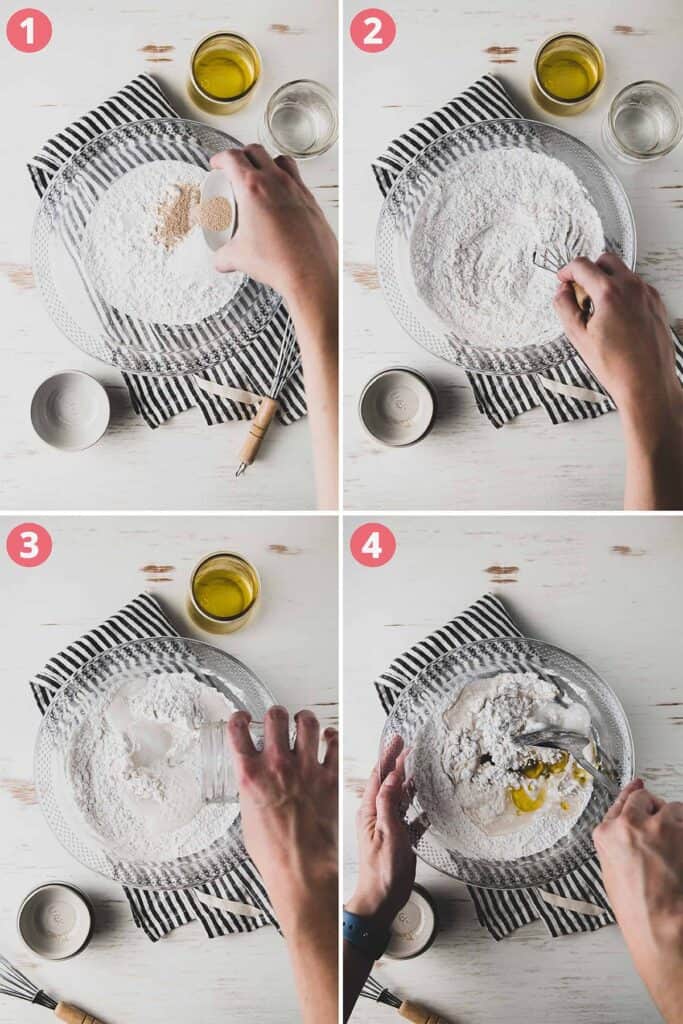
Step 1 (as seen in images below): Place the flour, instant yeast, & salt in a large bowl or stand mixer bowl.
Step 2: Whisk them together.
Save This Recipe!
Step 3: Pour in warm water & olive oil.
Steps 4, 5 & 6: Stir, Stir, Stir! Mix and mash with a sturdy spoon until the dough is very well combined. If using a stand mixer, blend on medium speed for 2 minutes using the regular paddle attachment.
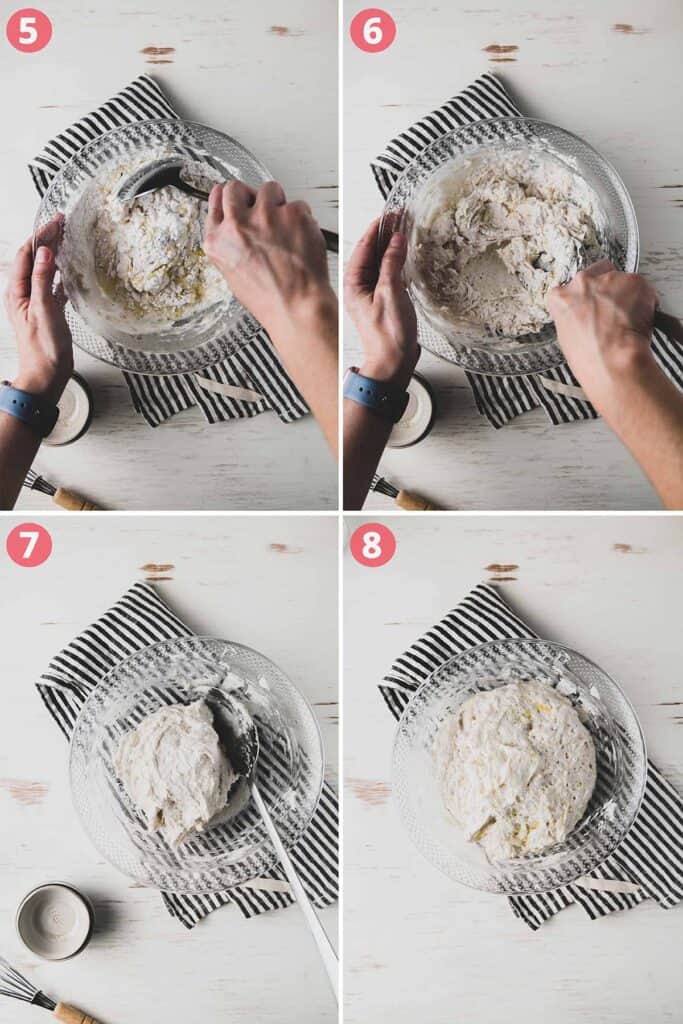
Step 7: At this point the dough will be very sticky, the texture of buttercream frosting. Scoop the dough into a ball and drizzle with a little olive oil. Roll the ball around to coat the dough and sides of the bowl with the olive oil. Cover the bowl with plastic wrap and then a dish towel. Set aside to let rise until doubled in size, about 1 hour.
Step 8: After the dough has doubled in size, you can form pizzas right away or place the covered bowl in the refrigerator until ready to use.
Pro-tip: The dough is much easier to work with if you have time to refrigerate it first! Keep it cold until you are ready to form the pizzas! You can refrigerate the dough for several hours so feel free to make it ahead of time!
Forming the Pizza
Forming the pizza is the trickiest part, mostly because gluten-free dough doesn't have the same elastic structure that a gluten dough would have. For this reason, it's easiest to form the dough on a piece of parchment paper.
Sprinkle plain white rice flour on top of the dough to prevent it from sticking to your hands as you pat out the dough into a circle. You can also use a rolling pin covered in rice flour to gently roll out the dough if you like.
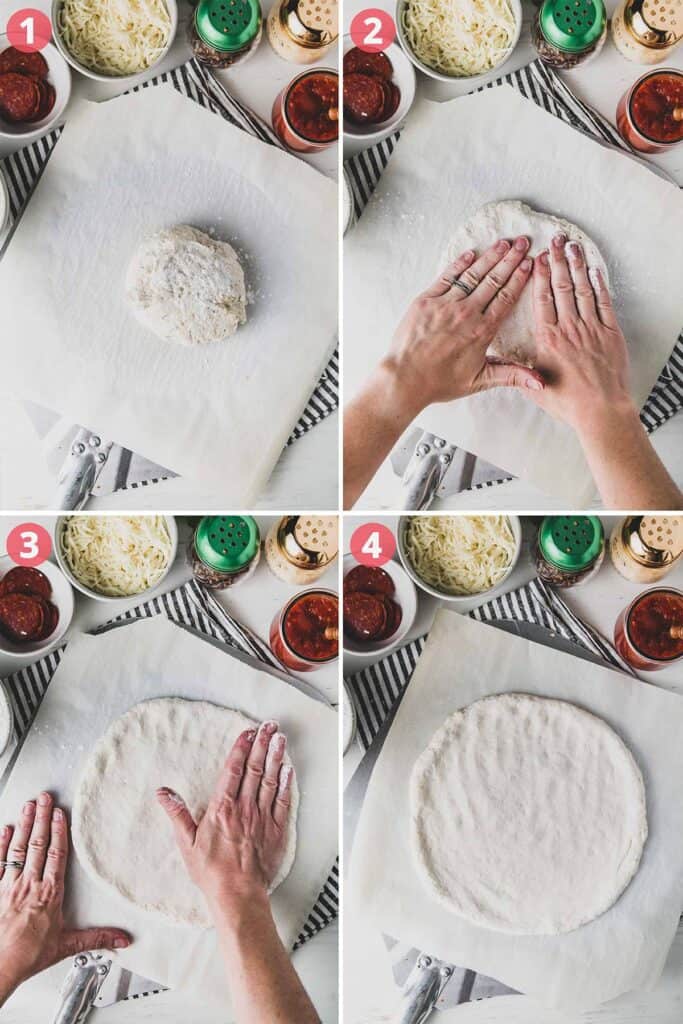
Pro-tip: if you like a thicker, softer crust edge, pat out the dough. If you like crispy, crunchy crust edges, roll the dough with a rolling pin. I've found the rolling pin flattens the edges more than when patting out the dough, which results in a crisper edge.
Cooking the Pizza
When it comes to cooking the pizza, there are a few tricks to getting the perfect gluten-free pizza in your home oven.
- You need a hot oven! The hotter the better! Crank the oven temperature to 450°F!
- Pre-heat the oven with your choice of pizza stone or cast-iron pan for at least 30 minutes.
- Pre-bake the crust. The dough takes longer to cook than the toppings, so pre-baking is necessary. Form the crust and then slide it into the hot oven, parchment paper and all. After 2 minutes or so you can pull the parchment paper out from underneath the pizza to get a crisper bottom.
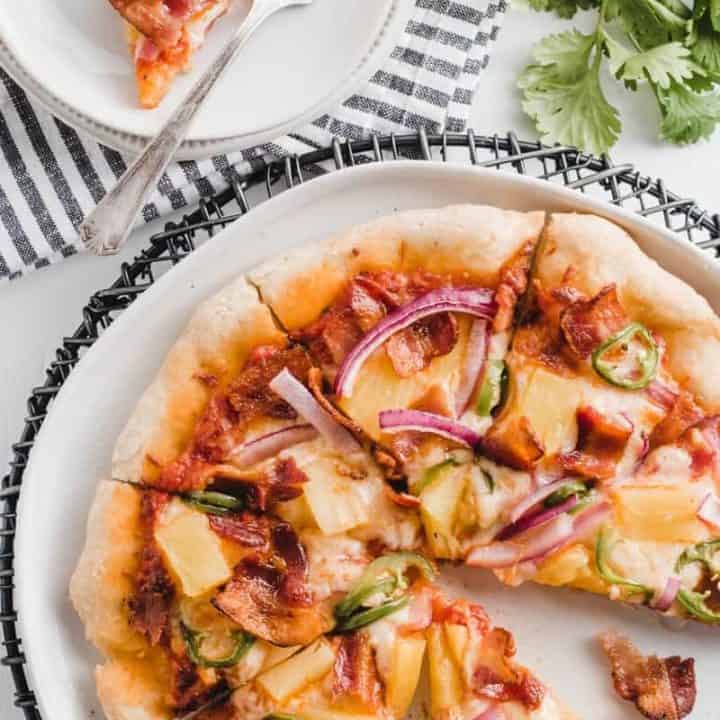
After the crust has been pre-baked, you can top the pizza with whatever toppings you like and finish baking it in the oven.
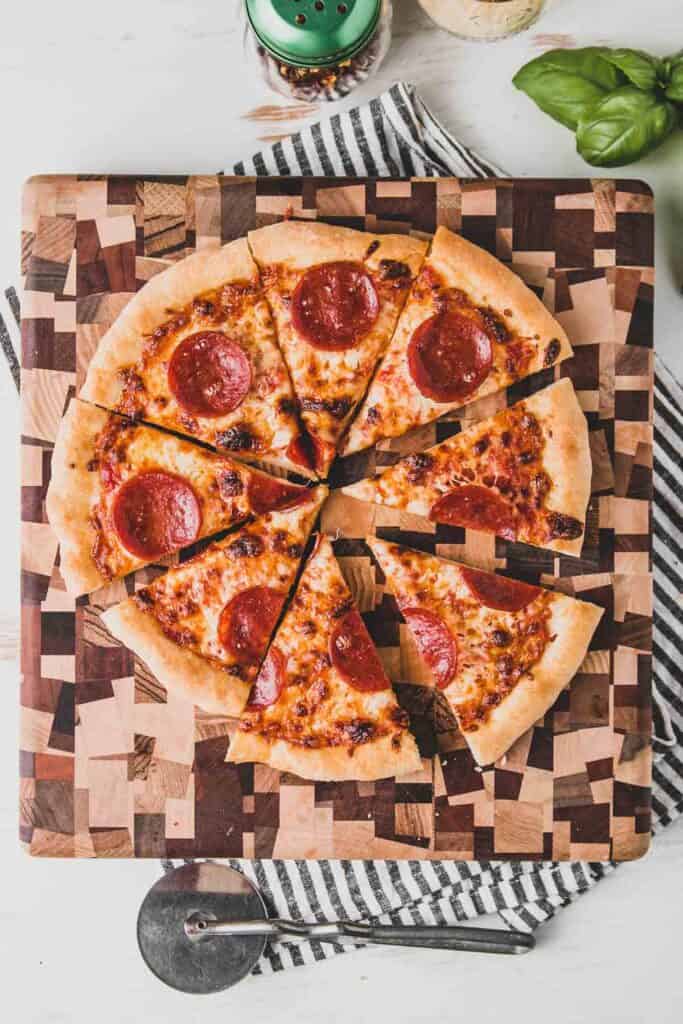
There you have it! All of my tips and tricks for getting the perfect gluten-free pizza right at home! If you have any questions, drop them in the comments and I will be glad to help you out!
The secret really is in the flour, so check out the links and grab a bag to try. Soon you will be making delicious gluten-free pizza that actually tastes like pizza! If you love this recipe, be sure to check out my gluten-free Chicago-style deep dish recipe as well!
More Gluten-Free Recipes with Fioreglut
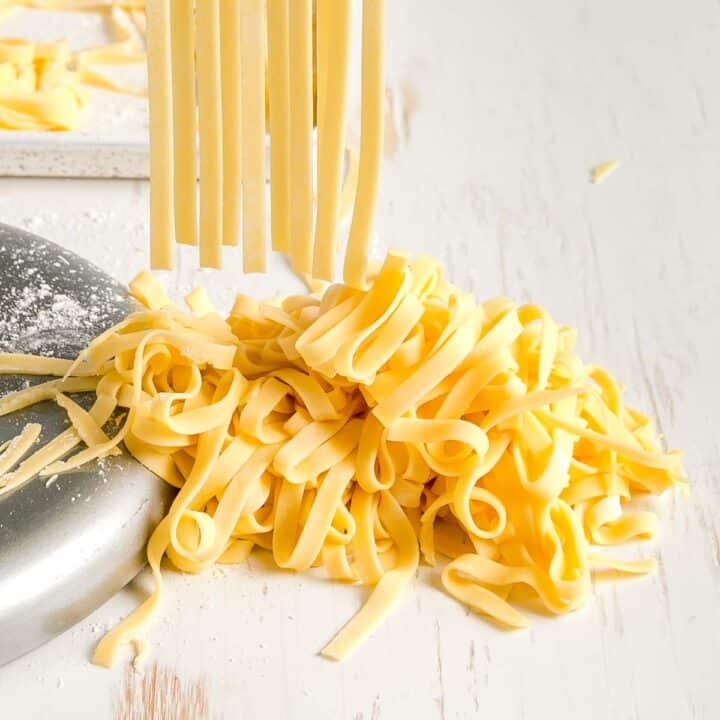
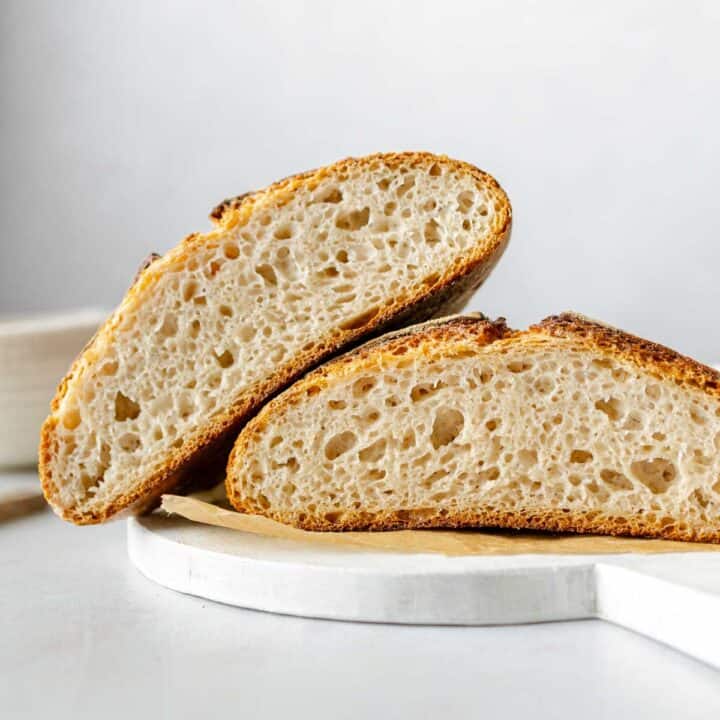
If you love using Caputo Firoeglut as much as I do, be sure to check out even more ways to use it here in this roundup of gluten-free recipes with Caputo Fioreglut, where you'll find even more great recipes like this gluten-free Detroit style pizza and these amazing gluten-free bagels!

Recipe

Best Gluten-free Pizza Dough - Caputo Fioreglut
Ingredients
- 4 cups Caputo Fioreglut Gluten-free Flour (spooned and leveled *See note.)
- 1 Tablespoon Kosher Salt
- 2 teaspoons Instant Yeast (Also known as Rapid Rise or Bread Machine Yeast)
- 1 ¾ cups Water (warmed to between 120°F-130°F)
- 2 tablespoons Olive Oil (plus more for brushing)
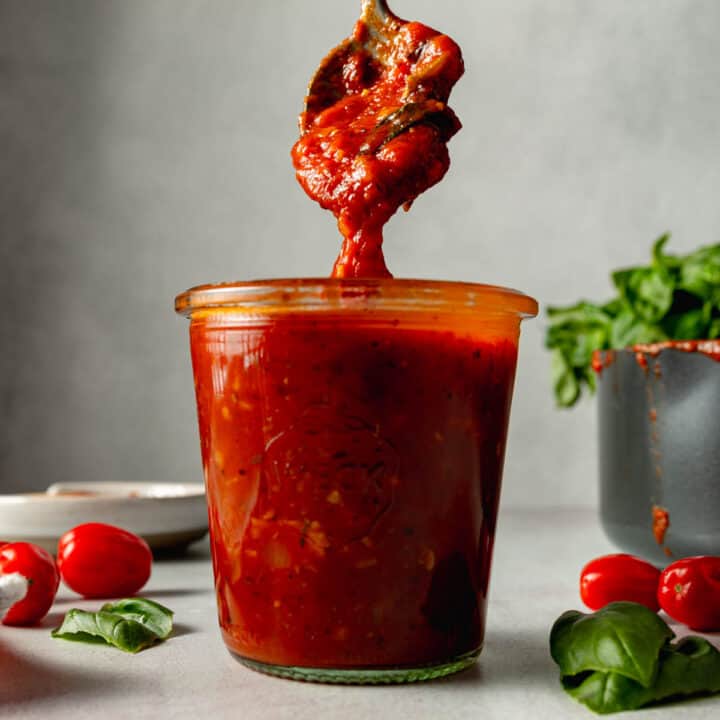
- Pizza Sauce, Cheese, and desired toppings
Instructions
Making the Dough
- In a stand mixer bowl or other large bowl, whisk together the dry ingredients.
- Pour in the warmed water (120°F-130°F) and olive oil.
- Blend on medium speed for 2 minutes or stir very well with a sturdy spoon.
- Scoop the dough into a ball and drizzle with olive oil. Roll it around to coat the dough and the sides of the bowl with a thin layer of oil.
- Cover the bowl with plastic wrap and then a kitchen towel. Let rise in a warm place for 1 hour or until dough has doubled in size. Use immediately or refrigerate until ready to make pizza. **See note.
Forming & Baking the Pizza
- Preheat the oven for at least 30 min. at 450°F with a baking stone or cast-iron pizza pan in the top ⅓ of the oven. ***See note.
- Place half of the dough on a piece of parchment paper that is no bigger than your pizza stone or pan.
- Sprinkle white rice flour on top and either pat out the dough with your hands or gently roll it out with a rolling pin into a 12-inch circle. (Pat out the dough for a thicker and softer crust edge. Roll out with a rolling pin for a thin and crunchy crust edge.)
- Brush the entire crust with olive oil. Then slide the pizza crust, along with the parchment paper, onto the pizza stone. Bake for 7 minutes, removing the parchment paper after 2-3 minutes.
- Remove the pizza crust from the oven, top with sauce, cheese, and other desired toppings.
- Slide the pizza back into the oven and bake for 7 additional minutes or until desired doneness.
Notes
- * Measuring by weight (grams) is the most accurate and is preferred for this recipe. (To convert to grams, click the "metric" button at the top of the ingredients list.)
- **The dough is easier to work with when cold. Feel free to make the dough ahead and refrigerate for several hours before making pizza.
- ***This pizza can also be cooked in an Ooni Pizza oven and it tastes phenomenal!
- Generally, follow the instructions that came with your Ooni for cooking the pizzas.
- Do not pre-bake the crust first when using the Ooni.
- Divide the dough into 3 or 4 portions instead of 2.
- Roll dough out as thinly as possible on a pizza peel dusted with GF flour and cornmeal. Check while rolling to ensure the dough is not sticking to the peel. If it is sticking, use a bench scraper to lift the edge and sprinkle more cornmeal underneath. Do a "jiggle test" frequently to make sure the dough is not stuck.
- Watch the edges because they tend to burn easily.
Save This Recipe!
Estimated Nutrition
* Nutritional information is provided as a courtesy and should be used as an estimate only. See the nutrition policy for more information.
Shop this post
*This post contains affiliate links, through which I may earn a small commission from qualifying purchases at no extra cost to you.


Blythe says
Any advise as to why my dough won’t rise? Second time I’ve made it and it won’t budge 😩
Katie | Wheat by the Wayside says
1. Is your yeast fresh? 2. Are you sure you're using the right kind of yeast? The recipe calls for Instant yeast, which does not need to be dissolved first. If you're using regular yeast, you'll need to dissolve it first. Sprinkle it over the warm water and let it set for 5 minutes before adding to the recipe. Let me know if this helps!
Kristian says
Can you make this same recipient in a bread machine? Thanks!
Karen says
I have made this pizza dough recipe three times now. It is sooooo good! I wish I could post a picture of my results. It is nothing like the cardboard pizza dough that you get when you order gf pizza out. I followed the recipe that you measure the ingredients by weight, which I think is more accurate, and it came out perfect every time. I used the recommended flour that I ordered online. I precooked my crust ten minutes instead of seven because I like a crispy crust. I’m so happy to have this recipe.
Julia says
Oops— I just realized I posted this as a reply to a comment and not as a stand-alone comment itself! Should the olive oil for this recipe be extra Virgin or extra light (for higher smoke point)? Psyched to try out this recipe in my Ooni!
Ellen says
the recipe says to use a scale to weigh ingredients but it does not give weight
Katie | Wheat by the Wayside says
As noted in the recipe notes section, click the metric button at the top of the recipe card next to where it says "ingredients." Hope that helps.
Linds says
The best gluten free pizza we have ever had! Have tried so many different gluten free versions and this is by far the best. Thank you so much for this recipe! Will be a permanent staple in our house now! Even non-gluten free grandma who normally complains about gluten-free foods loved and asked for this recipe!
Katie | Wheat by the Wayside says
Love it!! So glad you all enjoyed the recipe!!
Jean says
I've made pizza with this flour several times and found the key to making a crisper but chewy crust is working out how your oven gets hottest. You can certainly aim for 550 in most regular ovens and if you heat a pizza steel for at least half an hour to 45 minutes then you should be able to make a Margherita pizza in around 5 minutes to 7 minutes without prebaking. If you leave it too long it will become too hard. You can increase browning on the top by turning off the oven and turning on the broiler for a few moments while you closely watch it.
I also use brown rice flour to shape and lubricate the parchment paper for an extra bit of flavour and texture.
This dough is an amazing boon for gluten free people longing for the taste and texture of real pizza! Your recipe, photos and presentation are top notch! Thanks for all your work and care.
Barbara Ward says
Hi Katie,
I just found your recipe and I am looking forward to making the pizza crust. I will be using a outdoor pizza oven. I would be interested in any tips or suggestions as to how the dough could be used in this type of oven. I would like to put it directly on the hot stone surface of the oven. You mentioned that the dough was used in a wood fired brick oven in a restaurant in Chicago. Did they have it in a pan or on the surface of the oven. Thanks so much for the recipe.
Katie | Wheat by the Wayside says
Hi Barbara,
I have an Ooni (wood-fired) pizza oven and use this recipe all the time for it. Here are my tips:
-Use less dough than you think for one pizza! The thinner you can roll it out, the better it cooks. If the dough is too thick, it may not fully cook through by the time the toppings will be done. I usually prepare a 1/2 batch of this recipe and I get about 3-4 (10") pizzas in the Ooni with it.
-Prepare the pizzas directly on a pizza peel. Then slide them off directly onto the hot stone.
-Sprinkle a good amount of rice flour and cornmeal on the pizza peel first to keep the dough from sticking as you roll it out.
-Jiggle the pizza peel frequently to be sure the dough is not sticking to the peel as you roll it out.
-If it is sticking, use a bench scraper to slide underneath the dough to lift it up. Give it another jiggle and/or sprinkle more cornmeal underneath to get the dough moving again. (If your dough is stuck to the peel, it will not come off so make sure it is moving freely before you put any toppings on.)
-Go light on toppings.
-Keep a close eye on the pizza while it cooks, because the edges will literally catch fire! I turn it 3-4 times in the pizza oven while it cooks, about every minute or so, maybe less depending on how hot the oven is.
Hope this helps! Feel free to send another message if you have more questions!
Mary Eninew says
I have heard nothing but good things about this flour, and i have tried two different recipes, but the pizza is still quite hard for my taste.
Val says
How long can you keep the par baked crust? If I wanted to make that part ahead and make the pizza the next day could I do that?
Katie | Wheat by the Wayside says
I haven't done that but I don't see why you couldn't. I would refrigerate it and it would keep at least overnight. You can also keep the dough in the fridge overnight without a problem if it's tightly covered, place oiled plastic wrap directly on the surface of the dough. That might honestly be a better route unless the reason you want to parbake is because you don't want the mess the next day.
Val says
Hello!
Just wanted to follow up and let you know I tried doing the partial cook in the morning and refrigerating for use that evening for a build your own pizza event and it worked perfectly! Cooked for the seven minutes in the morning, then let it cool completely, wrapped it well in plastic wrap with parchment on bottom and in between two crusts, refrigerated. Then proceed as normal that evening with adding toppings and baking remainder of the way. Was the best pizza there!
Katie | Wheat by the Wayside says
That is awesome! Thanks for sharing the results! I’m so happy it worked out so well and that you enjoyed the pizza!
Tassi says
I just found your recipe. I’m excited to try it out. I was wondering if it could be frozen after the dough has been rolled out. I like to have homemade pizza dough stored in the freezer for those days we want pizza but don’t have time to make the dough the day of.
Katie | Wheat by the Wayside says
I have not tried this. You can refrigerate the dough overnight if that helps! You’ll just want to keep the plastic wrap touching the dough so it doesn’t dry out. Next time I make a batch I’ll try freezing some and see how it goes!
Jennifer Meharey says
Any luck with trying to freeze the dough?
Adam says
I had no problems with freezing the dough. It kept well and thawed nicely.
Judy Leise says
It was really great but I'm wondering how to get a brown crust around the edges. This made 2 pizzas larger than 12". Mine was a little too think. Any advice?
Thanks!
Katie | Wheat by the Wayside says
You could try brushing the edges with a little olive oil next time! Sometimes I do that and it probably does help with browning.
KerenW says
I just purchased a bag of this flour to use for baking bread (though the pizza looks amazing, too) what I'm wondering is if you can make a sourdough bread with this using a GF sourdough starter? And how would I go about figuring it out??!!
Katie | Wheat by the Wayside says
I haven't tried that yet, so I'm not so much help at the moment but I can this request to my list of recipes to work on!
Julie says
This dough is amazing...the best gluten free pizza I've had since being diagnosed with celiacs!
How long can it be refrigerated? Thanks!!!!
Katie Olesen says
Isn’t it great?! I haven’t refrigerated more than a few hours. I would think maybe up to overnight would work but a crust does kind of form on the top where it’s exposed to the air, even with the bowl covered in plastic wrap.
Jeanne says
Oil the plastic wrap and place directly touching g the dough. I just did this and I had no skin.
Bonnie Preissler says
This was amazing! I’ve been gluten free after being diagnosed with celiac in 2015 and I’m always looking for good pizza crust. This was the best I’ve had. I had to keep reading the bag to make sure it was gluten free lol. The dough after being in the fridge for 3 hours was spongy and soft, it cooked so good and had air bubbles in it like real dough. I can’t thank you enough for showing me this flour!
Katie Olesen says
This is wonderful, Bonnie! I’m so happy you enjoyed it! Thank you for sharing with me!
Julia says
Hi! Should the olive oil for this recipe be extra Virgin or extra light (for higher smoke point)? Thanks!
Loren says
This was sooooo freaking amazing! I've made your rolls and cinnamon rolls with this flour (both delicious) but this.crust.is.amazing.
I was able to keep it over night once it was well oiled in an air tight gallon bag.
Thank you!
Katie | Wheat by the Wayside says
So happy you enjoyed it Loren!!
tressa says
If making in cast iron skillet rather than pizza pan do you think the parchment will still slide out from under it after a few minutes?
Katie | Wheat by the Wayside says
The parchment should slide out but if you're worried removing the parchment will wreck the shape of your pizza, you're welcome to leave the parchment in place throughout the baking time. I've also made deep dish in a cast iron skillet without any parchment at all.
Peg Bsrgstrom says
Can you use this flour for other baking besides pizza?
Katie | Wheat by the Wayside says
Yes! It is also wonderful for yeast breads and pasta. Here’s my recipe for Hawaiian Rolls if you’d like to take a look. https://wheatbythewayside.com/gluten-free-hawaiian-rolls/
Nikki says
This flour makes really good scones and flour tortillas as well.
Katie | Wheat by the Wayside says
Oh yes! It's great for so many things!