Do you miss pizza that tastes like pizza? I did too, but not anymore! Make this gluten-free pizza dough for the most delicious homemade pizza that actually tastes like pizza!

💌 Want to Save This?
Unsubsribe at any time.
Jump to:
If you're gluten-free, there's probably one thing you're searching for... good pizza. Oh man, is it hard to find! Over the years, I have tried basically every pizza mix I could find on the market.
While there have been one or two that I have found to be good, the pizza was still not quite right. Whether in flavor, texture, or both, there was always something a bit off.
That is until I took a visit to a restaurant in a Chicago suburb that specializes in wood-fired pizzas. They are well-known in the area for making delicious gluten-free pizzas. I can attest, they are very good!
So what was the secret? How were they doing it? Well, oddly enough they give away the secret right on their menu! They share that they use a special gluten-free flour, direct from Italy, to make these amazing gluten-free pizzas! Thanks to Amazon, you can ship some of it right to your front door!
Needless to say, I've been using this flour ever since to make my own gluten-free pizzas right at home! My family agrees it is the best gluten-free pizza we have had because it actually tastes like normal pizza!
This versatile dough can be used to make a pizza in your oven or even outdoors in a wood-fired pizza oven! If you're making this pizza for the wood-fired oven, check out my post dedicated to gluten-free pizza in the Ooni for all the tips and tricks! Although for today, I will be sharing how to make this pizza in your home oven.

Get the Goods!
Caputo Fioreglut
I recommend you buy Caputo Fioreglut from Brick Oven Baker. They have great prices and you can use code: KATIE for 10% off your first order!
The Flour: Caputo Fioreglut
Let's talk about that special flour for a second. Using this specific flour, Caputo Fioreglut, is the secret to making the best gluten-free pizza at home. You can surely make this recipe with another flour but I doubt it will be quite as good.
To find it, just search Caputo Fioreglut either on google or Amazon. It's should be about $15 or less for a 2.2lb bag. You will be able to make at least four pizzas out of one bag, which comes out to roughly $3.75/pizza crust. That is not bad compared to other gluten-free pizza options, especially since this one actually tastes good!
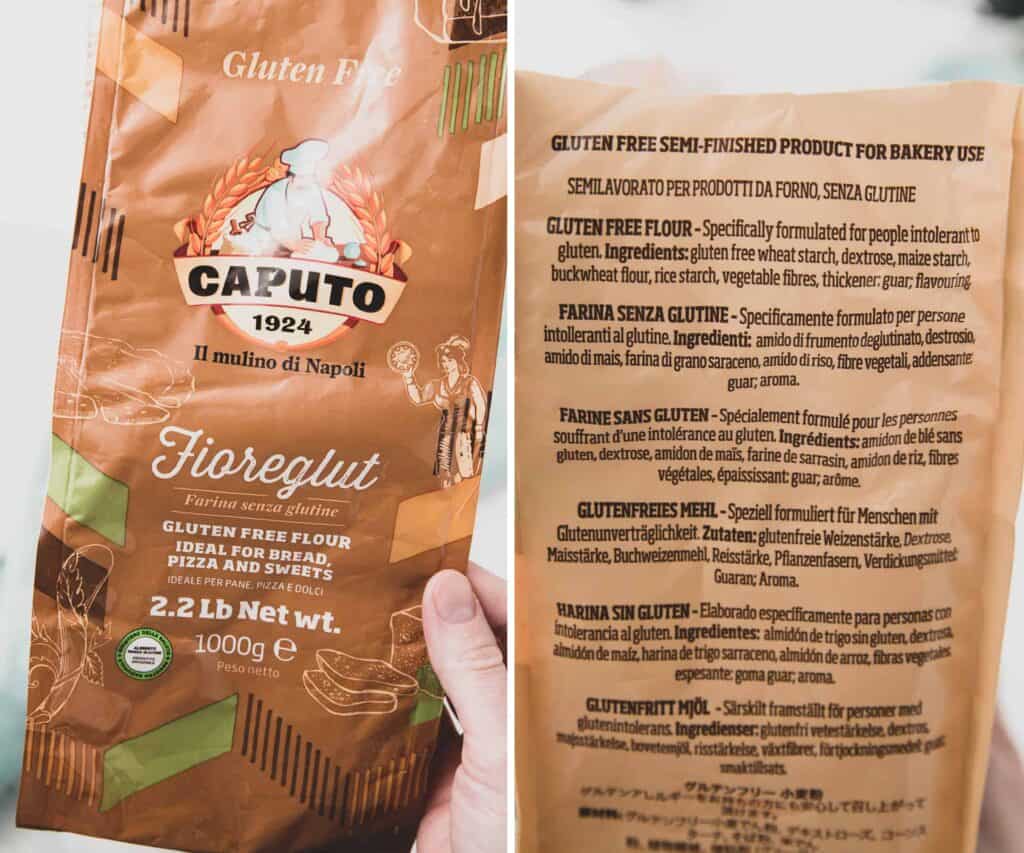
Gluten-free Wheat Starch
A quick look at the ingredients and you might notice something... gluten-free wheat starch. Wait! What? I know. Don't quit reading and run for the hills quite yet!
Gluten-free wheat starch is an ingredient that is not only gluten-free but it's also safe for people with Celiac Disease. I personally was shocked the first time I ever saw it in a list of ingredients, which was long before this flour!
I actually saw it first on a package of Schar Gluten-free Crescent Rolls. Instead of immediately ruling it out, I did a little research to learn more about it. Here's what I found:
Schar, a well-respected gluten-free brand, uses gluten-free wheat starch in some of their products and has been for years! It's used to enhance the texture of certain products. They wrote a really great article about gluten-free wheat starch, what it is, and what it's used for. Make sure to read it! It's very informative.
When I was researching this particular flour, I noticed that little green symbol on the front of the bag. The words are in Italian so I popped it into Google Translate, it reads: "Ministry of Health National Register, Gluten-free food dispensable product."
Turns out, that is Italy's symbol indicating that this gluten-free food is produced and safe for those with Celiac Disease. In order to display that symbol, documentation must be supplied to the Ministry of Health that the level of gluten in the product is <20ppm of gluten.
During this research, I also found out, other than I want to move to Italy, that they provide those with Celiac Disease a monthly stipend of 140 euros to spend on gluten-free foods, including this flour! Talk about amazing seeing as the financial cost of this disease can definitely put a strain on the budget!
Alright then, let's get on with pizza making!
The Other Ingredients
Aside from our special flour, here are remaining ingredients you'll need for this pizza dough:
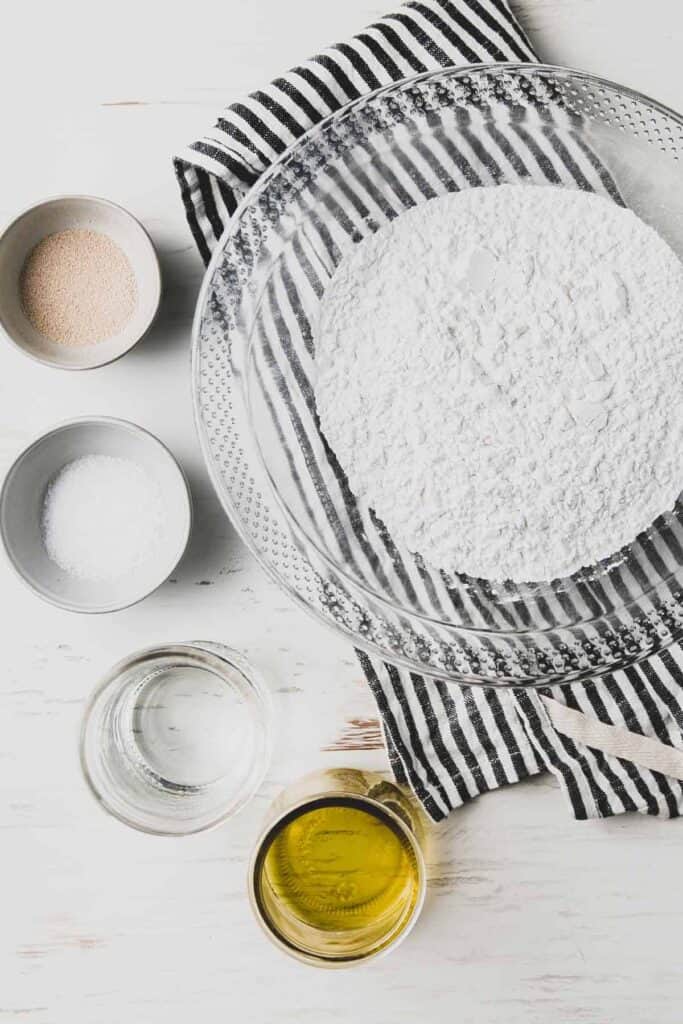
- Instant Yeast: Always get Instant Rise, Rapid Rise, or Bread Machine yeast. Those different names for yeast are actually all the same type of highly active, fast-rising yeast. Instant yeast is the easiest to use, especially for gluten-free baking! You can mix the yeast right in with the dry ingredients without dissolving in water first.
- Kosher Salt
- Olive oil
- Water
There you have it. Only 5 ingredients are needed to make the best gluten-free pizza dough!
Equipment Needed
There are some tools that come in handy for making pizza at home. You don't need any or all of them but if you're into making pizza, these are the tools that help:
- A digital kitchen scale: I especially like to measure the flour and water by weight. I will include cup measurements as well but weighing the ingredients is the most accurate.
- A stand mixer: I usually make this dough in my stand mixer but in case you don't have one, I will show you that you can also mix it by hand. It takes a little more elbow grease but the results are the same. (Please note: I would not use a hand mixer for this recipe. The dough is pretty thick and will likely break the motor.)
- Parchment paper: The dough is sticky and parchment paper helps immensely in rolling out and forming the crust.
- A pizza stone, steel, or cast-iron pan. Something that can rest in the oven and get very hot! This helps the crust get a crispy bottom. Please note, cheap pizza stones can break at high temperatures. My preferred option is a cast-iron pizza pan. They are affordable and will never break! If you don't have or want to buy one, you can make the pizza on a standard pizza pan or cookie sheet although your pizza may not get quite as crisp on the bottom.
- A pizza peel often comes in handy for getting the pizzas into and out of the oven. A flat rimmed cookie sheet or flat pizza pan could also work.
Making the Dough
A lot of people get intimidated by the word yeast. It brings to mind complicated recipes and techniques. When it comes to gluten-free baking and especially this pizza dough, you really don't have to fear. If you can measure and stir, you can make this recipe!
Step 1 (as seen in images below): Place the flour, instant yeast, & salt in a large bowl or stand mixer bowl.
Step 2: Whisk them together.
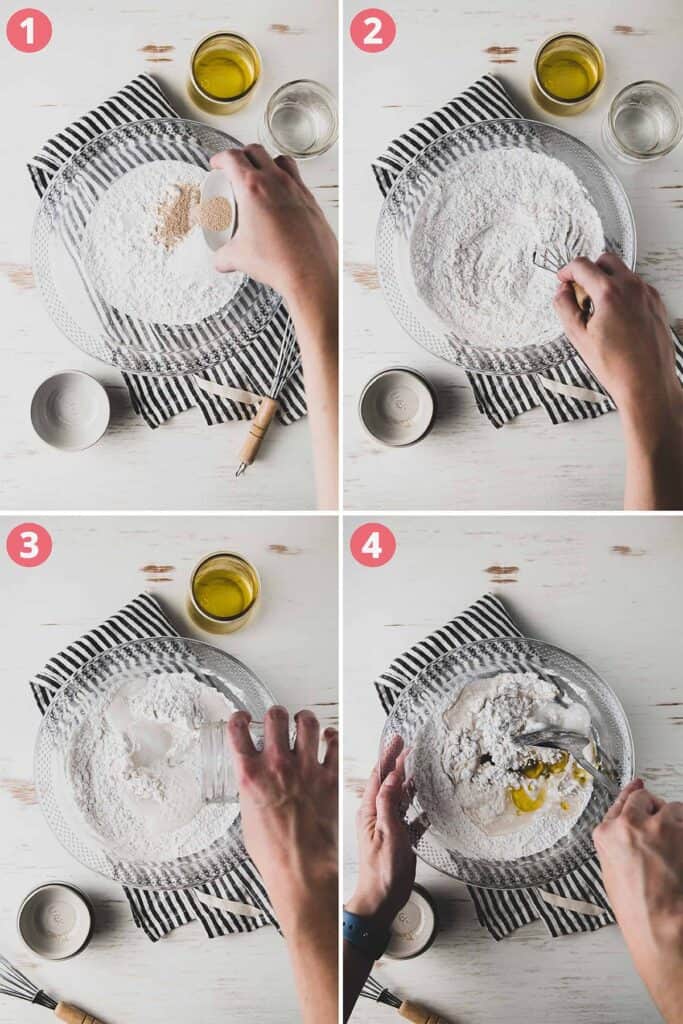
Step 3: Pour in warm water & olive oil.
Steps 4, 5 & 6: Stir, Stir, Stir! Mix and mash with a sturdy spoon until the dough is very well combined. If using a stand mixer, blend on medium speed for 2 minutes using the regular paddle attachment.
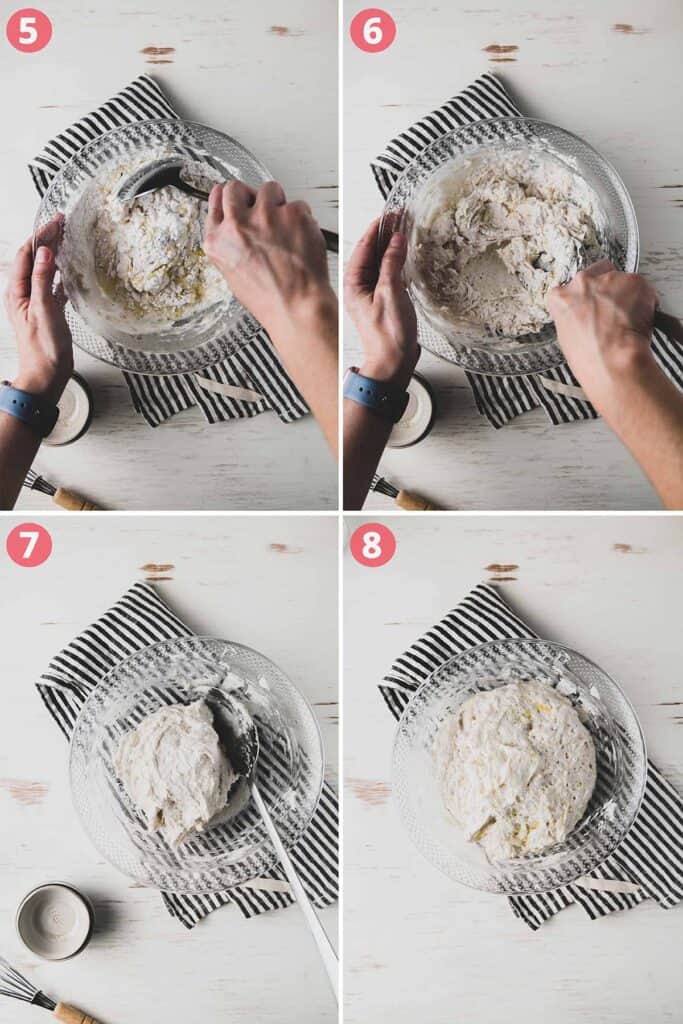
Step 7: At this point the dough will be very sticky, the texture of buttercream frosting. Scoop the dough into a ball and drizzle with a little olive oil. Roll the ball around to coat the dough and sides of the bowl with the olive oil. Cover the bowl with plastic wrap and then a dish towel. Set aside to let rise until doubled in size, about 1 hour.
Step 8: After the dough has doubled in size, you can form pizzas right away or place the covered bowl in the refrigerator until ready to use.
Pro-tip: The dough is much easier to work with if you have time to refrigerate it first! Keep it cold until you are ready to form the pizzas! You can refrigerate the dough for several hours so feel free to make it ahead of time!
Forming the Pizza
Forming the pizza is the trickiest part, mostly because gluten-free dough doesn't have the same elastic structure that a gluten dough would have. For this reason, it's easiest to form the dough on a piece of parchment paper.
Sprinkle plain white rice flour on top of the dough to prevent it from sticking to your hands as you pat out the dough into a circle. You can also use a rolling pin covered in rice flour to gently roll out the dough if you like.
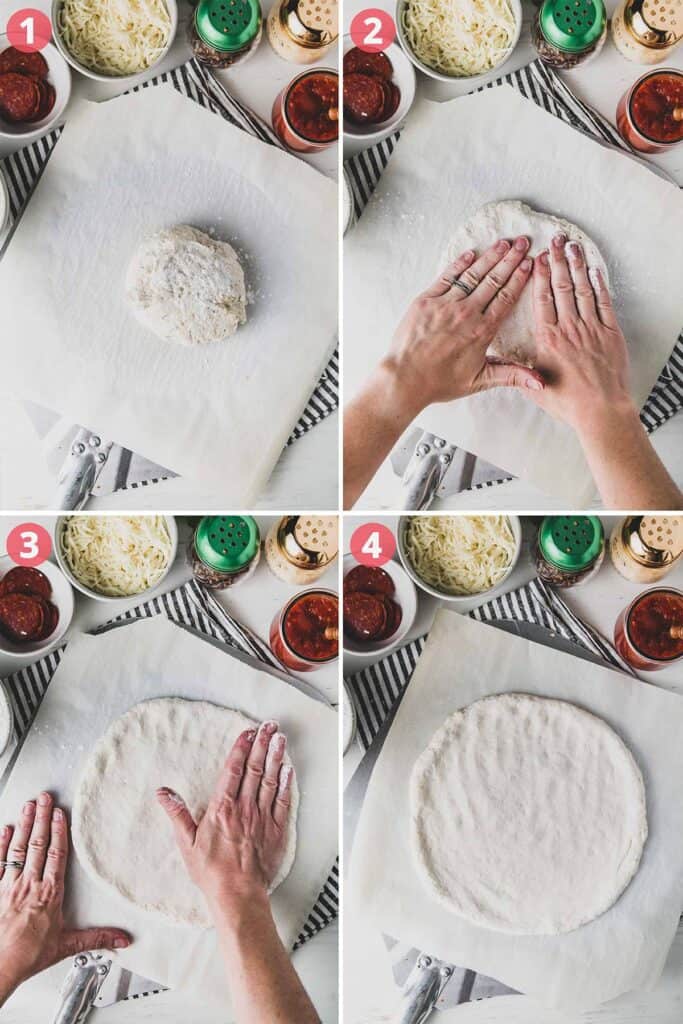
Pro-tip: if you like a thicker, softer crust edge, pat out the dough. If you like crispy, crunchy crust edges, roll the dough with a rolling pin. I've found the rolling pin flattens the edges more than when patting out the dough, which results in a crisper edge.
Cooking the Pizza
When it comes to cooking the pizza, there are a few tricks to getting the perfect gluten-free pizza in your home oven.
- You need a hot oven! The hotter the better! Crank the oven temperature to 450°F!
- Pre-heat the oven with your choice of pizza stone or cast-iron pan for at least 30 minutes.
- Pre-bake the crust. The dough takes longer to cook than the toppings, so pre-baking is necessary. Form the crust and then slide it into the hot oven, parchment paper and all. After 2 minutes or so you can pull the parchment paper out from underneath the pizza to get a crisper bottom.
After the crust has been pre-baked, you can top the pizza with whatever toppings you like and finish baking it in the oven.

There you have it! All of my tips and tricks for getting the perfect gluten-free pizza right at home! If you have any questions, drop them in the comments and I will be glad to help you out!
The secret really is in the flour, so check out the links and grab a bag to try. Soon you will be making delicious gluten-free pizza that actually tastes like pizza! If you love this recipe, be sure to check out my gluten-free Chicago-style deep dish recipe as well!
More Gluten-Free Recipes with Fioreglut
If you love using Caputo Firoeglut as much as I do, be sure to check out even more ways to use it here in this roundup of gluten-free recipes with Caputo Fioreglut, where you'll find even more great recipes like this gluten-free Detroit style pizza and these amazing gluten-free bagels!
Still Hungry? Subscribe Here!
Recipe

Best Gluten-free Pizza Dough - Caputo Fioreglut
Ingredients
- 4 cups Caputo Fioreglut Gluten-free Flour, spooned and leveled *See note.
- 1 Tablespoon Kosher Salt
- 2 teaspoons Instant Yeast, Also known as Rapid Rise or Bread Machine Yeast
- 1 ¾ cups Water, warmed to between 120°F-130°F
- 2 tablespoons Olive Oil
- Pizza Sauce, Cheese, and desired toppings
Instructions
Making the Dough
- In a stand mixer bowl or other large bowl, whisk together the dry ingredients.
- Pour in the warmed water (120°F-130°F) and olive oil.
- Blend on medium speed for 2 minutes or stir very well with a sturdy spoon.
- Scoop the dough into a ball and drizzle with olive oil. Roll it around to coat the dough and the sides of the bowl with a thin layer of oil.
- Cover the bowl with plastic wrap and then a kitchen towel. Let rise in a warm place for 1 hour or until dough has doubled in size. Use immediately or refrigerate until ready to make pizza. **See note.
Forming & Baking the Pizza
- Preheat the oven for at least 30 min. at 450°F with a baking stone or cast-iron pizza pan in the top ⅓ of the oven. ***See note.
- Place half of the dough on a piece of parchment paper that is no bigger than your pizza stone or pan.
- Sprinkle white rice flour on top and either pat out the dough with your hands or gently roll it out with a rolling pin into a 12-inch circle. (Pat out the dough for a thicker and softer crust edge. Roll out with a rolling pin for a thin and crunchy crust edge.)
- Slide the pizza crust, along with the parchment paper, onto the pizza stone. Bake for 7 minutes, removing the parchment paper after 2-3 minutes.
- Remove the pizza crust from the oven, top with sauce, cheese, and other desired toppings.
- Slide the pizza back into the oven and bake for 7 additional minutes or until desired doneness.
Notes
- * Measuring by weight (grams) is the most accurate and is preferred for this recipe. (To convert to grams, click the "metric" button at the top of the ingredients list.)
- **The dough is easier to work with when cold. Feel free to make the dough ahead and refrigerate for several hours before making pizza.
- ***This pizza can also be cooked in an Ooni Pizza oven and it tastes phenomenal!
- Generally, follow the instructions that came with your Ooni for cooking the pizzas.
- Do not pre-bake the crust first when using the Ooni.
- Divide the dough into 3 or 4 portions instead of 2.
- Roll dough out as thinly as possible on a pizza peel dusted with GF flour and cornmeal. Check while rolling to ensure the dough is not sticking to the peel. If it is sticking, use a bench scraper to lift the edge and sprinkle more cornmeal underneath. Do a "jiggle test" frequently to make sure the dough is not stuck.
- Watch the edges because they tend to burn easily.
Nutrition
* Nutritional information is provided as a courtesy and should be used as an estimate only. See the nutrition policy for more information.
Shop this post
*This post contains affiliate links, through which I may earn a small commission from qualifying purchases at no extra cost to you.






Samantha says
Made the recipe as stated except oven at 500 degrees. I did refrigerate the dough for about 4 hours since I made it early in the day. I really think this helped with spreading it out before baking. It was pretty easy to work with, adding a little gluten free flour. I pre-baked for only 4 minutes since my oven was hotter, added toppings and baked an additional 5-6 minutes. Used a pizza stone. It was delicious!! My husband, who does not have to eat gluten free, thought it was great. Did not miss the gluten at all! Thank you for the recipe!
Phoelisa says
I’m giving this 5 stars because even though I messed up the recipe (I didn’t read the part where it makes 2 pizzas) it still has 5 star potential! So I made one really large pizza that was too thick and a bit doughy but we were still very fond of the flavor and plan to make it correctly next time! Ha!
Lor says
I'm very inexperienced - tried recipe exactly using a pizza stone and the bottom crust is hard to bite through. Ideas where I may have failed?
Thanks.
Katie Olesen says
Did it look overcooked at all on the bottom?
Robert Brown says
Don’t normally bother to comment but this is the best GF pizza dough recipie going.
Oly says
This is now my favourite GF pizza dough. Won't make anything else.
One question though is have you tried making it up in dough balls (one ball per pizza) then freezing it? Defrost on day of use. I know you can buy GF dough balls from Ooni and these are frozen.
Katie Olesen says
I have. It worked but it didn't rise quite as well.
Marcia says
Can you please share with me the restaurant you originally had this flour at near Chicago? This flour is amazing. Thank you so much!
Katie Olesen says
Sure! It was Fiamme in Naperville.
Cathy says
Can sugar be added to the dough?
Katie Olesen says
I think you could add 2 tablespoons or so. Might help with browning too.
Cathy says
I made this pizza today and it was very good! All the tips and tricks were very helpful. It made, basically, 2 dinner-plate sized pizzas.
Next time I will spread the dough out to make 3 - it really puffs up, which is amazing!
Katie Olesen says
Glad you enjoyed it! That flour makes all the difference!
Erik says
I just recently learned about Caputo Fioreglut and came across your post while doing some searches. Since you released this recipe, I see that King Arthur Flour has released a gluten free pizza flour blend that uses gluten free wheat starch as the first ingredient - the remaining ingredients are very similar to Caputo's blend. Just wondering if you've tried it with this recipe? The cost is a bit less, so I'm thinking it's worth a try?
Katie Olesen says
Hi Erik, I have not tried the new KAF blend yet. I can't say for sure it will work exactly the same, because while they appear similar, they are different and may behave differently with my given recipe. If you try it, bear in mind the recipe may need some tweaking to achieve a similar result.
Johnny T. says
I followed the recipe exactly as stated.
The dough was very STICKY!
I couldn't roll it or spread it.🤦🏽♂️
Katie Olesen says
Gluten-free dough is inherently sticky. You are free to use flour and cornmeal to help roll out the dough. Always be as gentle as possible, it's not like working with yeast doughs made with wheat flour. Also, working with cold dough is much easier, so if you have time to refrigerate before you roll it out, that certainly helps.
Jen says
Turned out great! Made two large crusts so I par-baked one to freeze. To spread it out easier I wet my hands, worked great.
Jean-Pierre Boisvert says
Caputo gluten free flour pizza
Should I prepare a large quantity of dough, and want to keep some portions for later use, can I freeze the left over portions and how should I store them and what is the best way to unfreeze them after.
Katie | Wheat by the Wayside says
Honestly, I haven't tried this so I'm reluctant to say go for it. The most recent experience I've had with freezing pizza dough wasn't great, granted it was a different recipe. If you were to freeze it, I would wrap each portion tightly and then thaw overnight in the refrigerator.
Jim Dew says
I removed the parchment paper and slid crust onto a cornmeal covered peel to eliminate having to open the oven.
Bren says
Have been experimenting with other gluten free flour mixes and trying my own mixtures. This flour is amazing and the recipe + instructions make a huge difference. Today I will try some of your other recipes with the Caputo gluten free flour. So excited for me as well as my diabetic husband.
Katie | Wheat by the Wayside says
Glad you're enjoying the recipes, Bren!
Louise says
Love this recipe- thank you!! Makes the best Gluten Free pizza ✨
Karen Godbey says
THE Absolute best pizza crust, oh... that doesn't contain gluten,..... known to man!
I had my kids and their families over and made about 3 batches of pizza dough. Each person made their own to their own specs. My son-in-law was told on the way over that we were going to be having "Home Made Pizza", so he was prepared to "be nice" and roll with it. He LOVED his pizza. When he realized it was not only "Home Made", but GLUTEN FREE as well, he couldn't believe his taste buds!
I will put my Caputo's gluten free, par-baked, pizza crusts up against ANYONE'S pizza crust, gluten free or not. Its Crave-able!!
Katie | Wheat by the Wayside says
So happy you loved the recipe!